In today’s digital world, efficient and secure document management is crucial for businesses of all sizes. Traditional methods of signing contracts and agreements can be slow, expensive, and often lead to mistakes or delays.
That’s where GoHighLevel’s e-signature feature comes in. This powerful tool simplifies the signing process by allowing you to sign documents electronically within the platform. It speeds up your workflow and ensures that all signatures are legally binding and stored securely.
In this guide, we’ll show you how to set up e-signatures in GoHighLevel step by step. We’ll also explore five practical ways this feature can enhance your business operations. So, let’s get started!
What is GoHighLevel’s E-Signature Feature?
GoHighLevel’s e-signature feature is designed to facilitate the easy creation, management, and storage of digital signatures within its platform. This feature allows users to send out documents that can be signed electronically by clients, team members, or partners, ensuring that all signatures are legally binding and secure.
The platform supports creating document templates, uploading PDFs, and embedding customizable signature fields. Users can assign signing orders, track the progress of signature collection, and ensure that all parties sign the required sections. By integrating e-signatures with other CRM functions, GoHighLevel enables businesses to automate workflows, reduce delays, and avoid the pitfalls of physical paperwork.
Benefits of Using E-Signatures for Contracts and Agreements
E-signatures offer numerous benefits for businesses, including:
- Legally Binding: E-signatures in GoHighLevel are compliant with international e-signature laws, such as the ESIGN Act in the U.S. and eIDAS in the European Union. This ensures that the signatures are recognized as valid in legal proceedings.
- Speed and Efficiency: Traditional signing processes can take days or weeks due to mailing and manual handling. E-signatures, on the other hand, speed up the process by allowing instant document completion and submission online.
- Cost Savings: Using e-signatures eliminates the need for printing, scanning, and mailing documents, saving businesses money on paper, ink, and postage costs.
- Enhanced Security: GoHighLevel’s e-signature feature uses encryption to secure documents and verify the authenticity of signatures, reducing the risk of tampering or fraud.
- Environmentally Friendly: By moving away from physical signatures, businesses reduce their paper consumption, contributing to more sustainable operations.
For a broader understanding of how GoHighLevel can empower small businesses beyond e-signatures, you might find our article about What Does GoHighLevel Do for a Small Business insightful.
How to Set Up E-Signature in GoHighLevel: Step by Step
Now that you understand the benefits of using e-signatures in GoHighLevel, here’s how to set them up on your account:
Step 1: Ensure You Are on Your Sub Account
Before you begin, it’s important to make sure you are on your sub account within GoHighLevel. As you may already know, GoHighLevel offers two types of accounts: Agency account and Sub account.
If you’re on the Agency account, you need to switch to your Sub account. To do this, locate the “Click here to switch” option at the top of the left-side menu. Click it to switch to your sub account. This step is crucial because e-signatures can only be set up from within your sub account.

Step 2: Navigate to the Payments Tab
Once you’ve successfully switched to your Sub account, it’s time to access the Payments tab. You’ll find this tab in the left-hand menu. Click on it, and you will be taken to the Payments Page Dashboard.
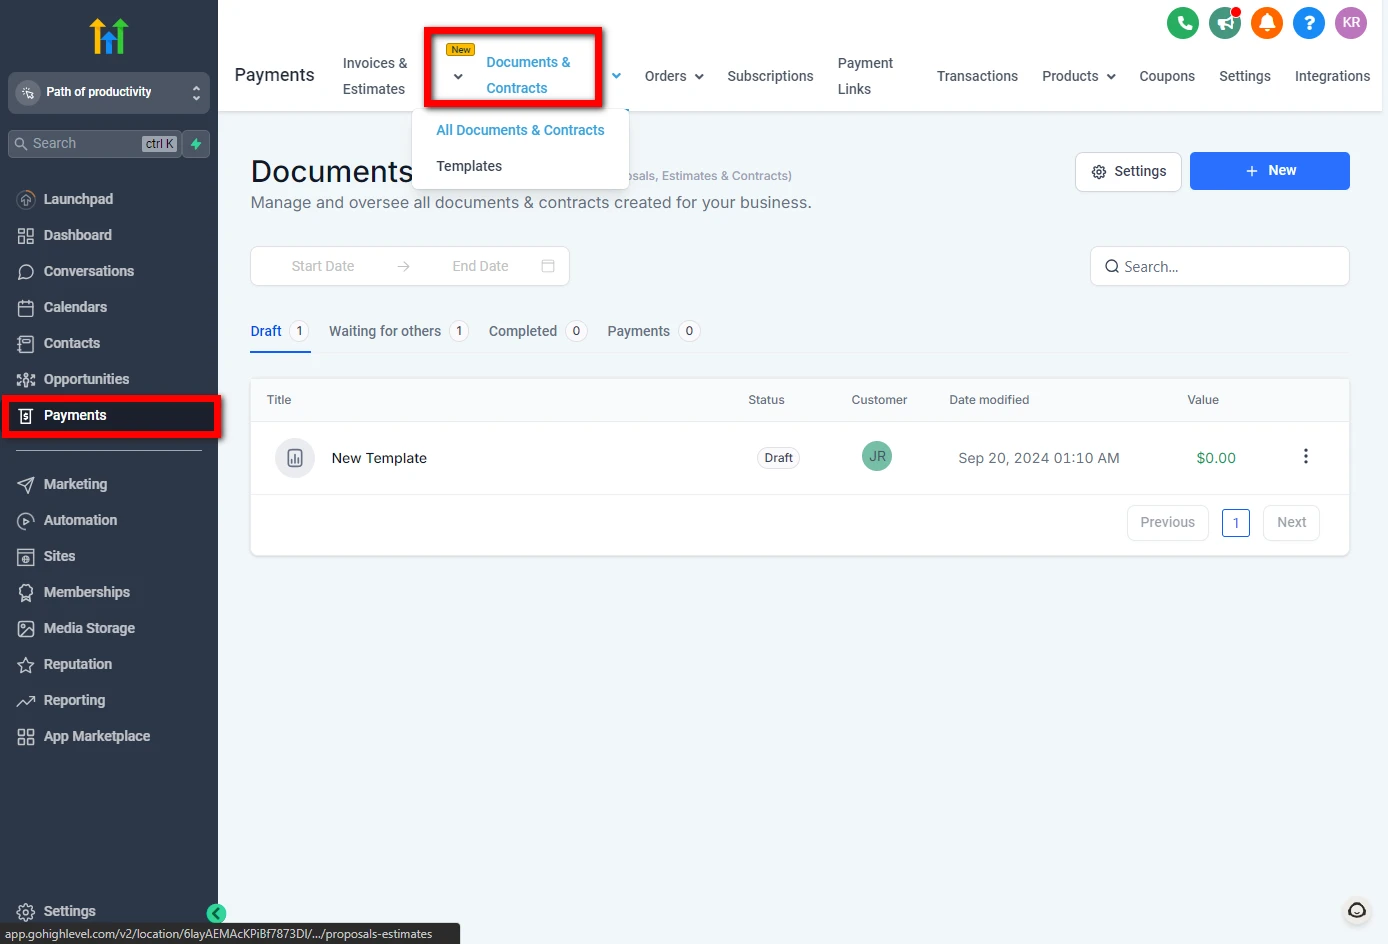
On this dashboard, you’ll notice several options, but for the purposes of setting up e-signatures, focus solely on the Documents & Contracts section. Hover over this option, and two sub-options will appear: All Documents & Contracts and Templates.
- All Documents & Contracts: This option displays all documents and contracts created within GoHighLevel, including those with e-signatures.
- Templates: This sub-option allows you to create new document templates. You can choose from various pre-made templates or design your own.
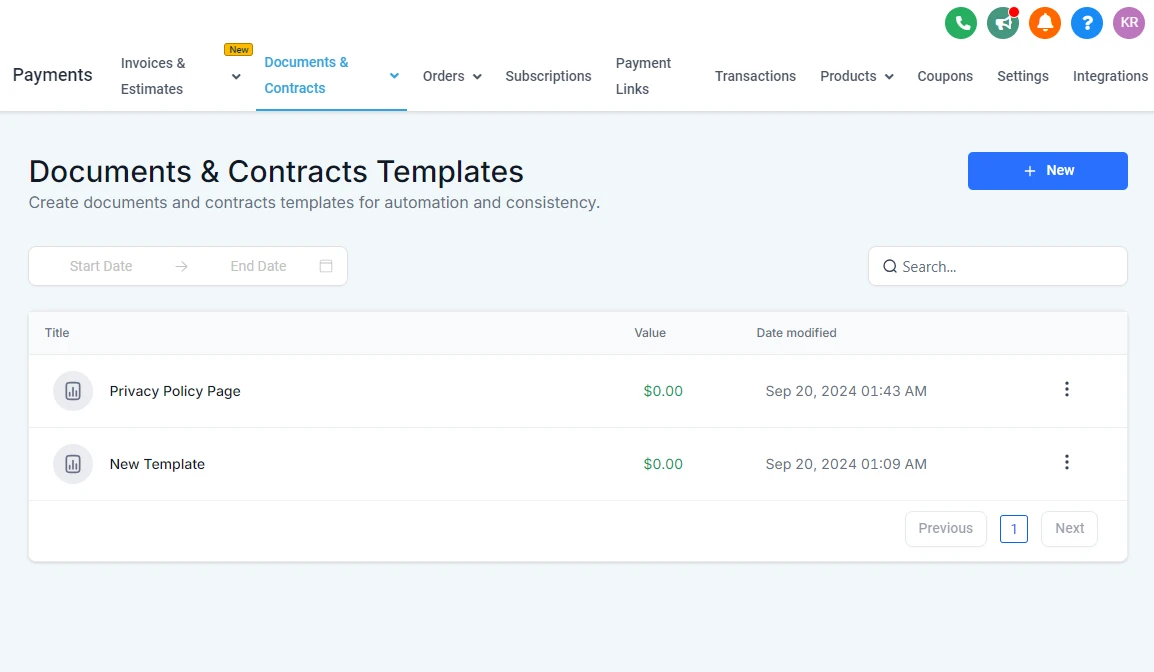
Step 3: Select the Templates Option
For setting up e-signatures, you’ll need to work with templates, so select Templates from the dropdown. This will take you to the Documents & Contracts Templates Page Dashboard, where you can view all of your saved templates. If this is your first time here, the page may be empty, but don’t worry — you’ll be creating a new template in the next step.
Step 4: Create a New Template
In the top-right corner of the Templates Page, you’ll see a blue +New button. Click on it to create a new template. You’ll be presented with two options:
- New Template: Allows you to create a document or contract template from scratch.
- Upload a PDF: Enables you to upload a PDF that can be customized with e-signature fields.
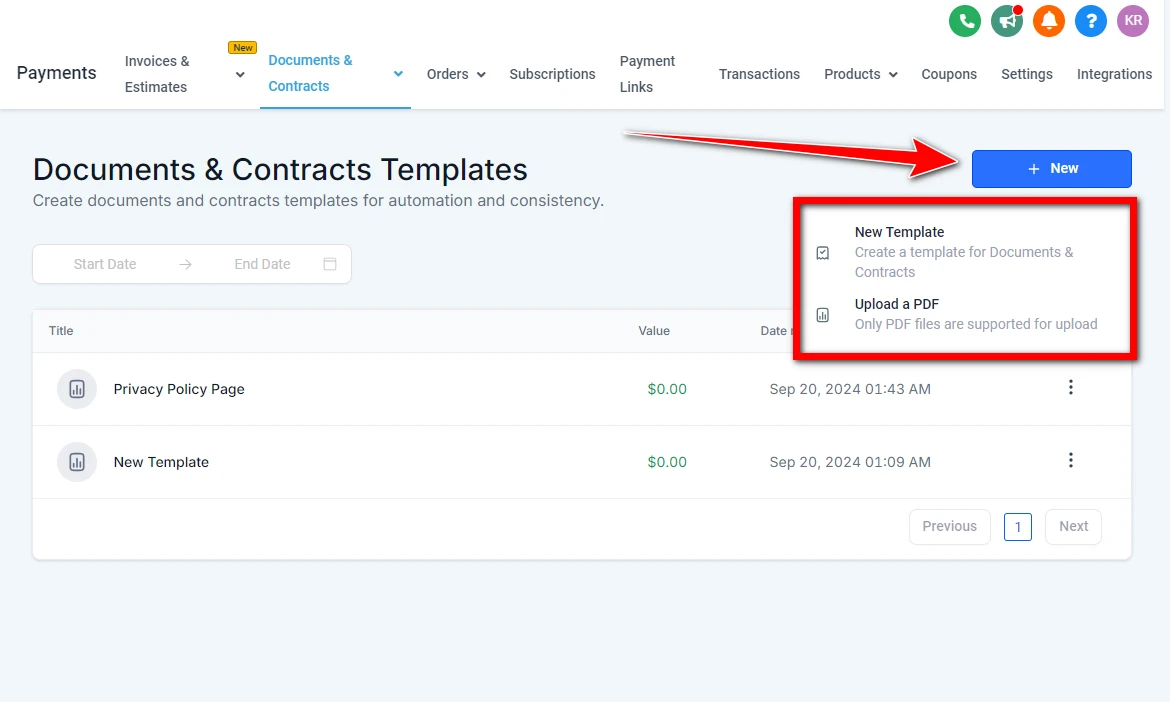
Since most businesses prefer using pre-made PDFs, select the Upload a PDF option. A popup window will appear where you can either drag and drop your PDF or browse your computer to select the file. Once uploaded, click Upload to move forward.
Step 5: Edit and Add Fields to Your Document
After uploading your PDF, you’ll be directed to a new screen where you can begin customizing the document. The first thing you’ll want to do is give your document a title. You’ll find the title field at the top of the page.
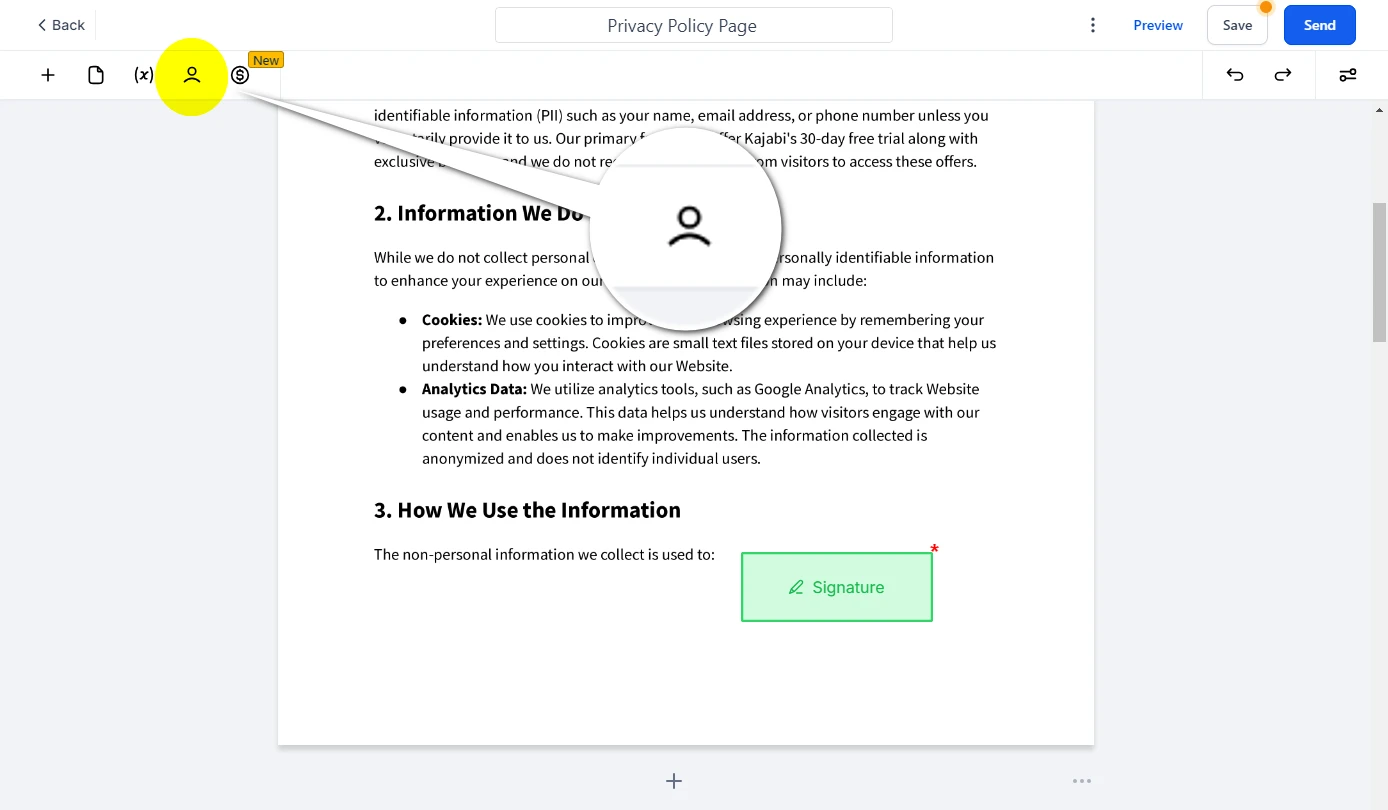
Next, focus on the options located on the top left side of the screen. Among these, you’ll notice a Plus (+) icon. Click on this icon to reveal a side menu with various types of fields you can add to your document, including text boxes, dates, checkboxes, and — of course — signature fields.
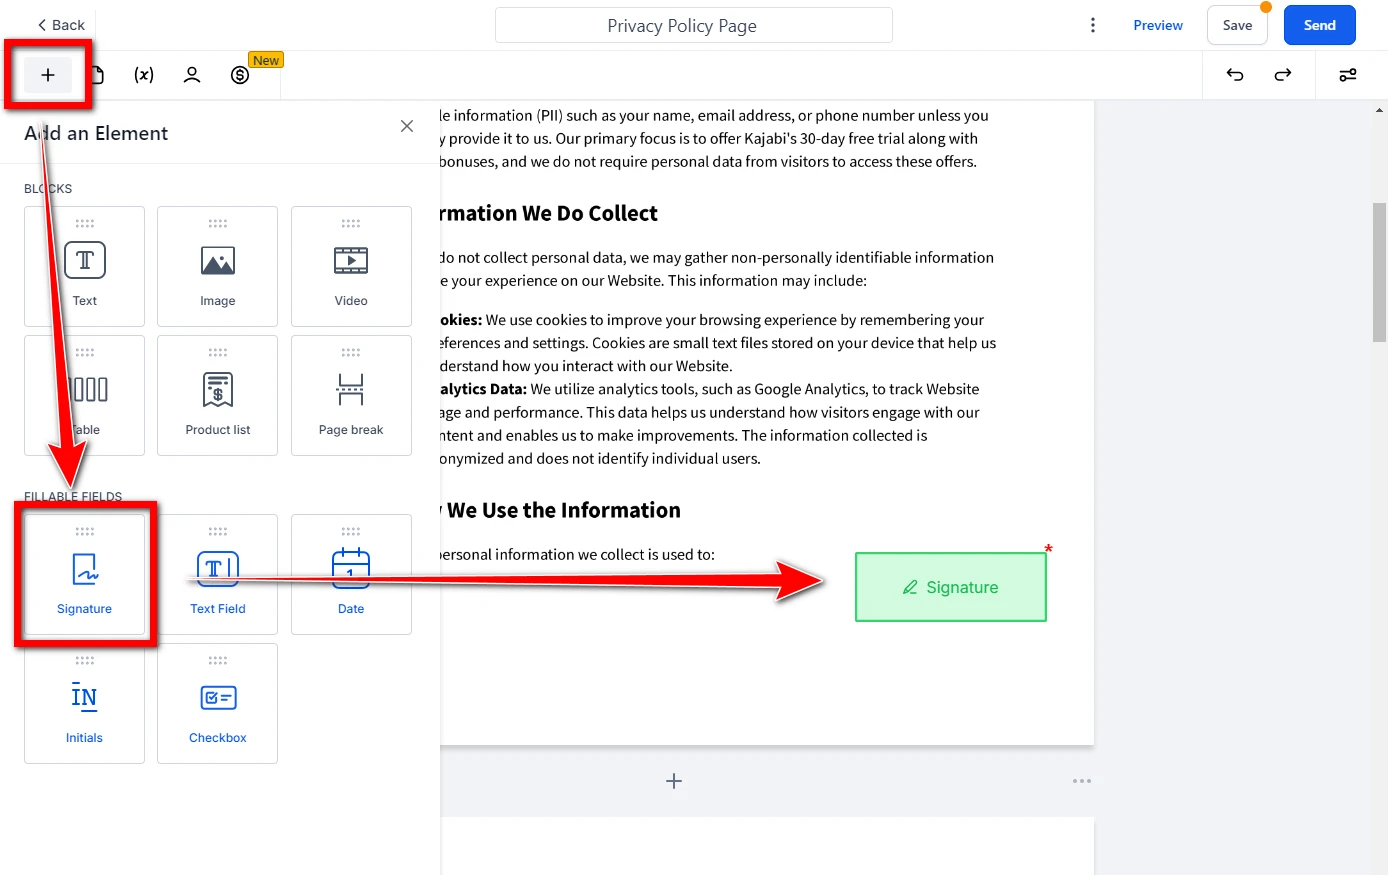
To set up an e-signature, simply drag the Signature field from the side menu and drop it onto your document where you want the signature to appear.
Step 6: Assign the Signature Field to a Signer
Once you’ve added the signature field to your document, the next step is to assign it to a specific signer. When you click on the signature field, a menu will appear on the right side of the screen. Look for the “To be signed by” dropdown menu.
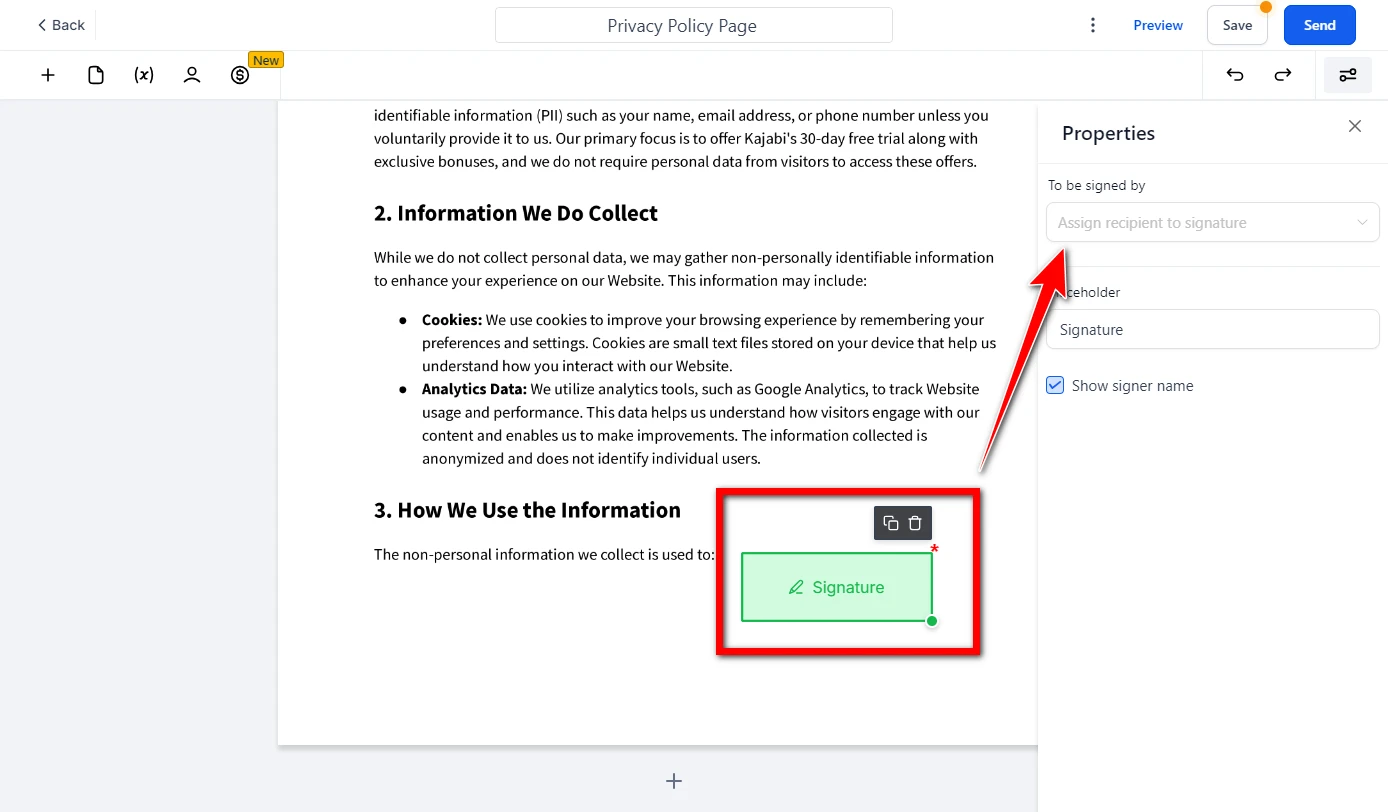
Here, you can select the contact (or signer) that this signature will be assigned to. If you don’t have contacts added yet, ensure you have your client or recipients saved within the system.
Step 7: Save and Use the Template
Once you’ve finished adding signature fields and other necessary fields, it’s time to save your progress. At the top right of the screen, you will see two options:
- Use Template: This option will save the document and make it ready for immediate use.
- Save: This option saves your progress, allowing you to make further edits before sending.
In this case, click Use Template to proceed. The system will take a moment to save your template and then redirect you to the document dashboard.
Step 8: Add Recipients to the Document
Now that your document is set up, the next step is to add recipients or signers. On the top left side of the screen, you’ll notice a new option: Recipients. Click on this, and you’ll see a field for adding contacts under Primary Client.
Here, you can enter the details of the recipient who needs to sign the document. If you need to add more than one signer, simply click the +Add More Recipient button to include additional contacts. You can also toggle the Set Signing Order option on or off, depending on whether you need a specific signing sequence.
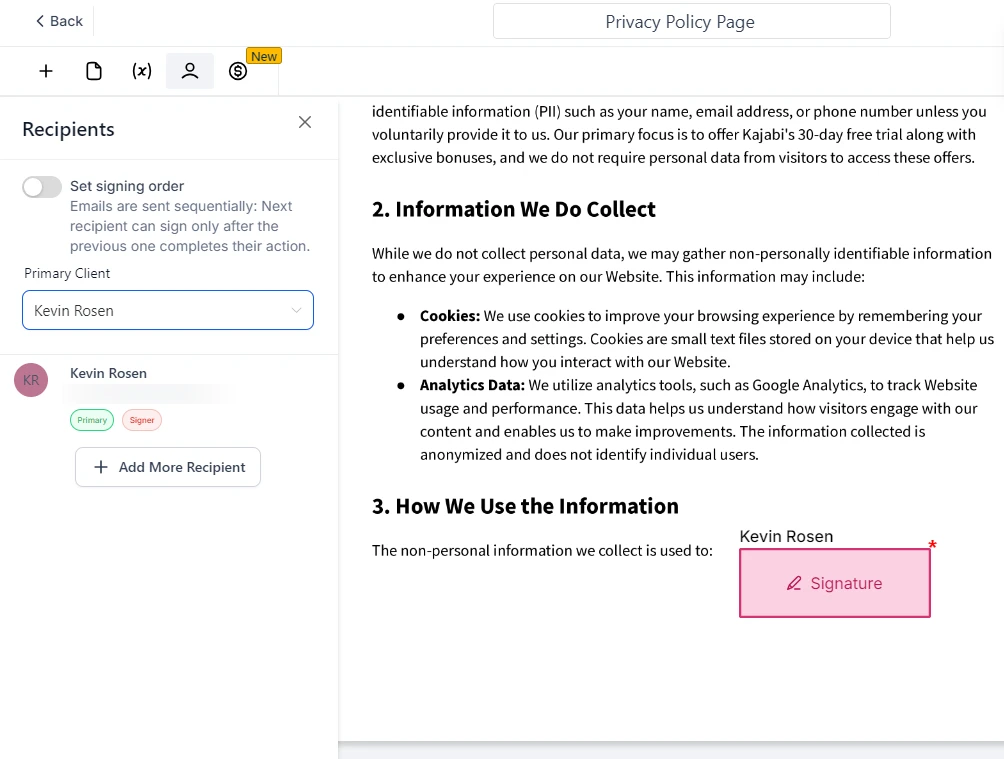
If you toggle this option on, you can drag and drop the recipient names to establish the order in which they will sign the document.
Step 9: Send the Document
Once you’ve added all the necessary recipients and set the signing order (if required), it’s time to send the document. Head to the top right corner of the screen, where you’ll see the SEND button.
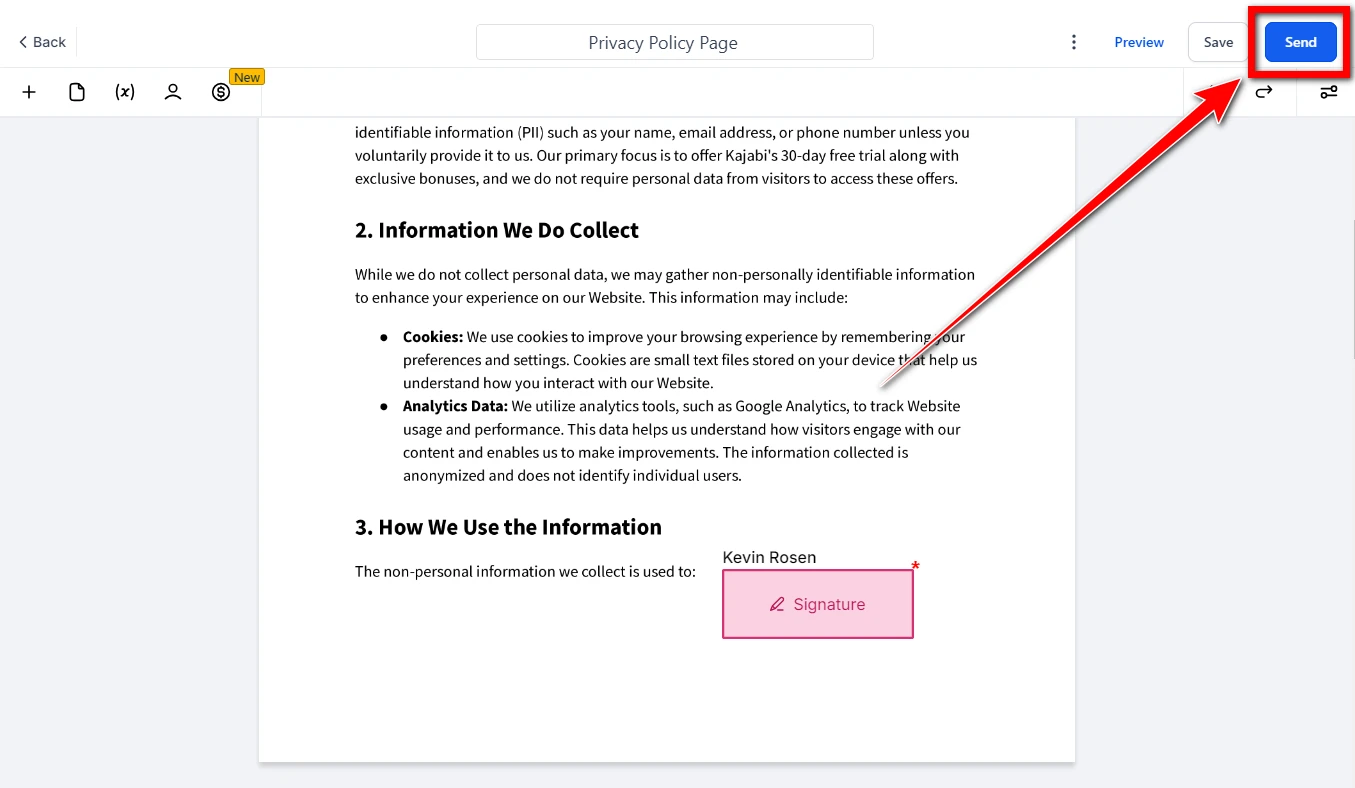
Click SEND, and you’ll be presented with two options:
- Send via email: If you choose this option, the document will be emailed directly to the recipient(s).
- Share via link: Selecting this option will generate a unique URL that you can share with your recipients manually.
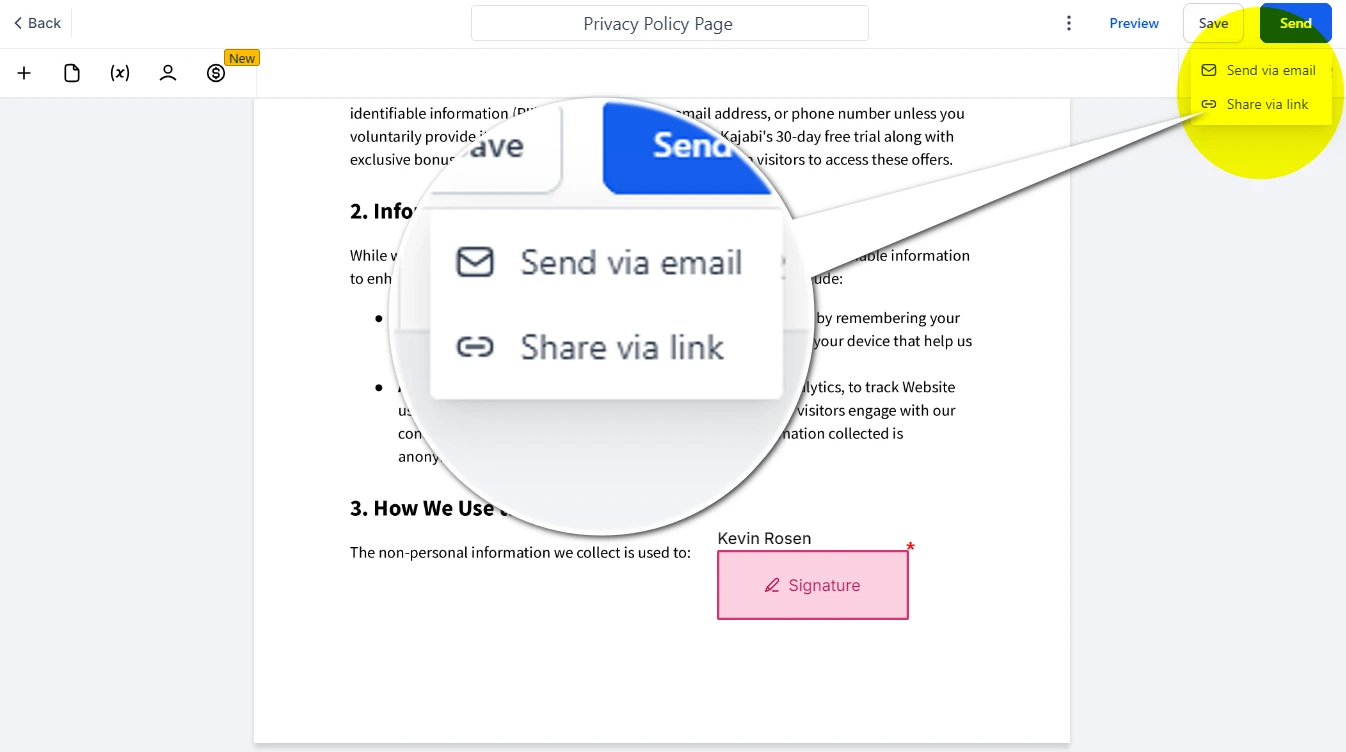
Choose the option that best suits your needs. If you opt for email, ensure the recipients’ email addresses are accurate. If you choose to share a link, make sure to provide the URL to your recipients through a reliable communication method.
Five Ways to Use GoHighLevel’s Signature Feature
GoHighLevel has improved its e-signature features by adding enhanced signature and validation options. They now include time-stamped signatures and encoded hash features for forms and surveys. These additions ensure that digital signatures are secure and protected against fraud and tampering.
This increased security opens up wider possibilities for different industries. Here are five key use cases where these enhancements can bring significant benefits:
1. Legal and Compliance Verification
Organizations that need legally binding documents can trust GoHighLevel’s e-signatures. These signatures are time-stamped and encrypted, ensuring they are genuine. This means that the document hasn’t been altered after signing, which is crucial for meeting legal standards.
Regulations like the ESIGN Act in the U.S. and eIDAS in the European Union require this level of security. For industries such as legal services, insurance, and government, having this validation is important. It guarantees that all agreements comply with strict regulatory requirements.
With GoHighLevel, the integrity of documents is preserved. This minimizes the risk of disputes, making it especially helpful for legal and compliance verification.
2. Financial Transactions and Agreements
In the financial sector, valid signatures are crucial for authorizing important documents like loan agreements, contracts, and legal filings. GoHighLevel offers enhanced security features, such as encrypted hashes and time-stamping. These features help financial institutions guarantee that signed documents are both authentic and secure, which significantly reduces the risk of fraud.
Mortgage brokers, banks, and financial consultants can greatly benefit from these features. They need to ensure that all signatures are verifiable and legally binding.
This added layer of security not only protects the organization but also builds trust with clients. Clients expect their financial information to be handled securely, and these measures help meet those expectations.
3. Healthcare and Medical Records
Hospitals, clinics, and healthcare providers must keep accurate records of patient consent forms and medical documents. GoHighLevel’s signature and validation tools help healthcare providers confirm that patient signatures are genuine and haven’t been changed after signing. This security is essential for following regulations like HIPAA (Health Insurance Portability and Accountability Act) in the U.S.
By using e-signatures for patient consent forms, discharge summaries, and treatment agreements, healthcare organizations can stay compliant while also improving their efficiency.
Additionally, these measures protect against tampering, giving patients peace of mind that their personal health information is being handled securely.
4. Software and Technology Services
For software and technology service providers, having signed agreements is essential. These agreements cover licensing, service contracts, and user agreements.
GoHighLevel’s e-signature solution, along with its enhanced validation features, ensures that all agreements are genuine and have not been altered after signing. This gives companies confidence, knowing their business contracts are legally sound and protected from fraud.
These features are especially important for SaaS (Software as a Service) companies, tech startups, and IT service providers. Signed contracts are crucial for onboarding clients and making sure service level agreements are met.
5. Intellectual Property Protection
In industries like tech, entertainment, and creative sectors, protecting intellectual property (IP) is crucial. Safeguarding proprietary information helps ensure that ideas and creations are secure. Common methods for protecting IP include signed non-disclosure agreements (NDAs) and patent filings.
GoHighLevel offers features like time-stamped and encoded hashes. These ensure that all signatures on documents are verifiable and haven’t been changed. This provides a strong defense against IP theft and disputes.
For inventors, creators, and businesses working with IP, these features add an extra layer of protection. They verify the authenticity of signed documents, which is vital when dealing with patents, trademarks, and trade secrets.
To enhance client engagement and community building, explore our step-by-step guide on the GoHighLevel Community Feature.
Final Thoughts
Using e-signatures with GoHighLevel is a smart choice for any business seeking to improve efficiency, security, and compliance in document management. I hope this guide has helped you quickly set up and start using e-signatures. With e-signatures, you can accelerate the processing of contracts, agreements, and other important forms that are crucial to your operations.
The benefits of e-signatures are numerous: they ensure legal compliance, reduce costs, and promote environmental sustainability. Additionally, the enhanced security features protect against fraud and tampering, making e-signatures valuable across various industries, including legal, financial services, healthcare, and intellectual property protection. GoHighLevel’s e-signature feature is more than just a simple tool—it’s a comprehensive solution designed to meet the evolving needs of modern businesses in the digital age.