In today’s digital world, having a strong online presence is crucial for any business that wants to reach more customers and increase sales. GoHighLevel provides an all-in-one platform that makes it easy to create a fully functional e-commerce store.
This guide will take you through the steps of setting up your own online store using GoHighLevel. You’ll learn how to customize it to match your brand and efficiently add products so you can start selling right away. By the end, you’ll have a fully functional online store ready to attract customers and drive sales. So, let’s get started!
How to Create an E-Commerce Store in GoHighLevel
Creating an e-commerce store with GoHighLevel is a simple process. You can complete it in just a few easy steps. Follow along and you’ll have your online store up and running in no time. It’s that straightforward!
Step 1: Sign Up for a GoHighLevel Account
The first and most important step is to sign up for a GoHighLevel account. If you already have an account, you’re all set to begin.
If you don’t have an account yet, you can sign up for a 30-Day Free trial. Once you sign up, you’ll gain access to all the tools you need to create your e-commerce store.
Step 2: Switch to Your Sub-Account
After signing in to your GoHighLevel account, you’ll land on your agency dashboard. GoHighLevel has two types of accounts: an agency account and a sub-account. To start building your store, you need to switch from your agency account to a sub-account.
First, look at the top of the left-hand side menu. There, you’ll find the “Click here to switch” button. Click it to proceed.

Next, a list of sub-accounts will appear. If you’re using a demo setup, you might see just one sub-account listed. Simply click on that sub-account to enter its dashboard.
Step 3: Access the ‘Sites’ Tab
Once in your sub-account, the dashboard offers a variety of options to explore, but to begin setting up your store, we’ll focus on the Sites tab.
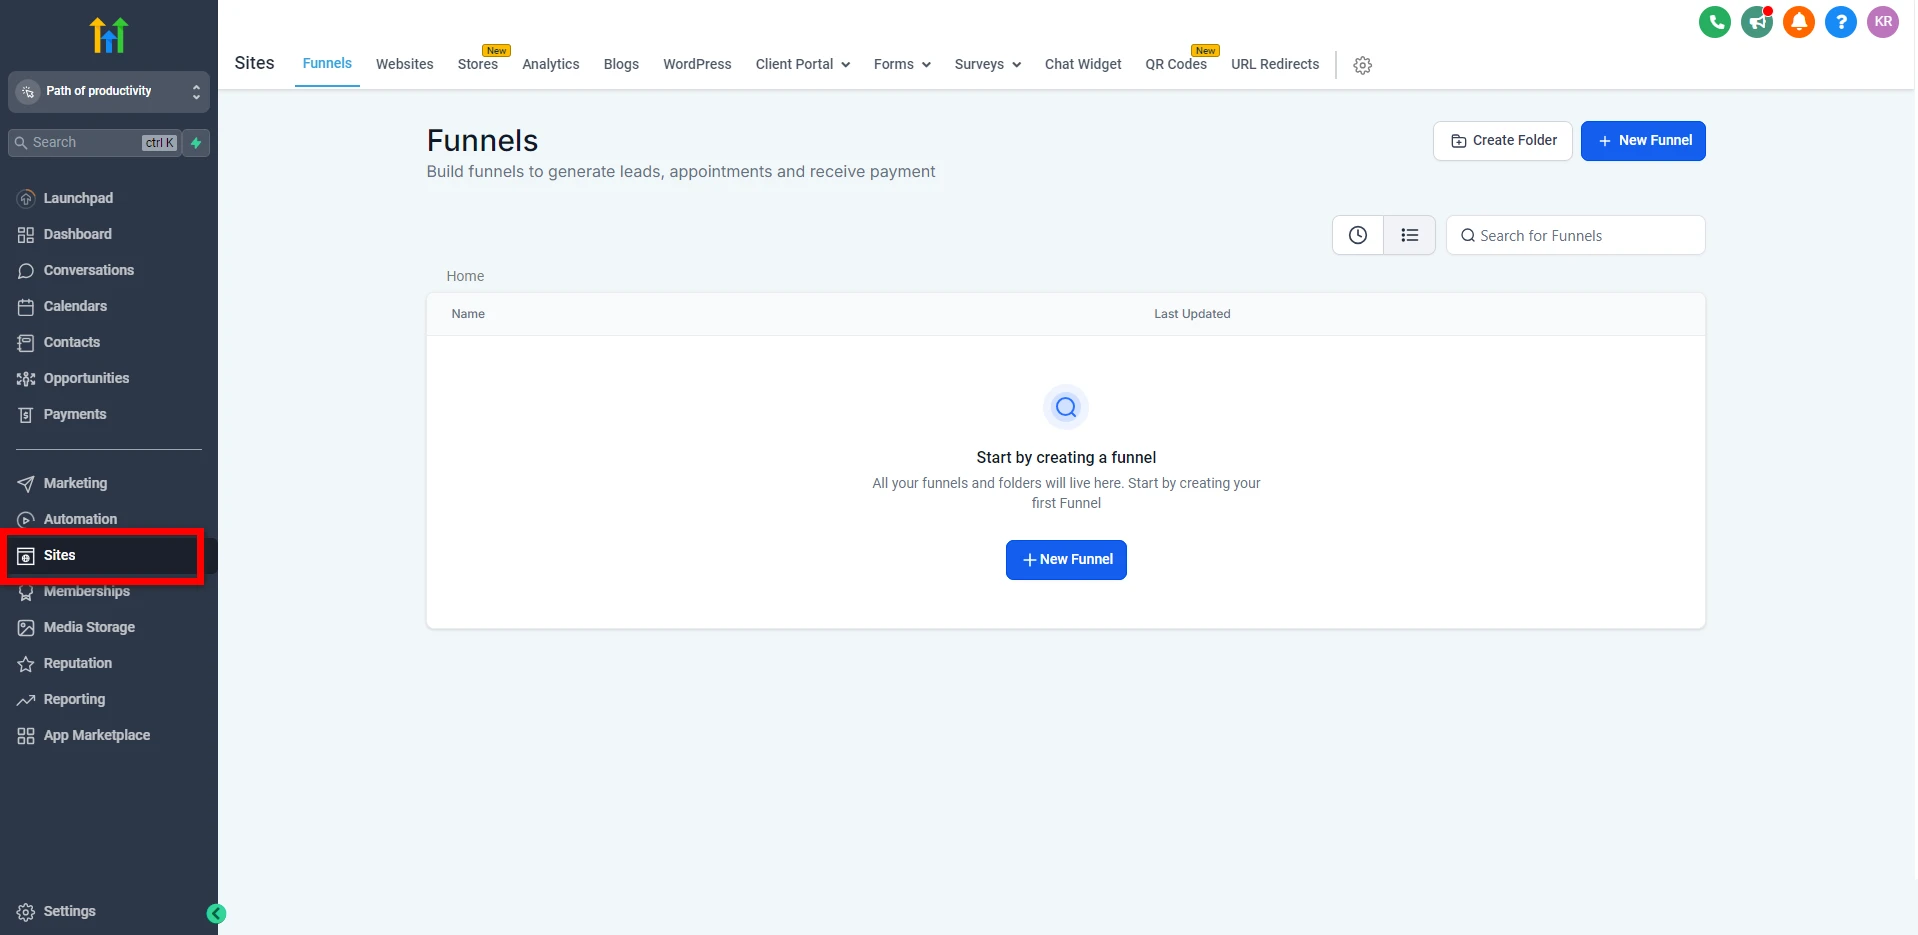
- On the left menu, click the Sites tab.
- This will take you to the site’s page, which contains different sections like funnels, websites, and blogs. For now, our focus will be on the Stores section as we’re building an e-commerce store.
GoHighLevel offers more than just e-commerce solutions. If you’re looking to build a vibrant community within the platform, check out our GoHighLevel Community Feature: A Step-by-Step Guide to Setup and Use for more details.
Step 4: Go to the ‘Stores’ Section and Create a New Store
To start building your store, head over to the Stores section.
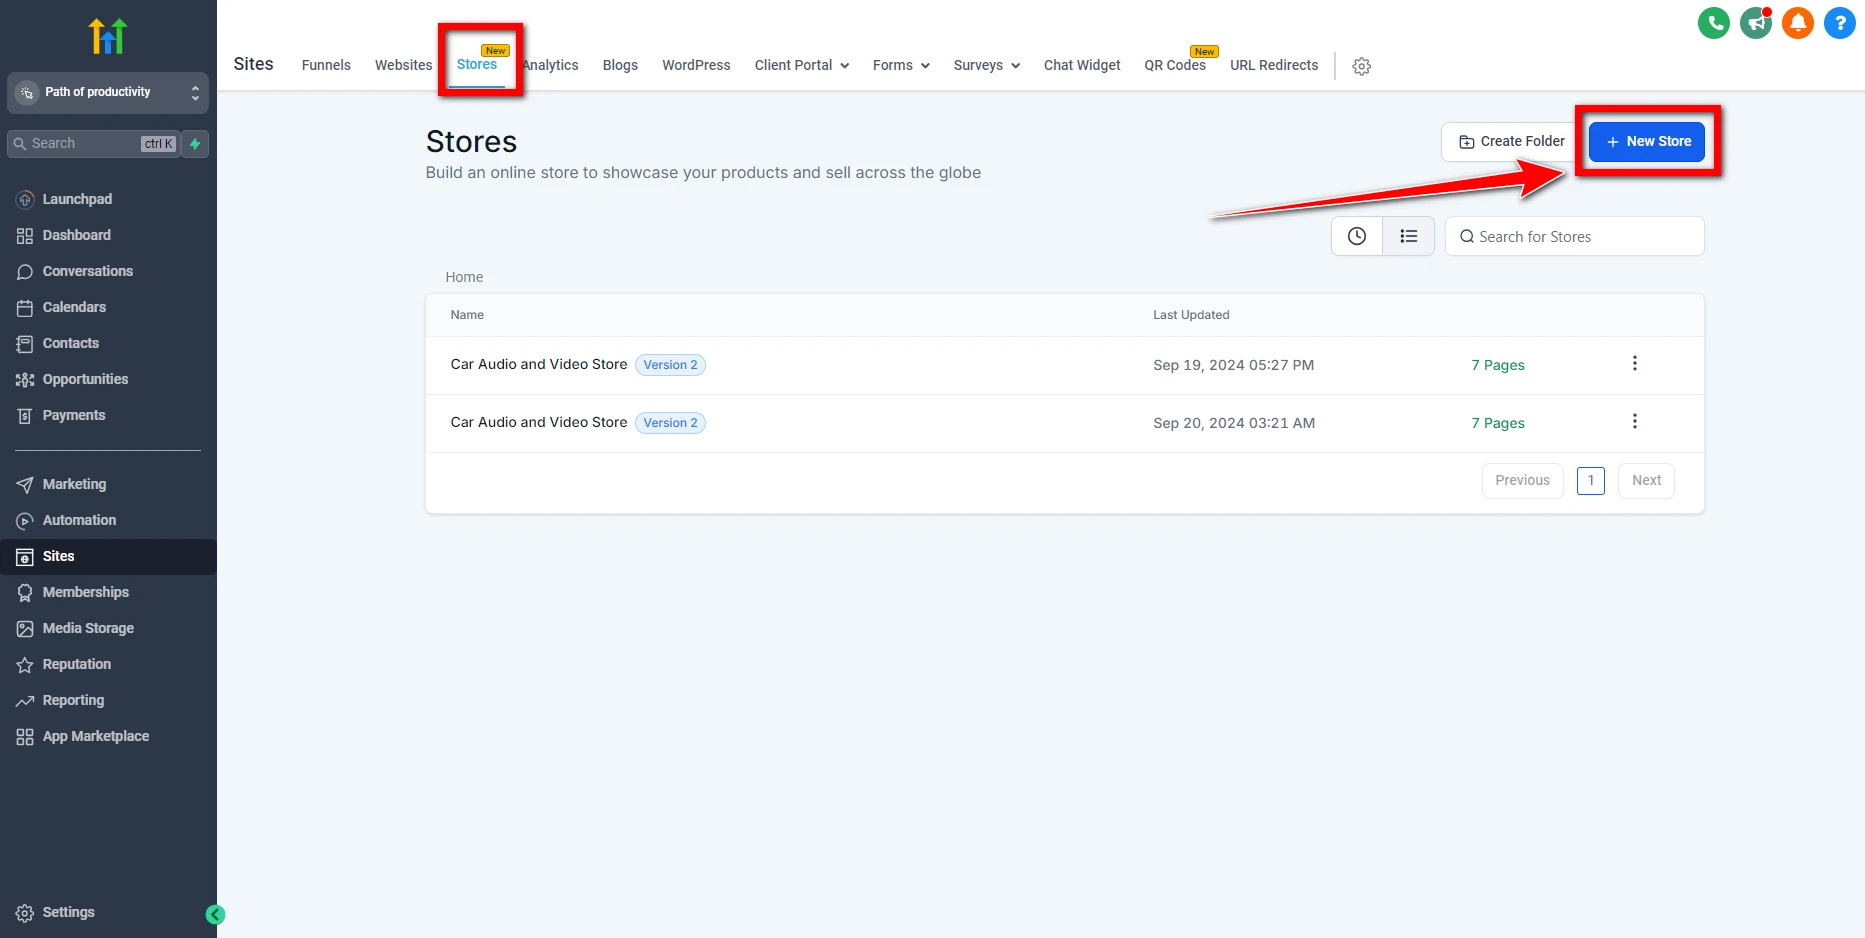
- In the Sites dashboard, click on Stores.
- Once you’re in the store’s dashboard, look for the + New Store button in the top-right corner. Click it to begin creating your store.
A pop-up will appear, giving you two options: From Blank or From Templates.
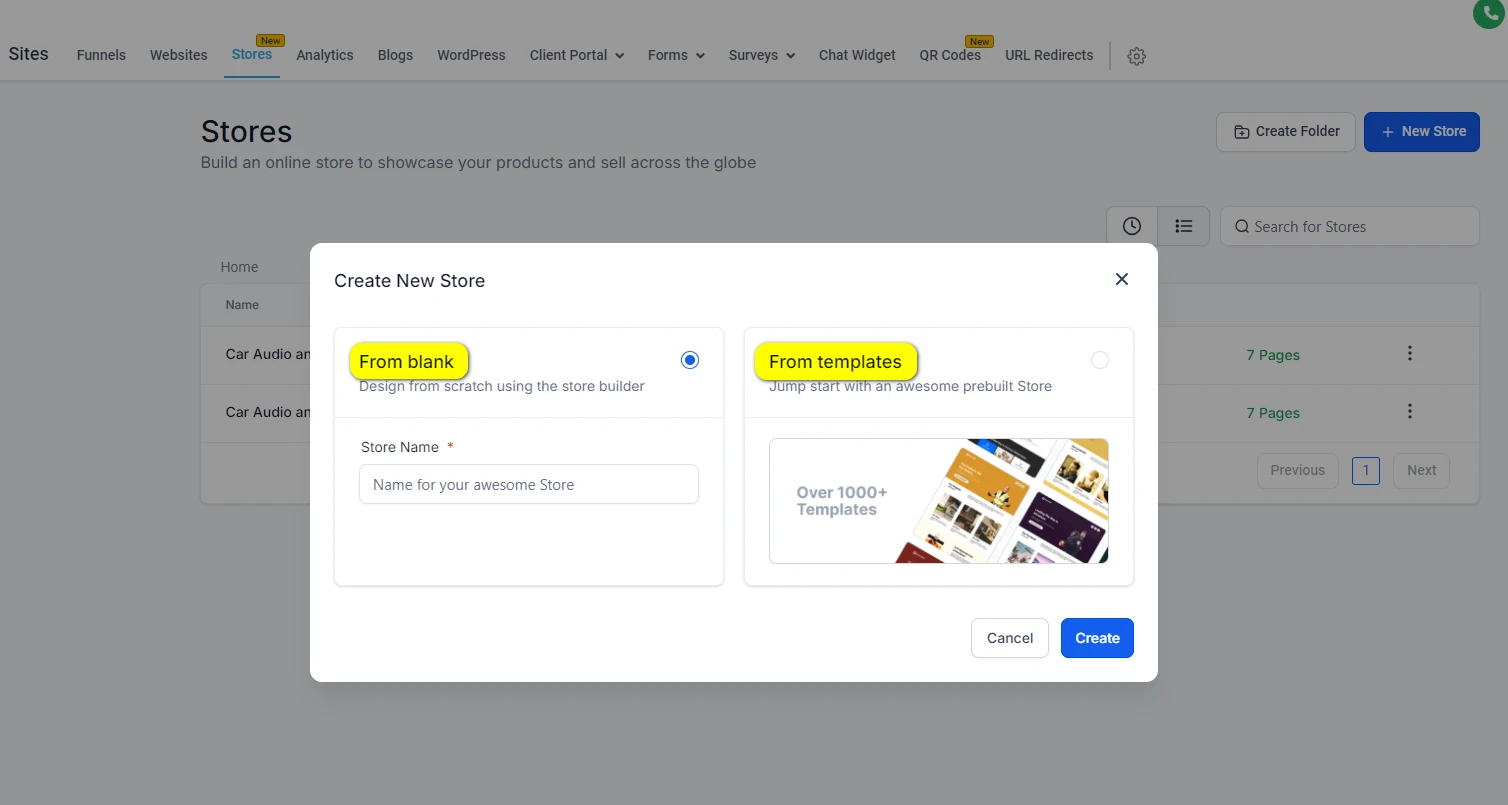
The From Blank option allows you to create your store from scratch. However, if you want to save time, I recommend selecting the From Templates option. For this demo, we’ll go with From Templates.
Step 5: Choose a Store Template
After you select From Templates, you’ll see a range of professionally designed templates that you can customize for your business.
Feel free to preview each template to get a sense of the layout.
For this demo, we’ll select the Car Audio and Video Store template.
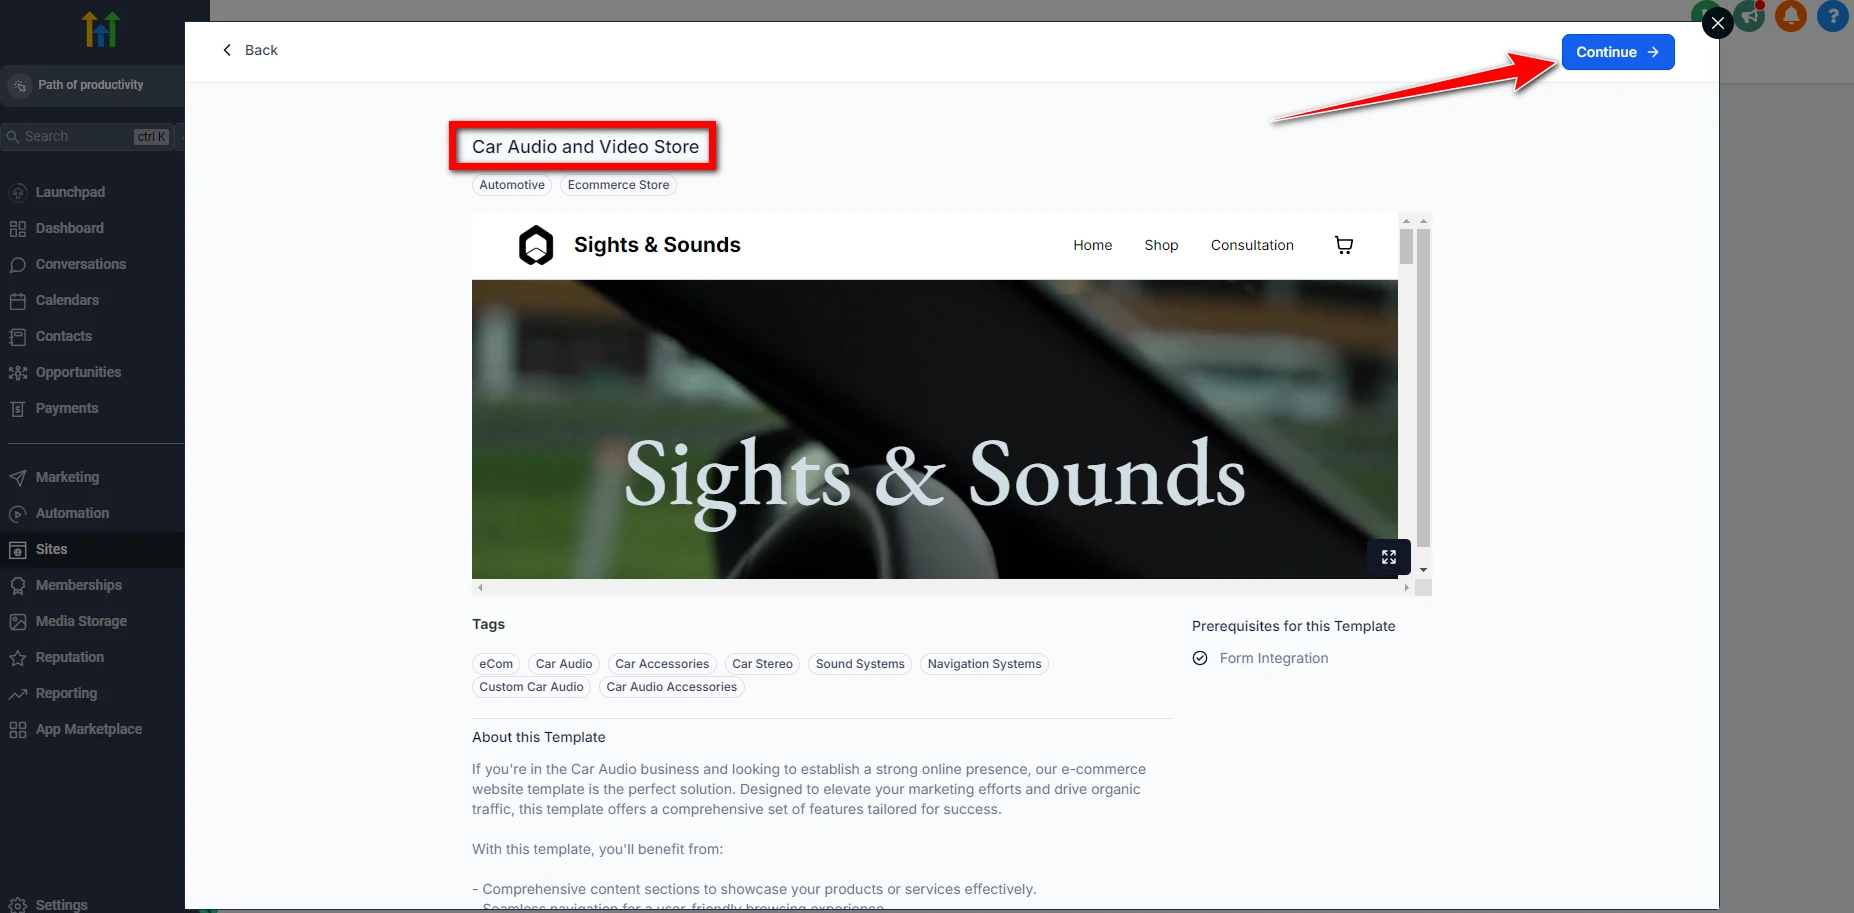
- Click on the template to see how it looks.
- When you’re happy with your choice, click the Continue button at the top-right corner of the page.
Step 6: Customizing Your Store Template
Now that your template is selected, you’ll be taken to the store builder. This is where the magic happens, allowing you to fully customize every aspect of your e-commerce store, including the header, hero section, product features, and footer.
Let’s break down each section for customization.
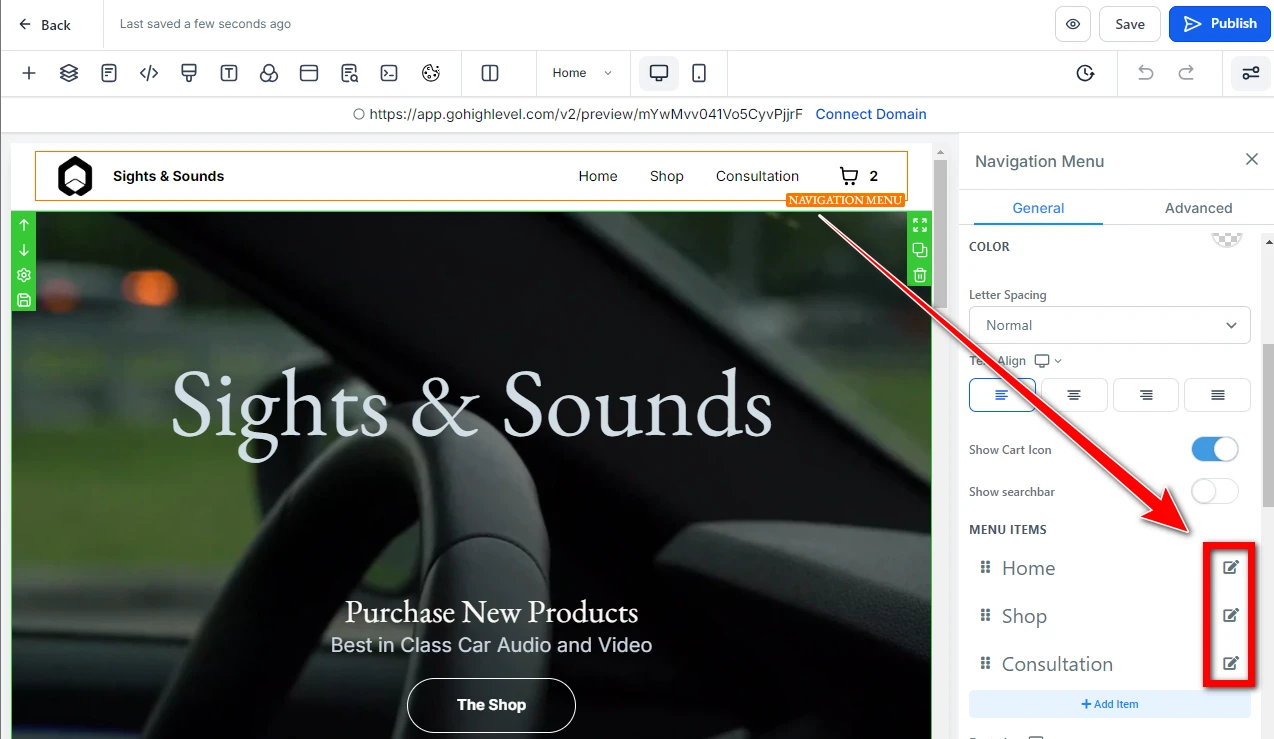
Customizing the Header (Top Navigation Bar)

The header is the first thing visitors notice. It should be clean, professional, and easy to navigate.
Logo:
Start by uploading your brand’s logo. Click on the logo placeholder, and a panel will appear on the right side. Scroll down to find the Brand Logo option. Click Choose Image to upload a high-resolution logo file.
Navigation Links:
Next, customize the top navigation bar. Include important pages like Home, Shop, and Consultation. To edit the navigation links, click on them. In the right sidebar under Menu Items, click the pencil icon next to each link. This will let you change the title and destination URL.
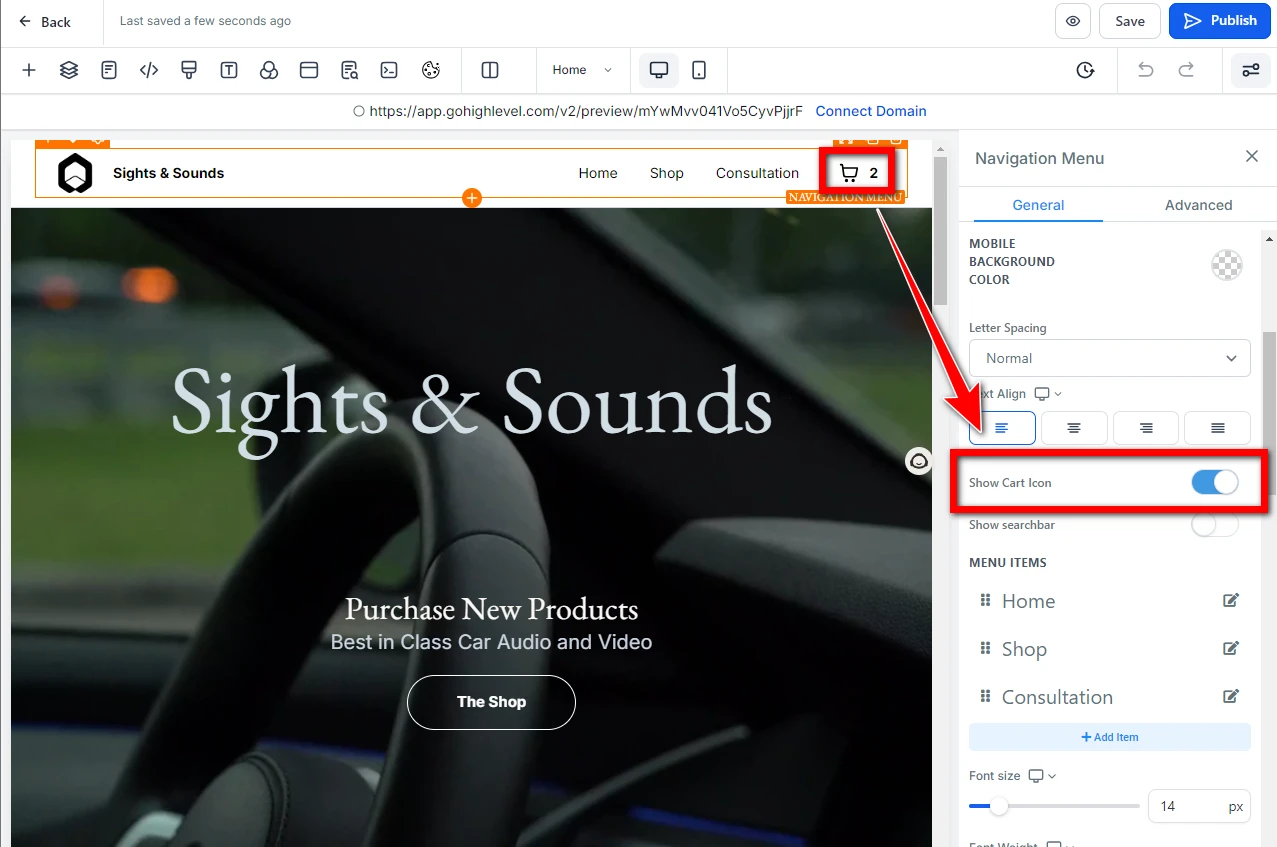
Shopping Cart Icon:
Your store’s shopping cart is essential. You can customize how it looks or hide it entirely. Use the Show Cart Icon toggle in the right sidebar to make these adjustments.
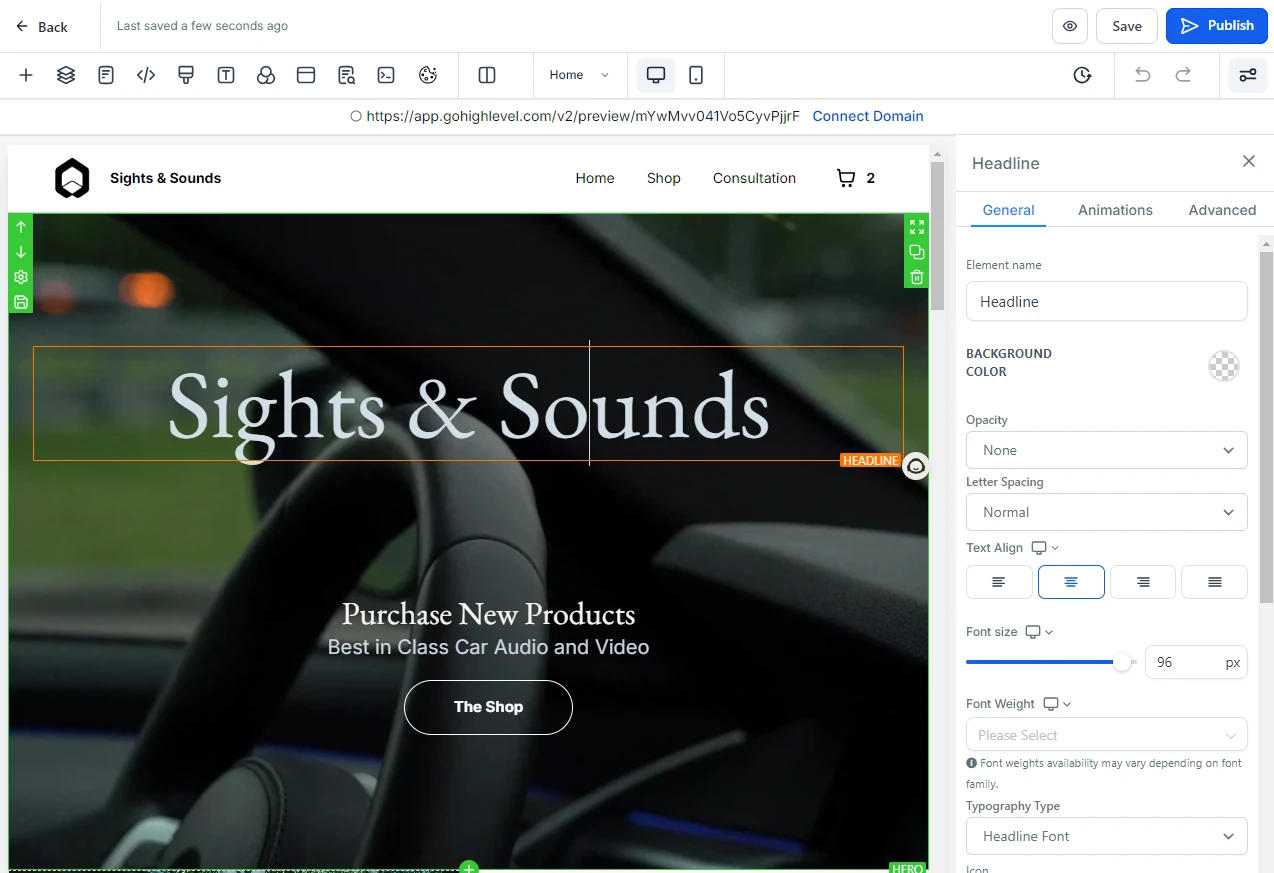
Customizing the Hero Section (Main Banner Area)
The hero section is a large visual area that highlights your store’s theme. Here’s how to customize it:
- Background Image: Click on the current background image, and in the right sidebar, choose between a new image or even a video background for added interactivity. Upload your file to reflect your store’s brand and theme.
- Text (Sights & Sounds): The main heading and subheading should immediately grab attention. Click on the text to edit the font, color, size, and content to align with your store’s voice and branding.
- Button (Shop Now): This call-to-action (CTA) button is vital for encouraging visitors to browse your products. You can change its label (e.g., “Explore Products” or “Shop Now”) and set the URL to your product page by clicking on the button and selecting the desired link destination.
Customizing the Product Features Section
The product features section allows you to showcase your best-selling or featured products.
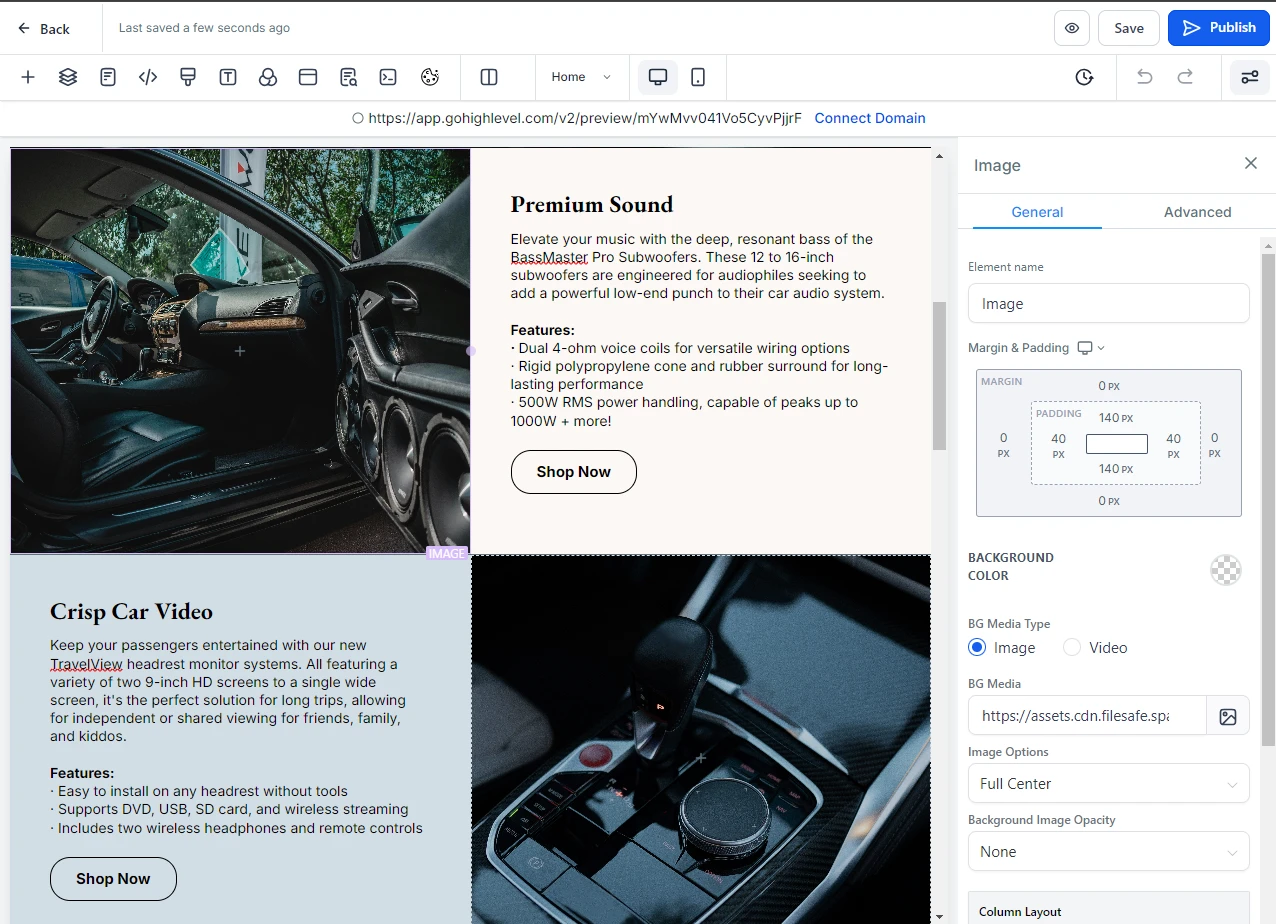
- Product Images: You can update the images for each product by clicking on the placeholders and uploading your own. This is where you can highlight your store’s unique offerings.
- Text and Descriptions: Modify the text by clicking on each product title and description. Ensure that your product descriptions are compelling, detailing features and benefits to persuade potential buyers.
- Shop Now Buttons: Customize the Shop Now buttons under each product. You can link these to specific product pages. You can also customize the button text, color, and animation to make it stand out.
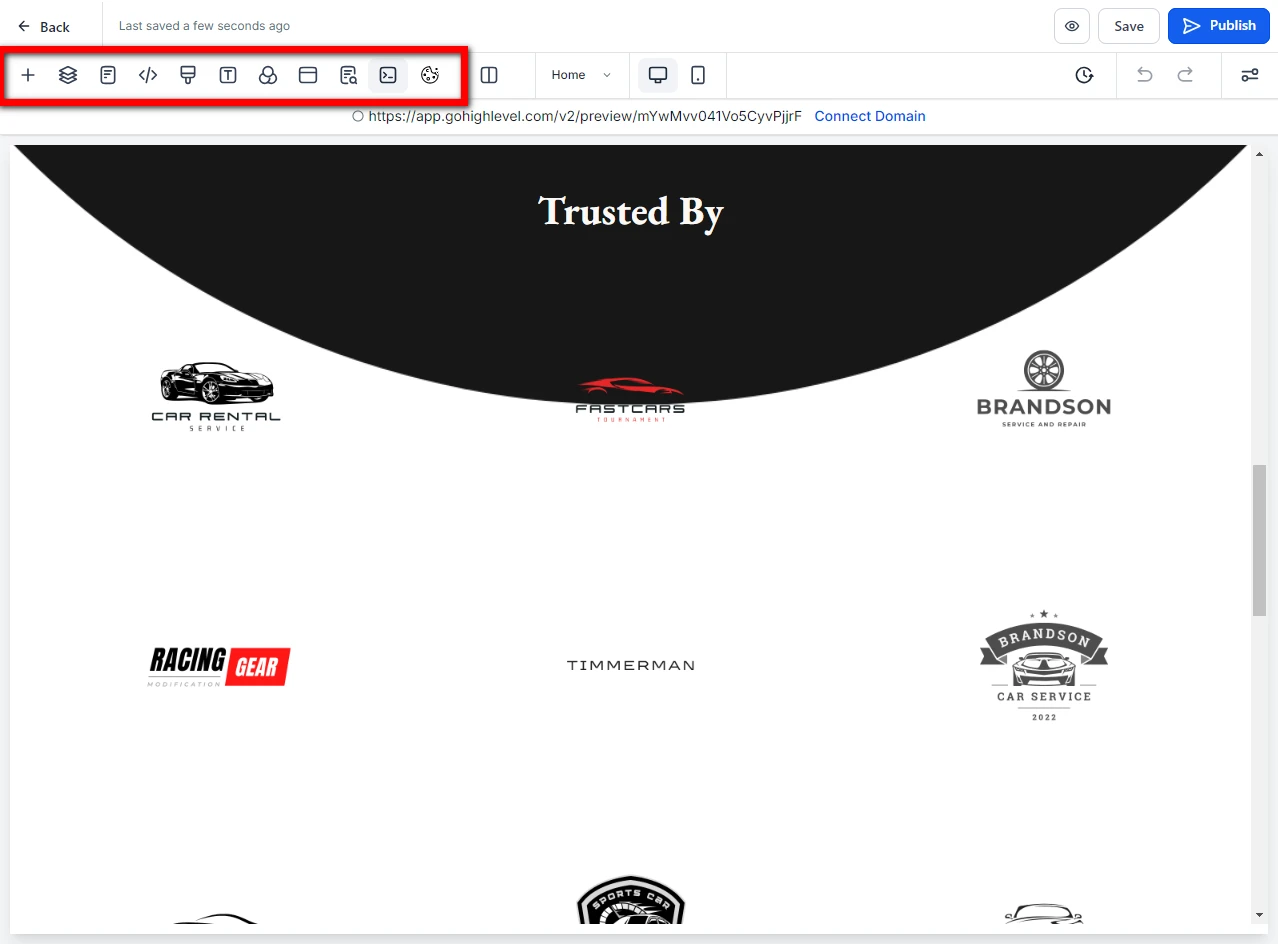
Customizing the Trusted By Section
This section builds trust by showcasing logos of partner companies or customers who use your product.
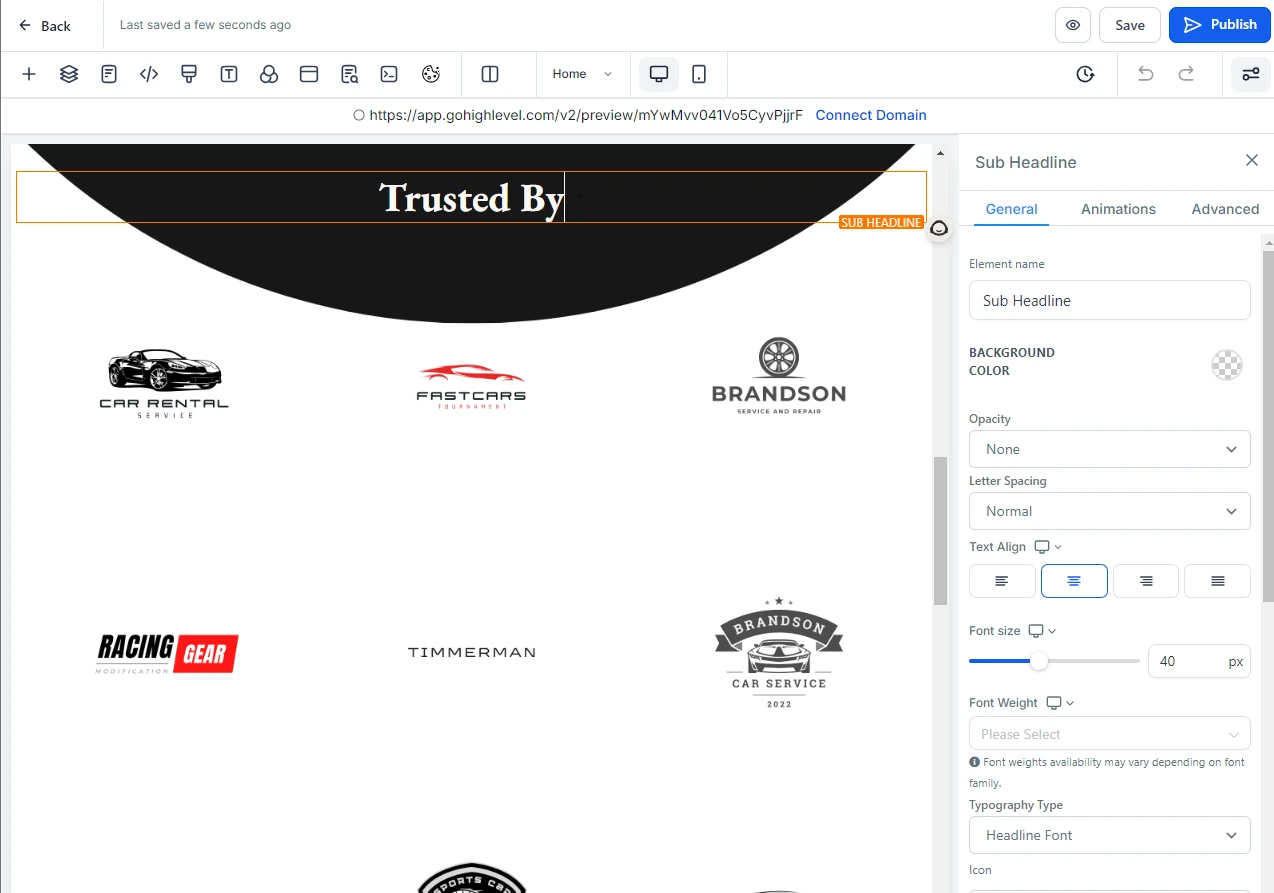
- Partner Logos: Replace the placeholder logos by clicking on them and uploading logos of companies or partners that endorse or collaborate with your brand.
Building trust is vital, and reputation management plays a big part in this. Learn more about Why this is so important.
Customizing the Consultation Section
If your business offers consultations, this section provides an opportunity to engage visitors.
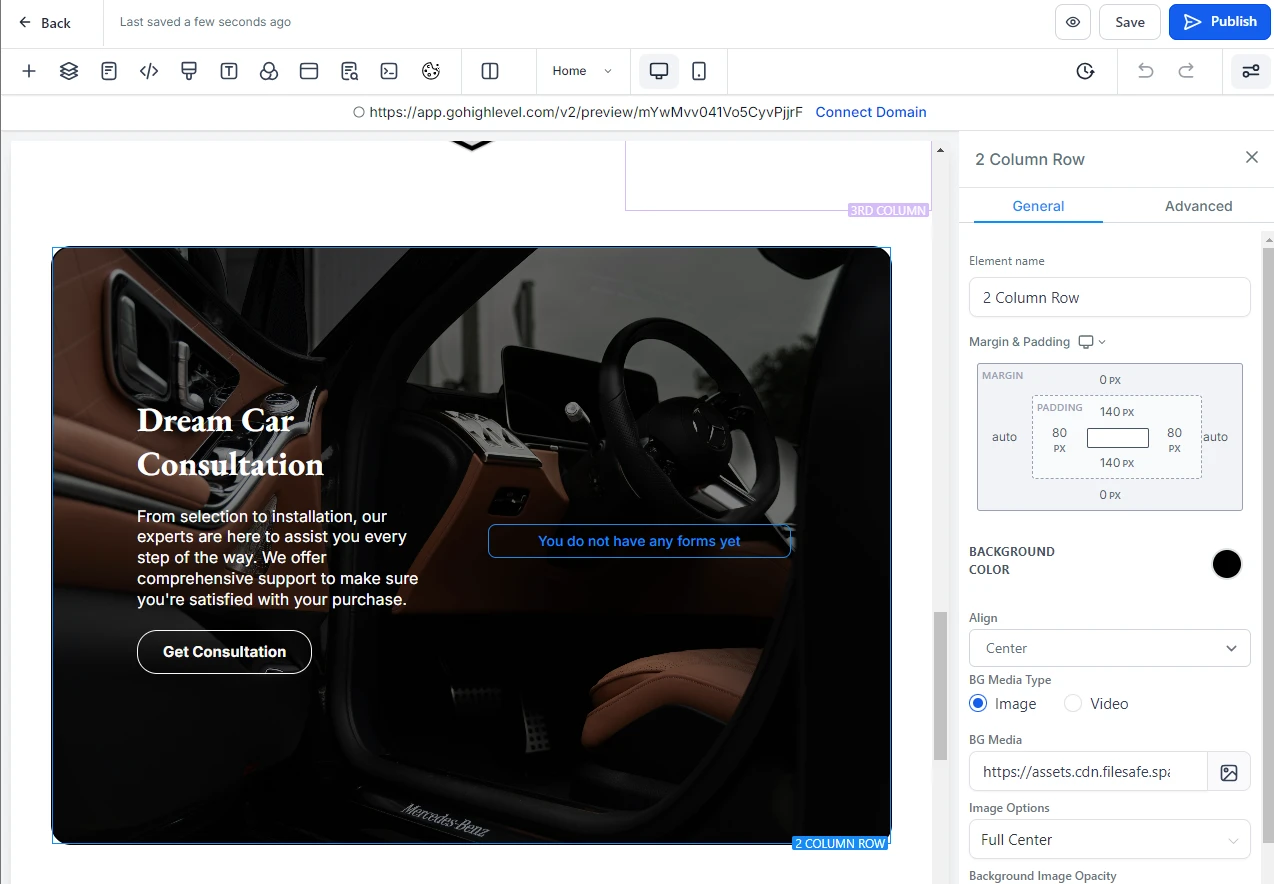
- Background Image: Similar to other sections, you can upload a background image that suits the theme of this section.
- Text (Dream Car Consultation): Edit the text to provide information about your consultation services. You might want to change the title to match the service offered (e.g., “Get Expert Consultation”).
- Get Consultation Button: This button can be linked to a booking form or contact page. Customize the text and link it to a specific scheduling tool or form for consultation requests.
Customizing the FAQ Section (Frequently Asked Questions)
An FAQ section helps address common customer queries and can reduce friction during the purchasing process.
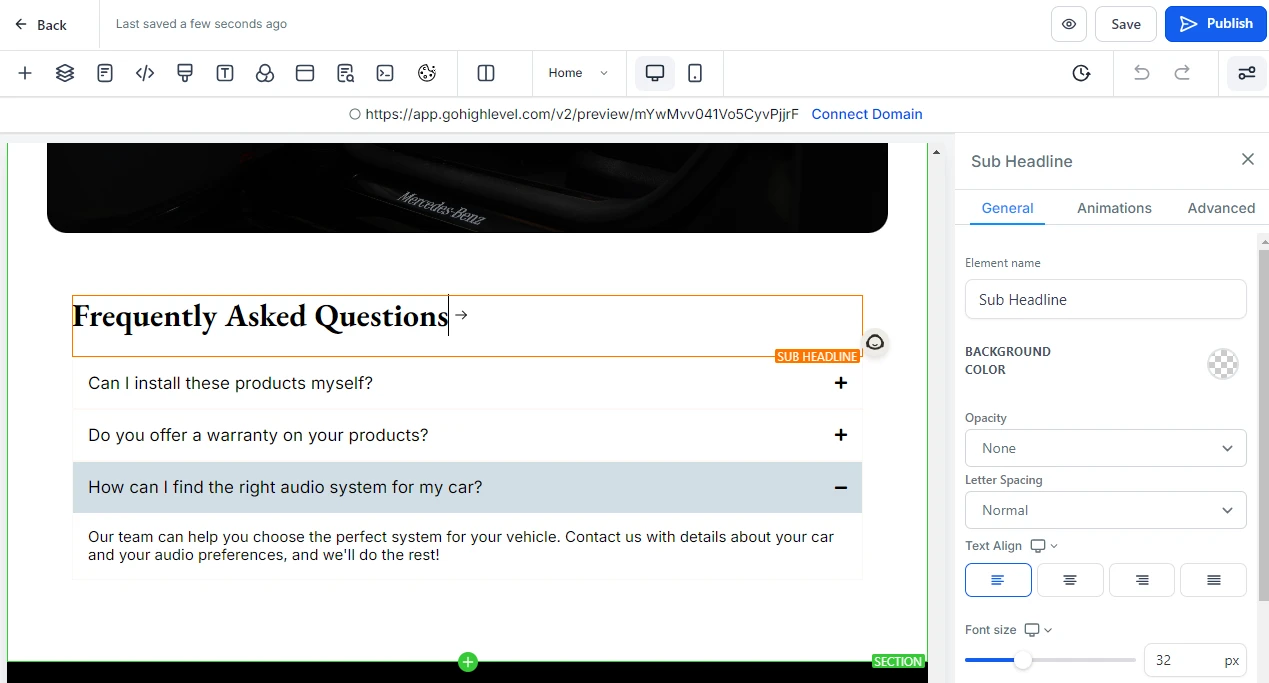
- FAQ Items: Each FAQ entry can be edited by clicking on the question-and-answer text. Make sure to include detailed, product-related questions that provide valuable information to your customers.
- Add or Remove FAQs: You can add more FAQs or remove unnecessary ones by using the + or X icons to add new questions or delete existing ones.
Customizing the Footer Section
Finally, the footer section is important because it provides essential business information.
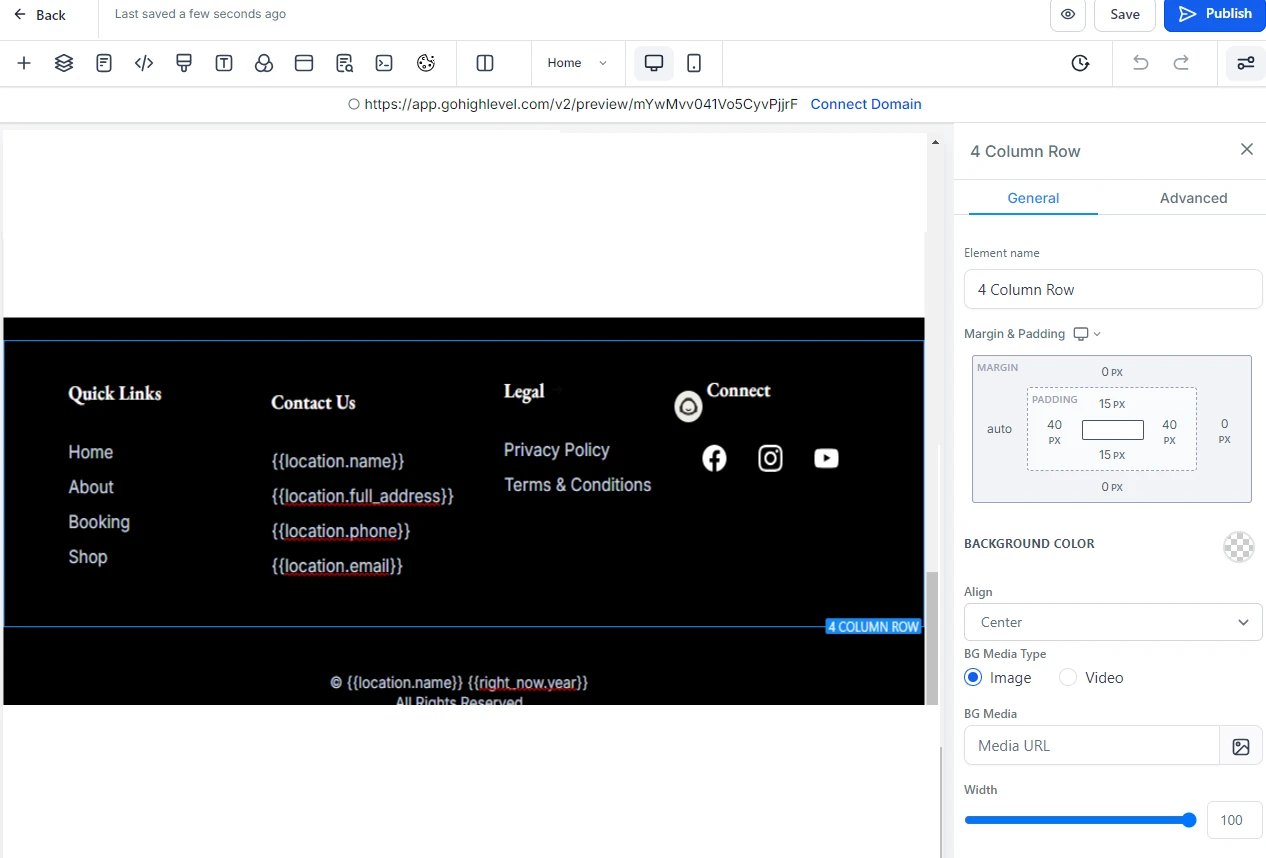
- Quick Links: Make sure to customize this section. Include easy access to important pages like Home, Shop, About Us, and Booking.
- Contact Us: Share your business contact details. This should include your business name, address, phone number, and email. It’s important that this information is clear and easy for customers to find.
- Legal (Privacy Policy, Terms & Conditions): Don’t forget to link to your privacy policy and terms and conditions pages. Be sure to edit the text and links so they direct users to the correct legal documents on your website.
- Social Media Icons: Connect your social media accounts by clicking on the icons. Enter the URLs for your Facebook, Instagram, Twitter, or any other platforms you use.
Options on the Top Left Side in the Store Builder
Now that you’ve customized different sections of your template, let’s explore some important tools located at the top-left side of the GoHighLevel store builder.
These options give you more control and customization features. They help you enhance your store’s appearance, structure, and functionality.
By understanding how to use these tools effectively, you can create a fully optimized and personalized e-commerce store.
1. Add Elements (+)
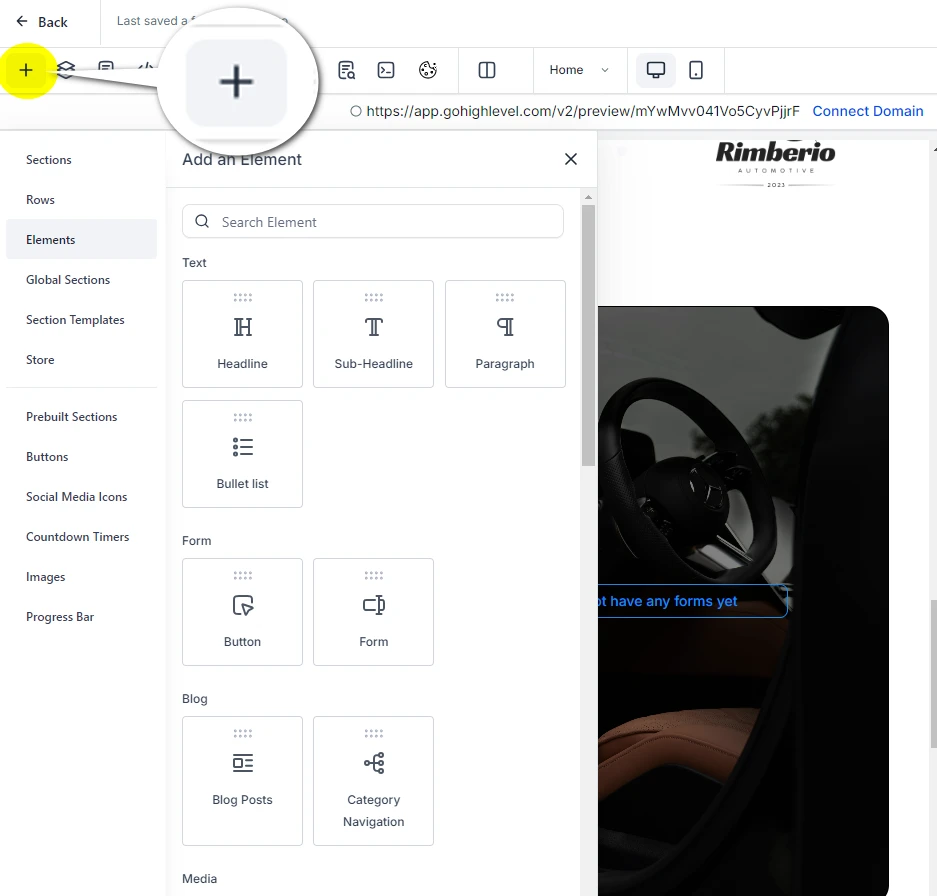
The “Add Element” option is one of the most powerful features in the GoHighLevel store builder. It allows you to enhance your store’s layout by adding a wide variety of elements such as text boxes, forms, images, buttons, videos, and more.
- Drag and Drop Functionality: Once you select an element, you can simply drag and drop it into any section of your store. For example, you may want to add a promotional video to your hero section or insert a call-to-action button within your product feature area.
- Additional Options: In addition to basic elements, you can also add more complex content like sections, rows, global sections, and even section templates. Global sections are particularly useful if you want to replicate a specific section across multiple pages. This feature provides flexibility to build a store that caters to your specific business needs.
How it Helps:
The “Add Element” feature is essential for building a lively and interactive store layout. By adding custom elements, you can make your store feel more personal and reflect your brand identity. This not only enhances your store’s appearance but also creates a more engaging experience for your customers.
2. Layers
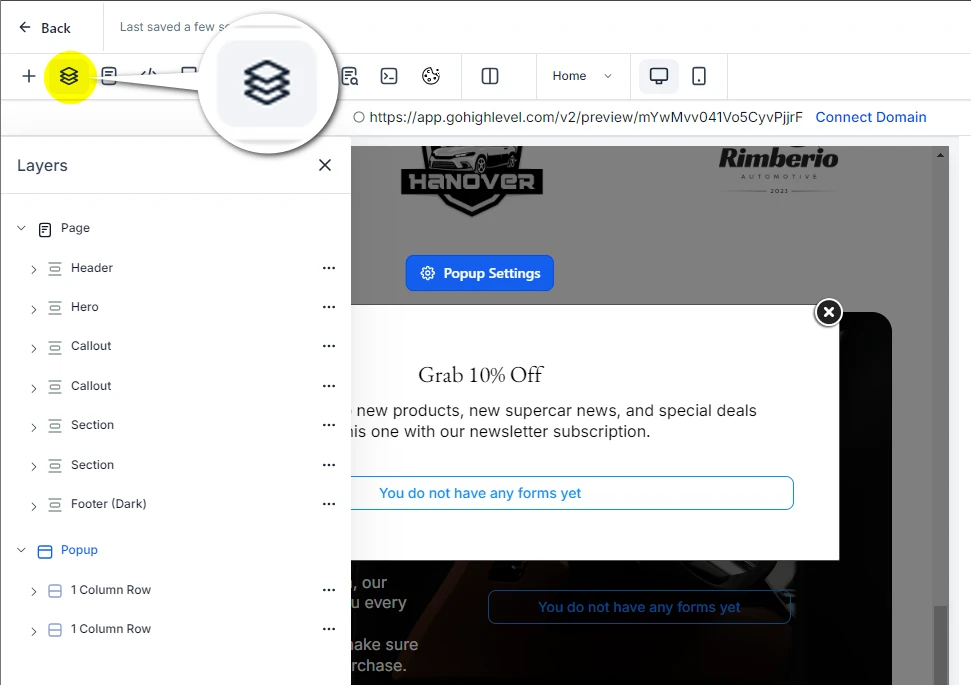
The Layers option offers a detailed, hierarchical view of all the sections, rows, and individual elements on your page. This feature makes managing your store’s structure incredibly easy, especially when dealing with complex layouts.
- View Structure: Click on the “Page” option, and you’ll see a detailed breakdown of your store’s structure—sections like the header, hero, callout, and footer will be listed. Each section can be expanded to show the individual elements within, such as images, buttons, or text blocks.
- Managing Popups: The “Popup” section works similarly. You can view all the elements in any active popups, helping you manage complex interactive components like forms or promotional messages.
- Reordering and Hiding Elements: You can rearrange elements by simply dragging them within the Layers panel. If you need to temporarily hide a section, you can do so directly from this panel without deleting it, which is useful when A/B testing different layouts.
How it Helps:
This feature helps you manage overlapping elements effectively. It’s especially useful for complex page designs. With this tool, you can easily organize and navigate through all the layers of your store. You’ll find it much simpler to keep everything in order!
3. Pages
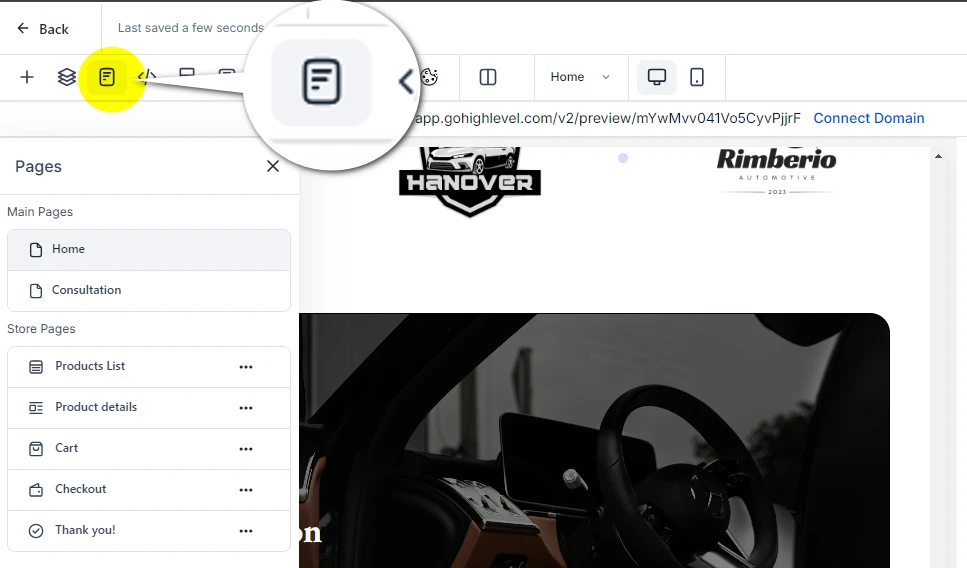
The Pages option is vital for managing multiple pages within your store, such as product listings, the shopping cart, and the checkout process.
- Switch Between Pages: This feature allows you to quickly switch between your store’s different pages, including Home, Consultation, Product List, Product Details, Cart, Checkout, and Thank You pages.
- Add or Remove Pages: You can also add new pages to your store or delete pages that are no longer necessary. Additionally, you can rearrange the page order, ensuring a logical and user-friendly flow for your customers.
How it Helps:
Managing multiple pages is crucial for any e-commerce store. This feature allows you to navigate easily through different sections of your store. You can also customize various aspects to ensure everything aligns with your business goals. By keeping your pages well organized, you can create a better experience for your customers.
4. Tracking Code
The Tracking Code option is critical for marketing and analytics. It allows you to insert third-party tracking scripts, such as Google Analytics, Facebook Pixel, or custom tracking codes.
- Conversion Tracking: By integrating tracking codes, you can monitor key performance metrics like conversions, page views, and user behavior. This data is invaluable for optimizing your store’s performance and running targeted advertising campaigns.
- Custom Scripts: If you’re using specialized tools like heat maps or customer behavior analytics, you can add the corresponding custom code in this section.
How it Helps:
Collecting accurate data with tracking codes is crucial for improving marketing strategies. It helps businesses understand customer behavior better. This understanding leads to more effective advertising campaigns. As a result, companies can achieve a higher return on investment (ROI) from their marketing efforts.
5. Custom CSS

If you want to have more control over how your store looks, the Custom CSS option is perfect for you. This feature lets you add advanced styles that go beyond the basic design options. You can personalize your store’s appearance and make it truly unique.
- Styling Rules: You can write specific CSS code to control things like fonts, colors, margins, and padding. This option is perfect for making unique design tweaks that aren’t available in the standard builder tools.
How it Helps:
Custom CSS offers flexibility for advanced users who seek greater design freedom. If you want to add custom animations or adjust the layout, this tool is perfect for you. With Custom CSS, your store can truly reflect your unique vision.
6. Typography (T)
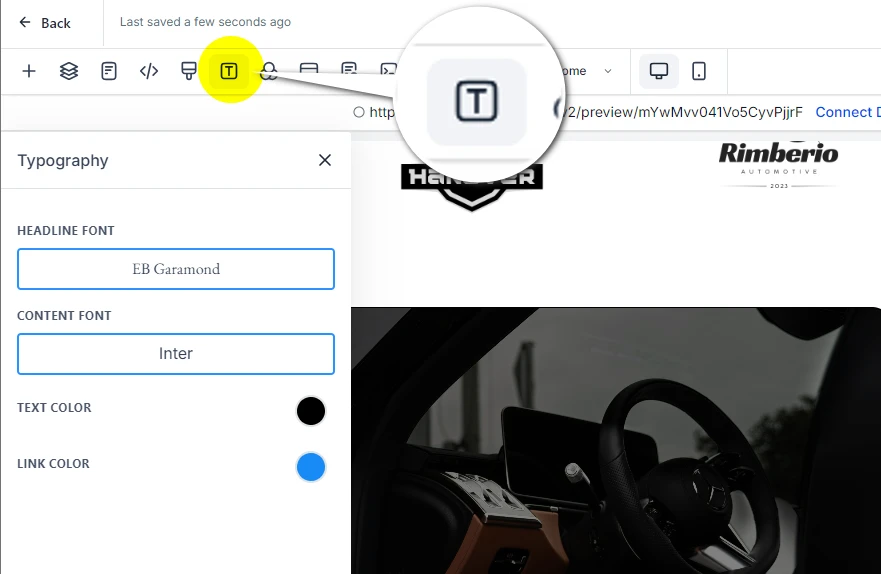
The Typography option is where you control the fonts and text styles used across your store.
- Manage Fonts and Styles: You can choose different fonts for headers, body text, and buttons. Additionally, you can adjust the font size, style (bold, italic), and color to ensure a consistent and appealing design.
- Consistency Across Pages: Using the typography settings, you can create a unified text style across all store pages, ensuring brand consistency.
How it Helps:
Typography is a crucial aspect of visual branding. The ability to control fonts and text styles ensures your store looks professional and maintains a cohesive design.
7. Background
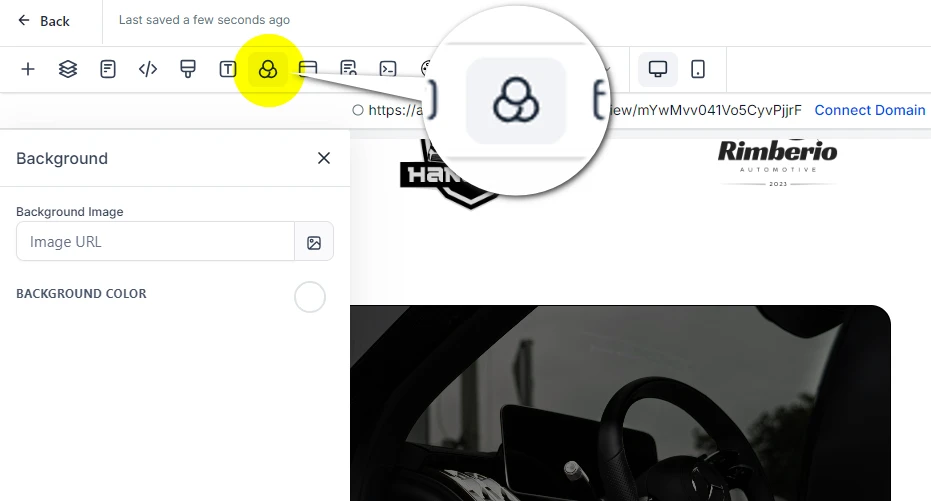
The Background option allows you to customize the background for your entire store or specific sections.
- Background Options: You can choose between a solid color, gradient, or image. This flexibility allows you to create a visually engaging backdrop that complements your products and overall branding.
- Section-Specific Backgrounds: If you want to highlight a particular section (e.g., the product feature area), you can apply a different background to make it stand out.
How it Helps:
A good background can greatly improve the look of your store. It helps highlight important areas and makes your shop more inviting. When customers enter, they should feel immersed in the shopping experience. A well-chosen background can make all the difference in drawing their attention to what matters most.
8. Popup Settings
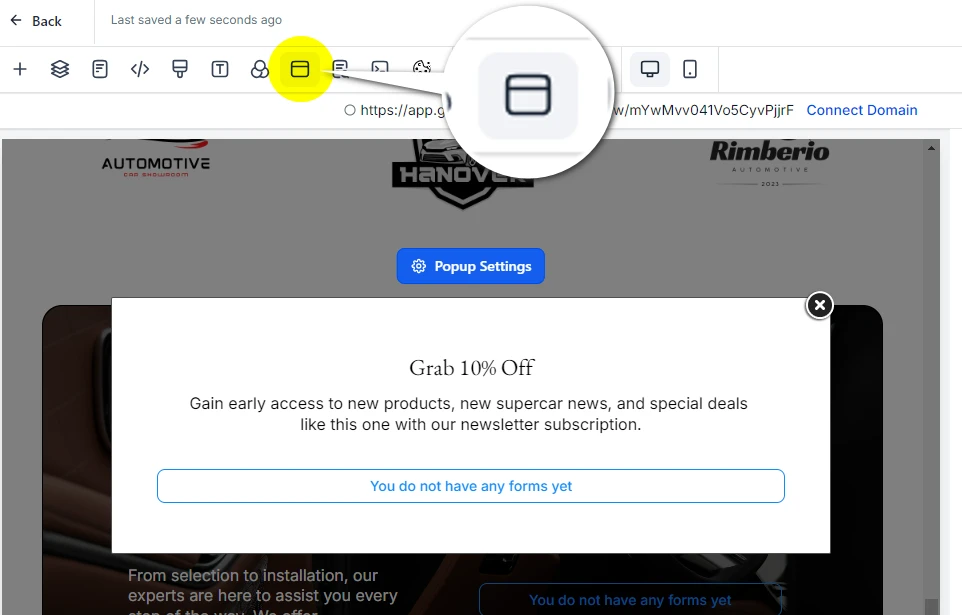
Popups are a powerful tool for capturing leads and promoting offers. The Popup Settings option helps you configure when and how these popups appear.
- Trigger Settings: You can set popups to trigger under various conditions, such as when a visitor scrolls a certain percentage of the page, attempts to exit, or after a specific time delay.
- Popup Content: Use popups to encourage newsletter sign-ups, promote special offers, or collect customer feedback.
How it Helps:
Well-timed popups can greatly increase your lead generation and sales. They can do this without being intrusive, which is a big plus. This option allows you to control how and when your pop-ups show up. By doing so, you can enhance user engagement and create a better experience for your visitors.
9. SEO Meta Data
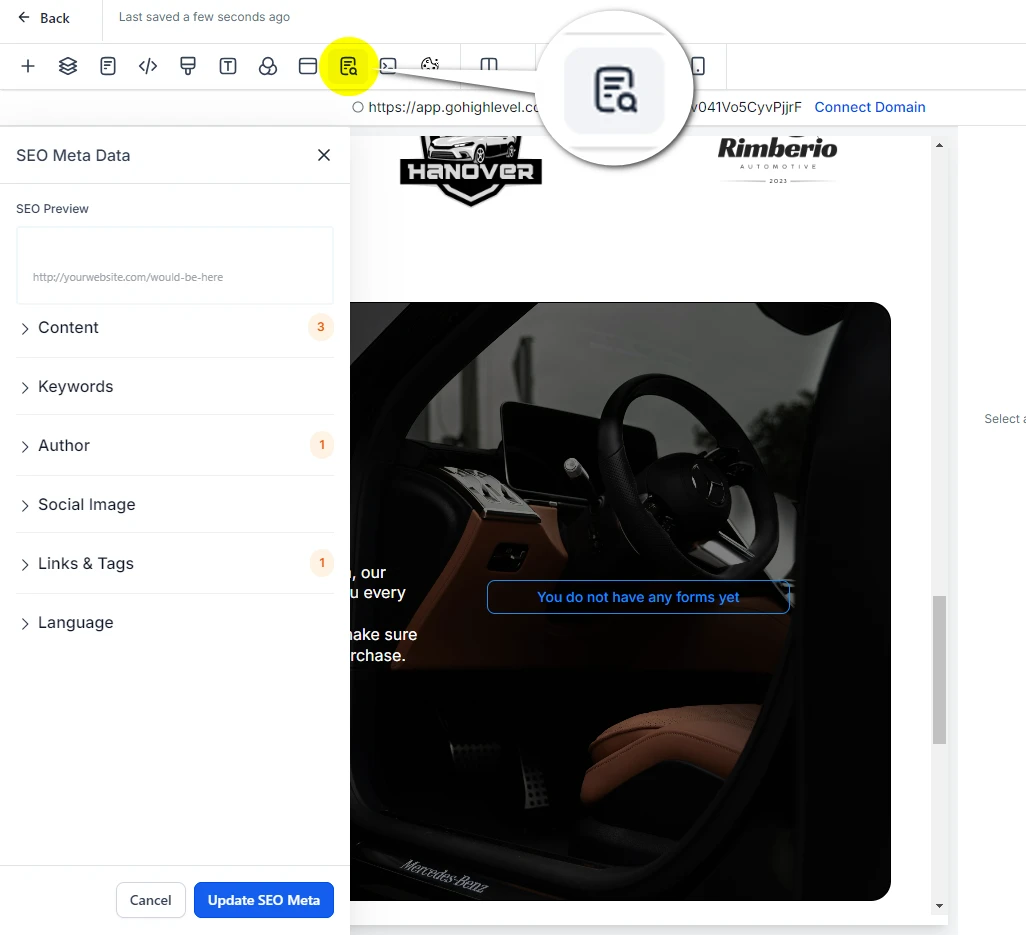
Optimizing your store for search engines is critical for attracting organic traffic. The SEO Meta Data section allows you to configure the title, meta description, and keywords for each page.
- Improve Search Rankings: Well-optimized meta data improves your store’s visibility on search engines like Google. Each page should have a unique title and meta description to rank for relevant keywords.
- Search Appearance: The meta description appears in search engine results, so make sure it’s compelling and relevant to increase click-through rates.
How it Helps:
SEO meta data ensures your store is easily discoverable by search engines, driving organic traffic and increasing your potential customer base.
10. Preview Custom Codes
The Preview Custom Codes option allows you to review any custom code you’ve added to your store (CSS, HTML, JavaScript) in real-time.
- Live Preview: This feature ensures that all your customizations are functioning properly without errors. It’s particularly useful when implementing advanced design or functionality tweaks.
How it Helps:
Previewing your custom code helps you catch any issues before publishing, ensuring that your store runs smoothly and looks professional.
11. Cookie Consent
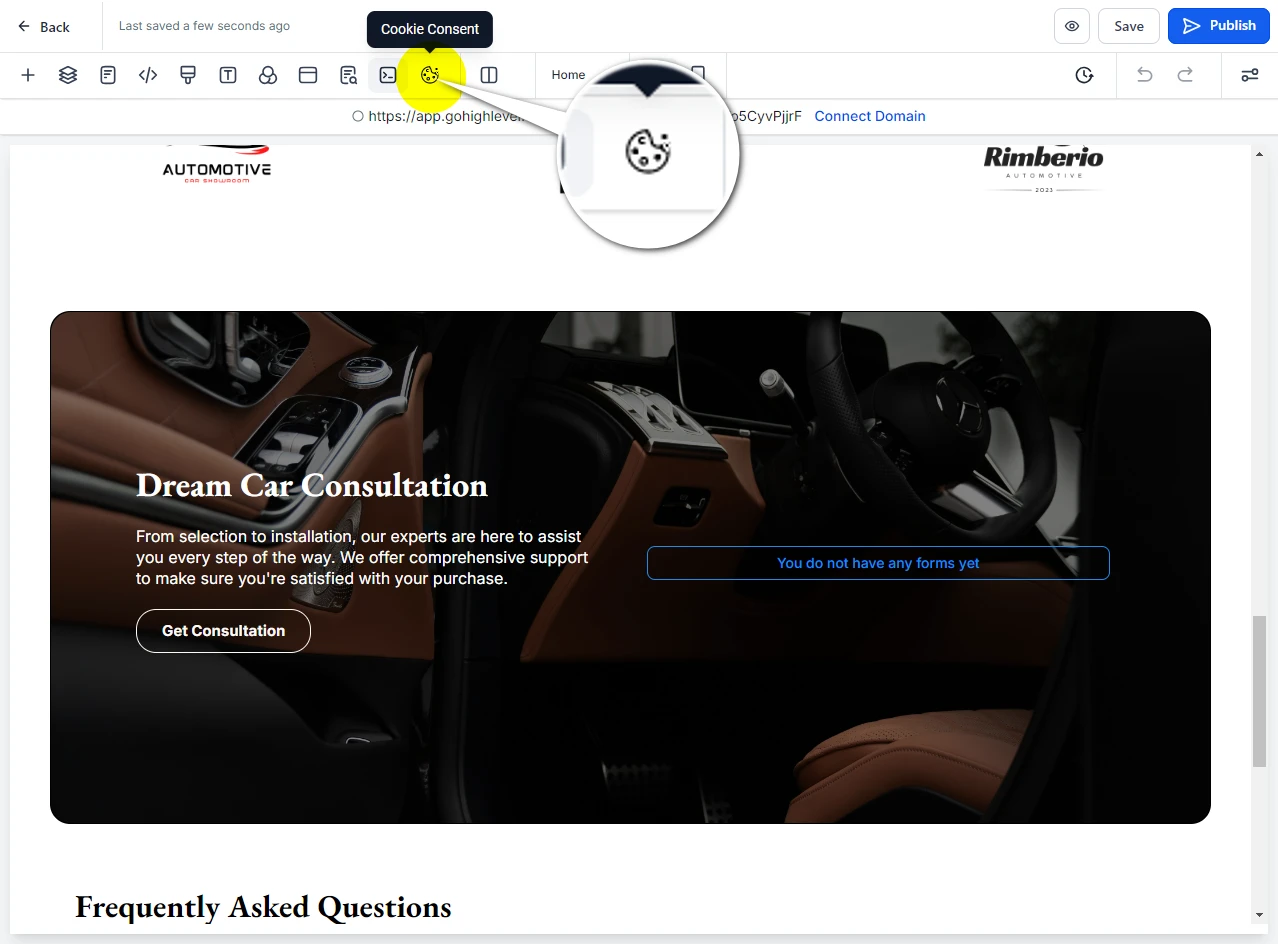
Compliance with privacy laws like GDPR is critical for any online store. The Cookie Consent option allows you to set up a cookie banner that informs users about cookie usage.
- Customizable Banner: You can adjust the banner’s text, style, and behavior to match your store’s branding. For example, you might allow users to accept or customize their cookie preferences.
How it Helps:
Ensuring compliance with privacy laws protects your business from legal issues and enhances customer trust.
General Tips for Using the Design Panel
Now that you have an overview of the different options in the design panel, here are some helpful tips for customizing your store.
First, remember that you can edit the style of each section or element. This includes images, text, and buttons. You can adjust the font, color, size, and spacing to match your brand’s visual identity. This level of customization ensures every part of your store reflects your brand’s personality and appeals to your target audience.
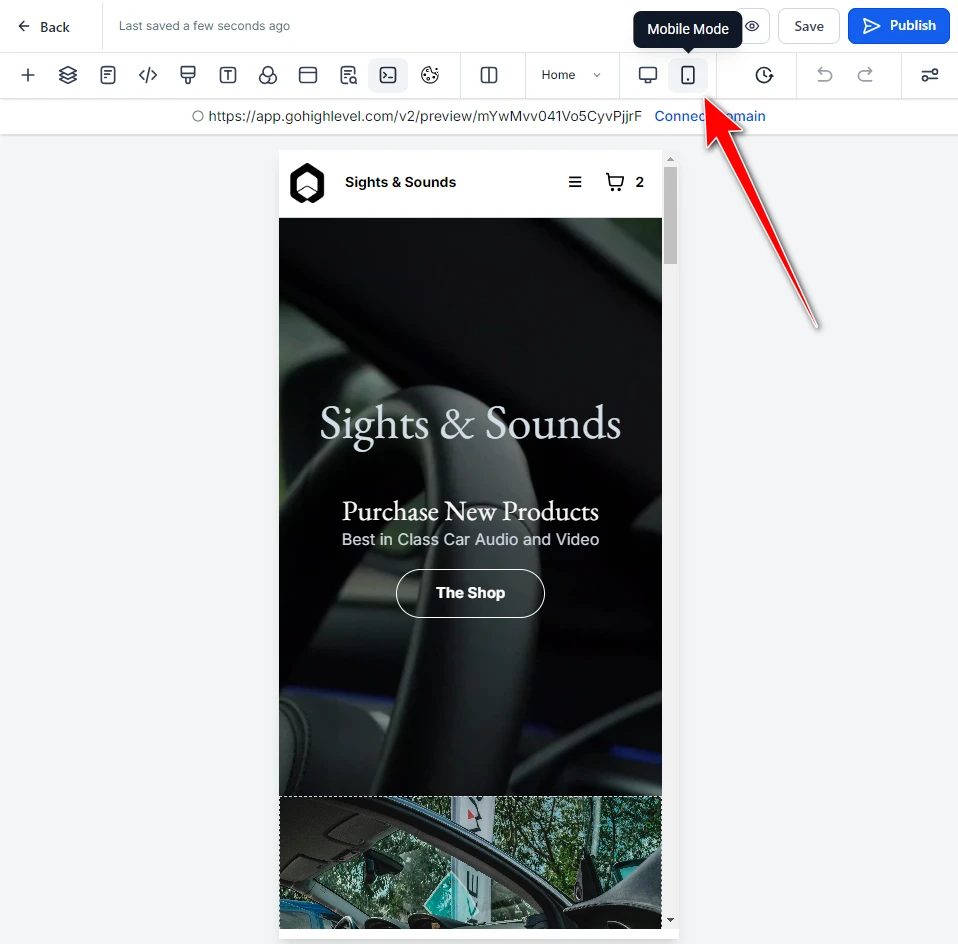
Next, don’t forget about Mobile Optimization. It’s crucial that your store looks great on both desktop and mobile devices. GoHighLevel typically offers a mobile view option, allowing you to preview and customize how your store appears on mobile. Since many customers shop using their mobile devices, optimizing for mobile is key to providing a seamless shopping experience.
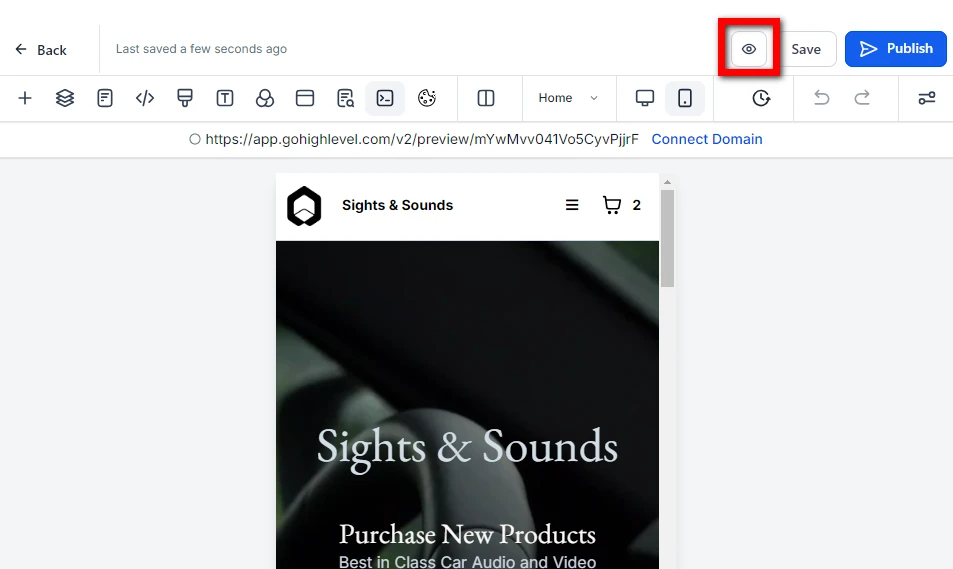
After making your customizations, click the “Preview” button. This feature lets you see how your store will look before it goes live. It’s a great way to catch any errors or make final adjustments.
When you’re satisfied with everything, click “Publish” to make your store available to your audience.
You will need to add a domain for your store when you click the “Publish” button. If you already have a domain, just enter it and click “Save” to publish your store.
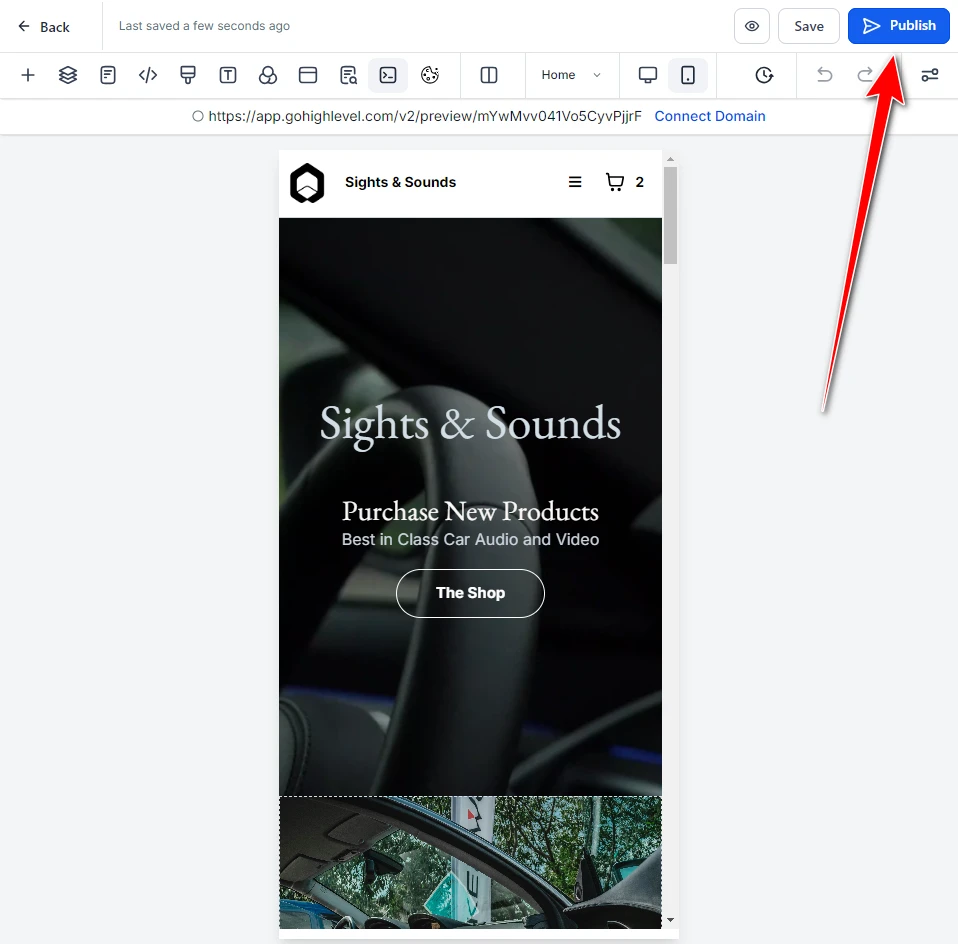
If you don’t have a domain yet, start by clicking the pencil icon next to “Add/Edit Domains.” This will open a new tab where you can set up your store domain. You can register a new domain or configure an existing one to point to your store.
Having a custom domain adds professionalism to your brand and makes it easier for customers to find you online.
By following these steps, you can customize the template to fit your brand and products. Taking advantage of the customization options will ensure that your e-commerce store not only looks great but also offers a user-friendly experience. This encourages customers to explore your products and make purchases.
How to Create a Product and Add It to Your GoHighLevel E-Commerce Store
Now that your GoHighLevel store is fully set up and customized, it’s time to add products for your customers to browse and buy. This process is straightforward, but it’s important to pay close attention to detail. This is especially true if you’re dealing with physical inventory, product variants, or multiple collections. Let’s go through the entire process of creating a product step by step.
If your business also handles contracts or agreements, make sure to learn how to set up e-signatures by following our How to Set Up E-Signatures in GoHighLevel – A Step-by-Step Guide.
Step 1: Accessing the Product Creation Page
First, you need to navigate away from the store editor and access the product management section. Here’s how:
- Exit the Editor: Leave the store builder and return to your sub-account dashboard.
- Payments Tab: On the left-hand menu, click on the Payments tab. This will take you to the payment settings and product management page.
- Products Section: Once on the Payments page, hover over the Products section. You’ll see several options appear, including Products, Collections, and Inventory.
- Select Products: Click on the Products option, which will take you to a page where you can view all existing products. Since we are working with a demo store that doesn’t have any products yet, this page will be empty.
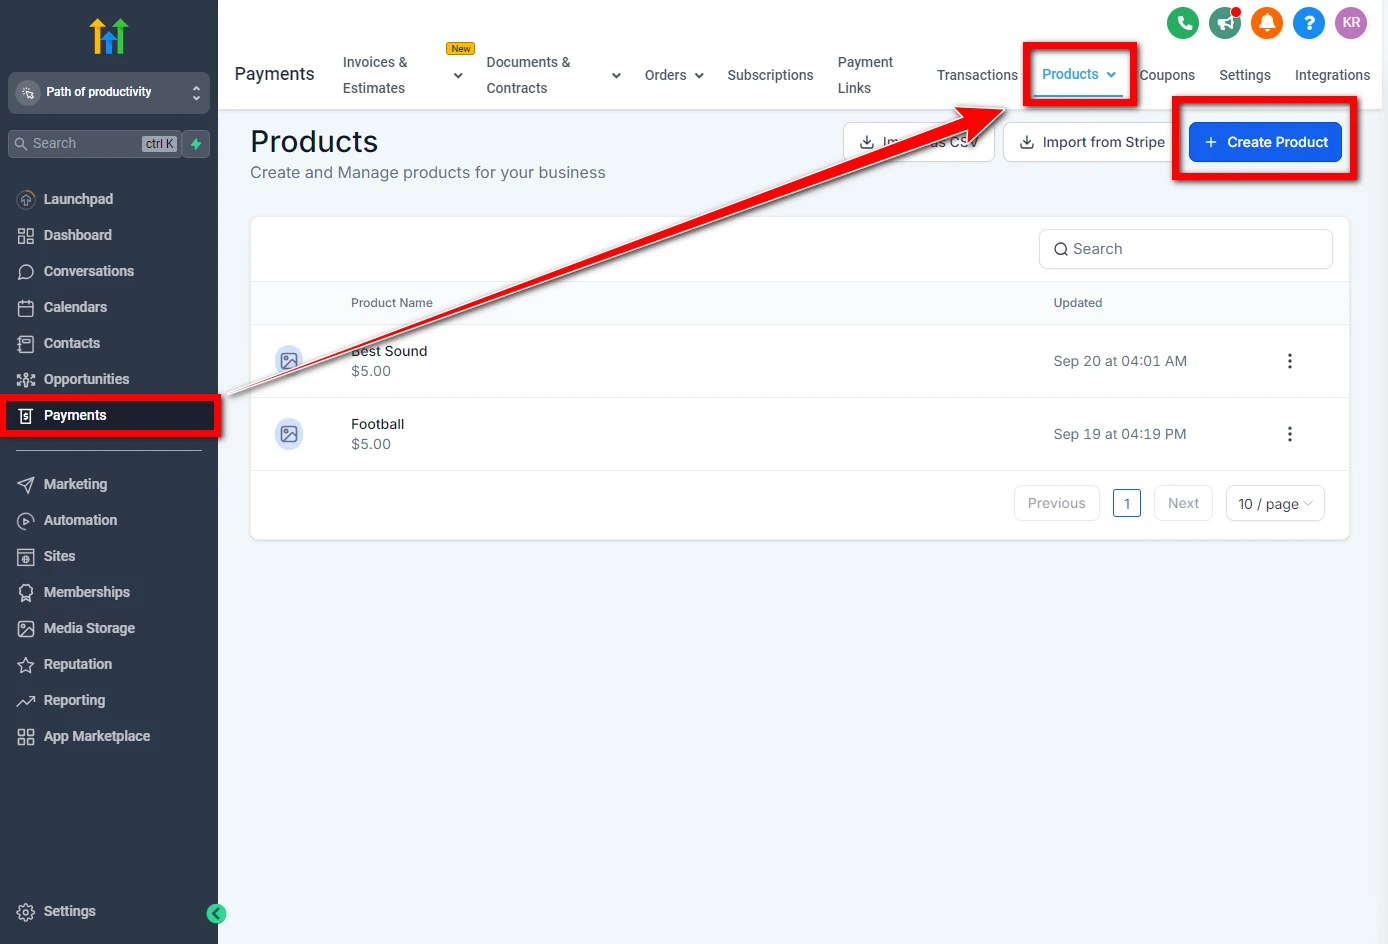
To add your first product:
- +Create Product Button: Click the +Create Product button, either at the center of the page or in the top-right corner. This will open the product creation page.
Step 2: Enter Product Information
Now that you’re on the product creation page, the first section you need to fill out is the Product Information section. Here’s what each field means and how to fill it out effectively:
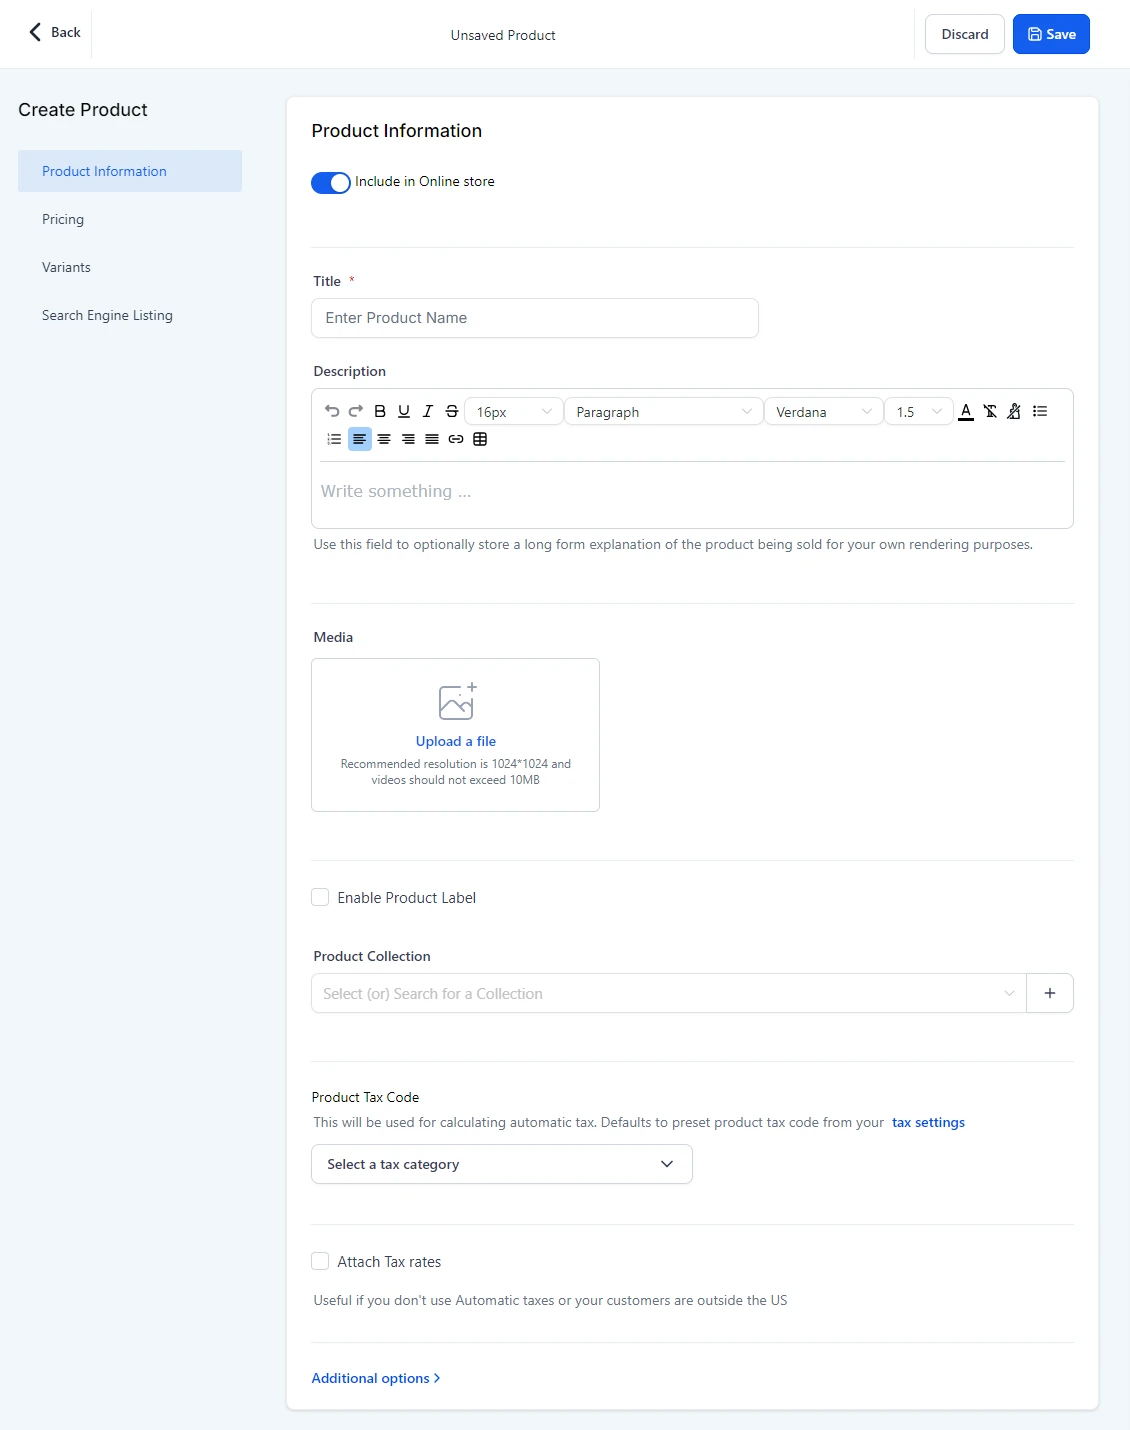
Include in Online Store
This is a toggle switch that determines if your product will be visible in your online store.
- Toggle ON: Make sure this is enabled if you want your product to show up on your storefront. If you disable this option, your product won’t appear in the store’s listings.
This step is crucial, so be sure it’s turned on before moving on to other details.
Title
The title is the name of your product and is one of the most important pieces of information you’ll provide.
- Best Practices: Your title should be clear, concise, and descriptive. If you’re selling different variations of a product, like sizes or colors, make sure the title represents the main product name (e.g., “Wireless Bluetooth Earbuds”).
- SEO Tip: Use relevant keywords that customers might search for. For instance, if your store specializes in tech accessories, include terms like “Wireless Earbuds with Noise Cancellation.”
Description
The description field allows you to provide a detailed explanation of your product’s features, specifications, and benefits.
- Formatting: You can format the text with different font styles, sizes, and paragraph breaks, making the content visually appealing and easy to read. Use bullet points for specifications and highlight key features.
- SEO Optimization: This section is also essential for SEO (Search Engine Optimization). Include relevant keywords naturally in the product description, such as the product category, features, and brand name.
Example: “Experience high-quality sound with our latest Wireless Bluetooth Earbuds. Featuring noise cancellation, ergonomic design, and a battery life of up to 24 hours, these earbuds are perfect for music lovers on the go.”
Media
The media section allows you to upload images or videos that represent your product.
- Images: High-quality images are crucial for showcasing your product. Upload images with a resolution of at least 1024×1024 pixels. Ensure the images highlight different angles and features of the product.
- Videos: Videos are highly engaging and can offer a more immersive product demonstration. If uploading a video, ensure the file size doesn’t exceed 10MB.
Best Practices:
- Use professional-quality images.
- Ensure that the first image is the most eye-catching, as it will be the thumbnail on product listings.
Enable Product Label
Product labels are a useful feature if you want to categorize or highlight specific products with tags like “New”, “Best Seller”, or “Limited Stock”.
- When to Use: Labels are especially helpful during promotions or when launching new products. Customers are more likely to click on items marked with attention-grabbing labels.
Product Collection
Collections allow you to categorize your products. For example, you might create collections like “Car Speakers”, “Head Units”, or “On Sale”.
- Why It’s Important: Assigning products to collections makes it easier for customers to find what they need in your store. For example, if someone is looking for car audio equipment, they can browse all the related products in that collection. This way, they won’t have to sift through unrelated items. Making shopping simpler helps improve the overall customer experience.
Product Tax Code
This section helps you set a tax category for automatic tax calculation.
- Automatic Calculation: Depending on the country or region settings, tax will be calculated and applied based on the product category.
- Manual Tax Rates: If your store doesn’t use automatic tax rates or if you’re selling to customers outside the U.S., you can attach tax rates manually.
Step 3: Set Product Prices
The next section is where you configure your product’s pricing. Here’s a breakdown of the key fields:
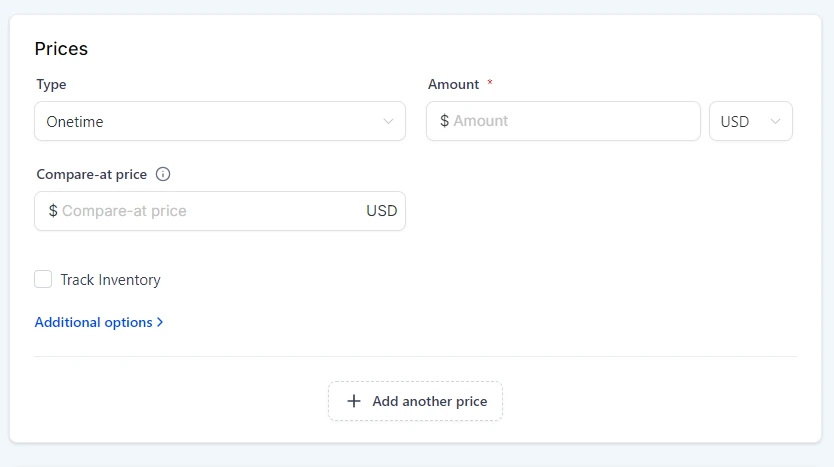
Type
This drop-down menu lets you select the pricing model for the product:
- One-Time Payment: This is for products sold as a single purchase.
- Recurring Payment: If your product is a subscription service or requires recurring billing (e.g., software or memberships), select this option.
Amount
This is the field where you enter the product’s base price.
- Tip: If you’re selling internationally, make sure the amount is displayed in the correct currency for each target region. You can set specific prices for different currencies if necessary.
Compare-at Price
The Compare-at Price allows you to display a higher regular price next to a discounted price. This is particularly useful for promotions and sales.
- Use Case: Let’s say your product usually costs $100. If you offer it at a sale price of $75, the original price of $100 will be shown crossed out. This clearly shows customers the discount they are getting.
Track Inventory
If you want to manage inventory levels for this product, enable the Track Inventory checkbox.
- Stock Management: This is essential for physical goods to ensure you’re not overselling items that are out of stock. You can set specific stock levels, and GoHighLevel will automatically update the availability as products are sold.
Step 4: Add Product Variants
If your product has different versions, like various sizes, colors, or materials, you can set up variants. Each variant can have its own price, SKU (Stock Keeping Unit), and inventory level.

To add a new variant, simply click the +Add Variant Button. You’ll be able to specify the name of the variant, such as the size or color. After that, you can assign unique pricing and inventory levels for each variant.
Example:
If you’re selling car audio systems, you can create variants for different types, like Standard, Premium, and Bluetooth options. Each variant can have its own price and inventory level based on the features it offers.
If you’re a coach using GoHighLevel, check out our Ultimate Guide To Using Go High Level As A Coach to make your work easier.
Step 5: Optimize Your Search Engine Listing
The Search Engine Listing section is all about making your product page friendly for search engines like Google. This step is vital for attracting organic traffic to your page.
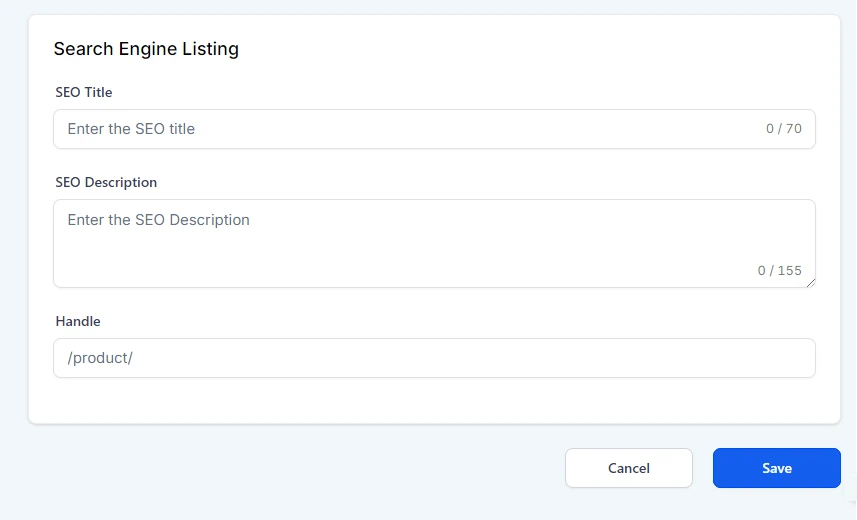
SEO Title
The SEO title is the headline that shows up in search engine results. To help your product rank well, use relevant keywords. Keep it concise and focus on the most important keywords related to your product. For example, you could use something like “Wireless Bluetooth Earbuds with Noise Cancellation.”
SEO Description
The SEO description, or meta description, appears below the title in search results. It should provide a short and engaging summary of your product.
Remember, this field is limited to 155 characters. Make sure to include keywords and a call to action. For instance, you might say, “Buy high-quality wireless earbuds with noise cancellation. Perfect for music lovers!”
Handle
The handle is the unique URL for your product page. It is automatically created based on your product title, but you can change it for better SEO.
For example, if your product is called “Wireless Bluetooth Earbuds,” the handle might look like this: “/wireless-bluetooth-earbuds.”
Step 6: Save or Discard Changes
After you’ve filled out all the product details, you’ll see two buttons at the bottom of the page.
- Save: Click this button to save the product to your store.
- Discard: If you want to start over or decide not to keep the current changes, click Discard. This will remove all the information you’ve entered.
Make sure to choose the right option based on your needs!
Step 7: Verify the Product in Your Store
After you save the product, it’s important to check that it has been successfully added to your store.
- Go to the Site Tab: First, navigate to the Sites tab located in the left menu of your sub-account dashboard.
- Open the Store Section: In this section, you will find the various pages that make up your e-commerce site. Look for the Product Details page.
- View the Product: Click on the Product Details page. This will allow you to see if your newly added product is visible and displaying correctly.
You should see all the details you entered earlier, such as the title, description, images, and price. Make sure everything looks good!
Conclusion
Building an e-commerce store can be simple and quick. With GoHighLevel’s user-friendly platform, you can easily create a professional online store. You can customize every part of it to match your brand and manage your product listings with ease.
Follow this step-by-step guide, and you’ll be on your way to reaching a global audience and boosting your sales potential.
Remember, a successful online store relies on regular updates, engaging product descriptions, and excellent customer service.
Start your e-commerce journey today with GoHighLevel, and watch your business thrive in the digital marketplace!