In today’s digital world, building a successful online community is essential. It’s not just a trend; it’s a necessity. For businesses looking to engage customers or educators aiming to promote collaboration, the right platform can make a big difference. One great option is GoHighLevel Communities. This powerful feature is part of the GoHighLevel CRM system. It allows you to easily create private, customizable communities.
In this comprehensive blog, we’ll explain what the GoHighLevel community feature is, highlight the key features and benefits of using it, show you how to set up your own community in GoHighLevel, and demonstrate how to effectively use the community you’ve created. So, get ready to unlock new levels of engagement!
What is GoHighLevel’s Community Feature?
GoHighLevel’s Communities feature allows you to create private, customizable spaces for communication, collaboration, and networking. You can set up groups for your internal teams or provide a space for clients and prospects to connect. This feature offers the flexibility and tools needed to build tailored community spaces.
Think of it as a virtual gathering space. It’s where your team, clients, and potential leads can come together. In this space, they can share ideas, ask questions, and collaborate on projects. It’s like having a private social media platform or forum that is built right into your CRM.
Key Features of GoHighLevel’s Community
Some of the key features that make GoHighLevel’s Community stand out are:
- Group Creation: You can easily create dedicated groups or channels for specific topics or projects. This helps in organizing discussions and keeping everything focused.
- User Profiles: Each member has the option to create their own profile. This fosters connections and helps everyone get to know each other better.
- Custom Domains: You can use your own domain name. This feature allows you to brand your community in a way that reflects your identity.
- Rich Content Support: The platform supports various types of content. You can share text, images, videos, and more to keep members engaged and informed.
- Seamless Onboarding: Inviting new members is straightforward. You can use easy-to-use invitation links so new users can join your community quickly.
- Included in All Plans: The community feature comes at no extra cost. It’s available to all users, no matter which subscription plan you choose.
These features make GoHighLevel Communities a great tool for enhancing communication and collaboration among members.
To learn more about how the Client Portal differs from other features, check out our detailed comparison: Go High Level Client Portal vs Memberships – What is The Difference?
How GoHighLevel Communities Can Benefit Your Business
The GoHighLevel Communities feature offers many advantages for businesses and agencies. It helps improve engagement and builds stronger connections with team members and clients. Here are some key benefits:
1. Enhanced Collaboration
With GoHighLevel Communities, you can easily create different groups or channels for specific teams or client projects.
For instance, set up a channel for your marketing team to collaborate on campaign strategies. You can also create a sales channel to track leads effectively.
Additionally, you can invite clients to these channels. This keeps them informed about their projects and allows you to provide real-time updates.
2. Branding Opportunities
Custom domains and user profiles offer great branding opportunities. By using your own domain name, your community becomes easily recognizable. This helps align with your overall branding strategy.
When your community has a professional appearance, it builds trust among members. They feel more comfortable interacting in a space that feels familiar. Overall, these elements contribute to a stronger community experience.
3. Community Building
Creating a strong sense of community among clients and team members is essential in today’s digital world. GoHighLevel Communities provides a space where users can connect, share ideas, and learn from each other.
This approach not only boosts client satisfaction but also enhances team collaboration. When everyone is engaged and sharing, productivity tends to improve. Building these connections helps everyone thrive.
4. Seamless User Experience
Onboarding new members is easy with GoHighLevel Communities. Just send an invite link, and new users can join right away.
Once they join, they can create their profiles and start participating in discussions immediately. There are no technical barriers or complicated steps involved, making the process smooth and straightforward.
5. Content-Rich Interactions
GoHighLevel Communities makes it easy to share project updates with clients and discuss strategies with your team.
You can use different types of content, including text, images, and videos. This variety helps create dynamic and engaging discussions. By going beyond just text-based communication, you can foster better interactions and collaboration.
How to Set Up a GoHighLevel Community
Setting up a community in GoHighLevel is a simple process. You can create a dedicated space for your team and clients to collaborate in just a few steps.
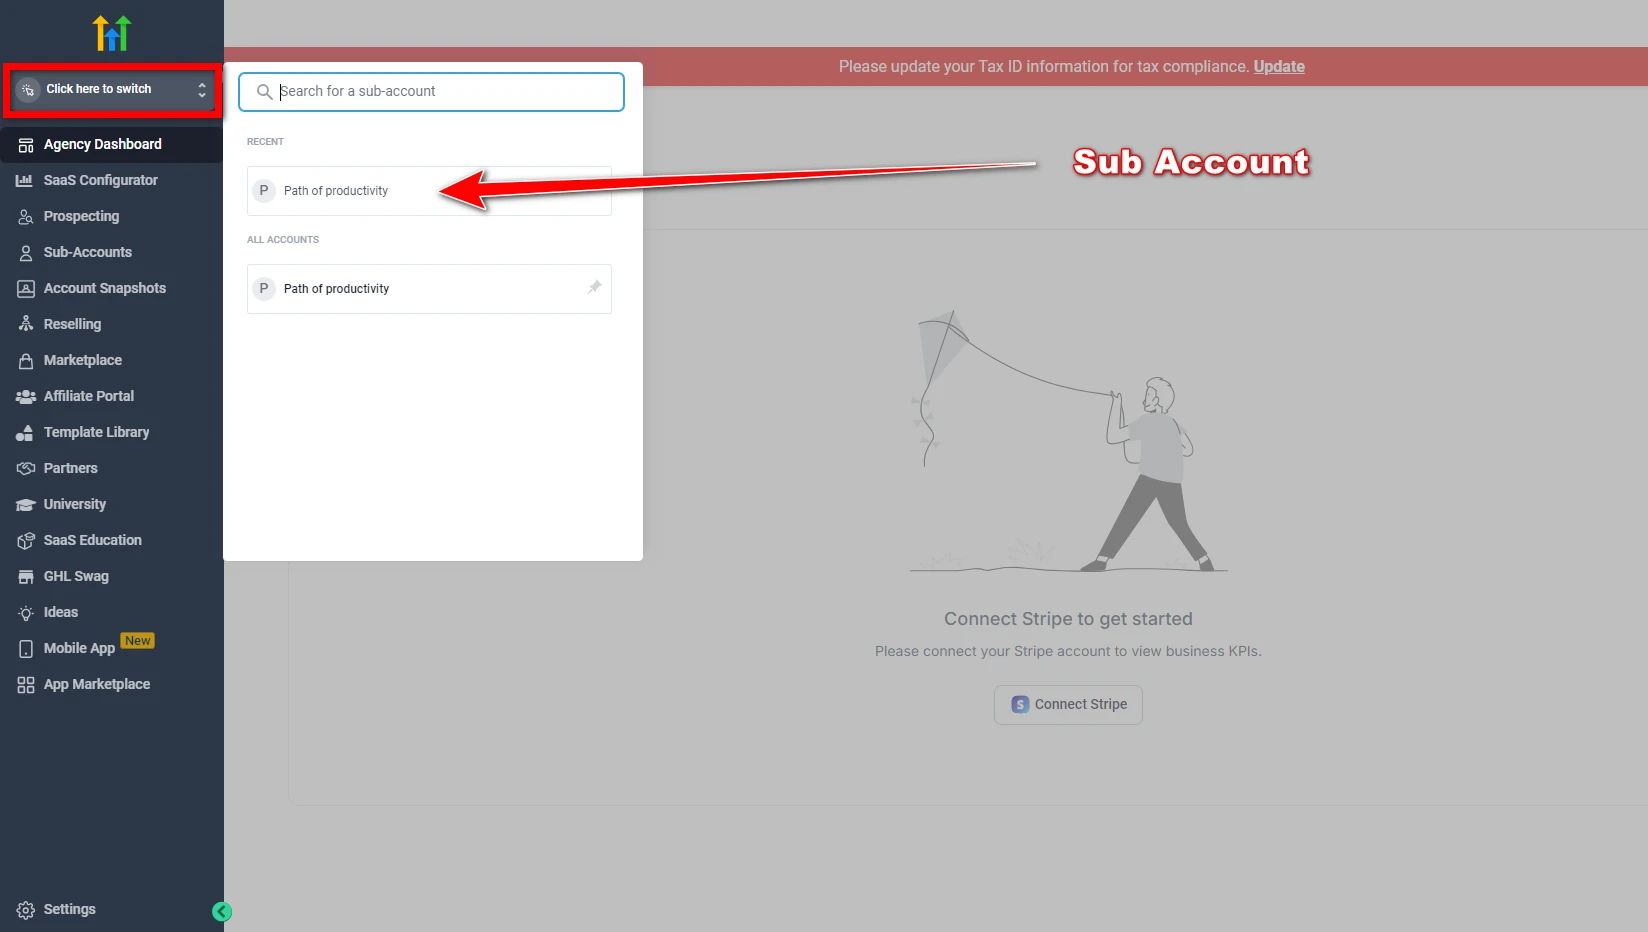
Step 1: Navigate to Your Sub-Account
First, log into your GoHighLevel account. Next, select your sub-account. Look for the “Click here to switch” option at the top of the left-hand menu and click on it. This will help you view and switch between your sub-accounts easily. Once you’ve chosen the right sub-account, you’re all set to start setting up your community.
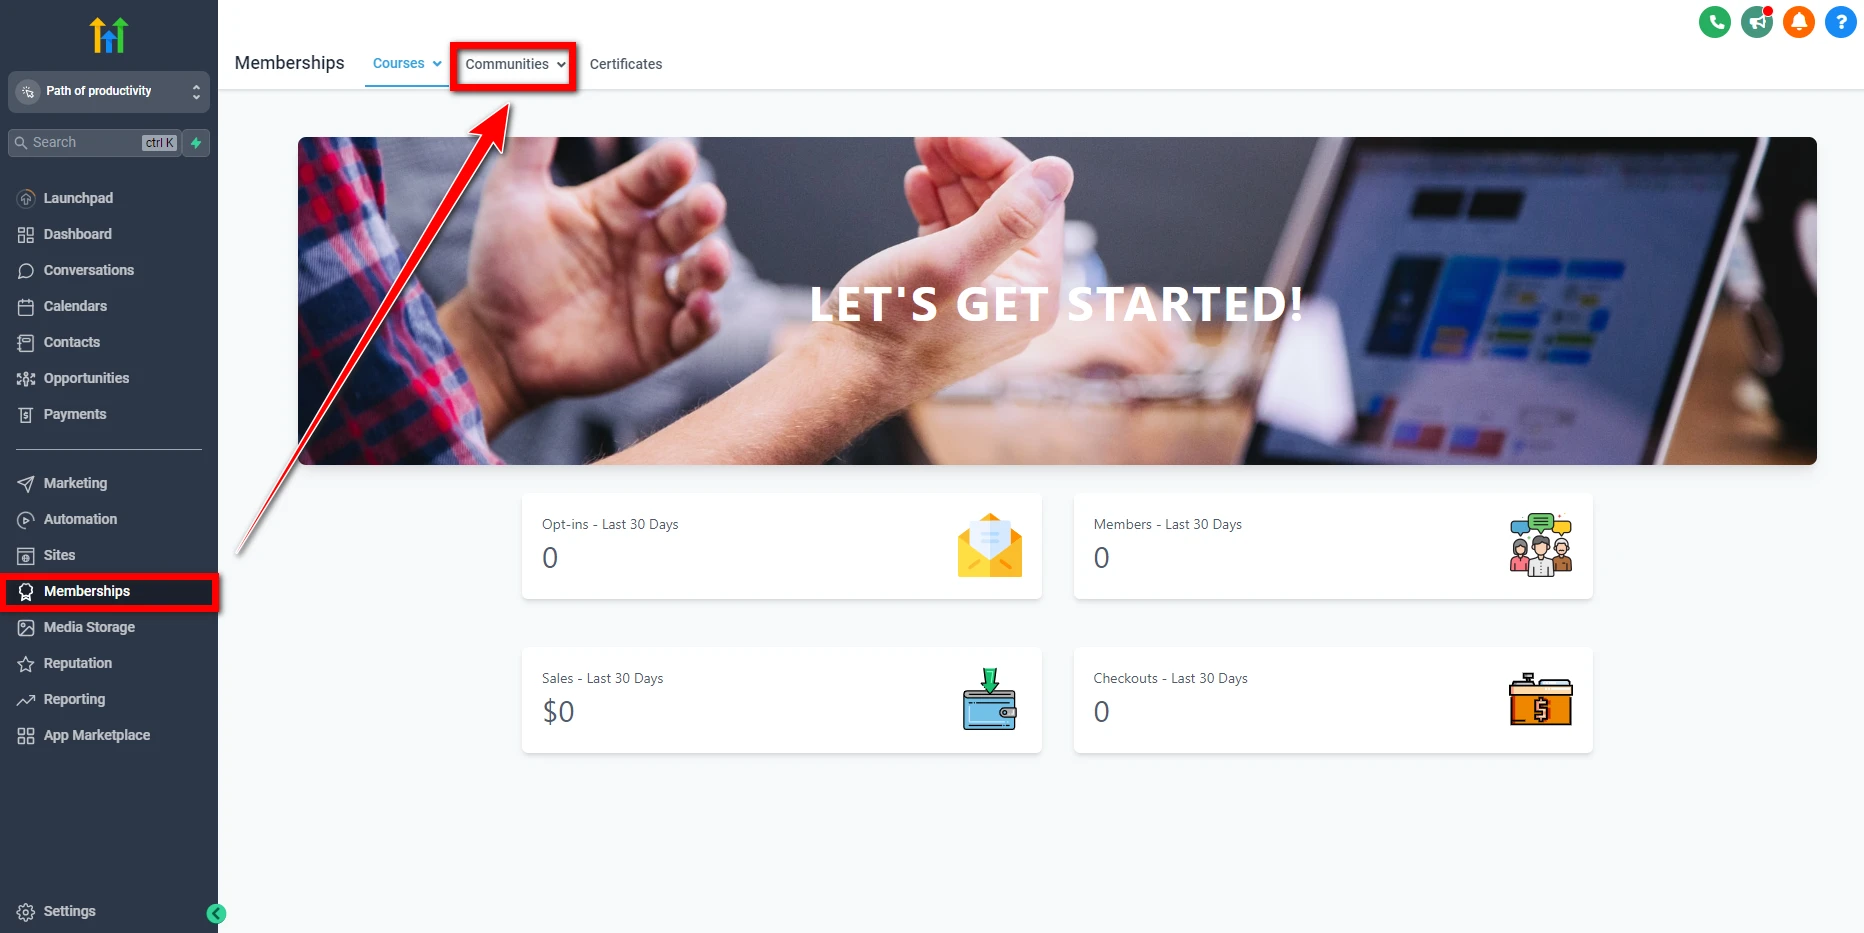
Step 2: Access the Memberships Tab
After switching to your sub-account, look for the Memberships tab in the left-hand menu. Scroll down until you find it and click on it. This will take you to the membership page, where you can start building your community.
On this page, you’ll see the “Communities” option. This is where you can manage all your community groups.
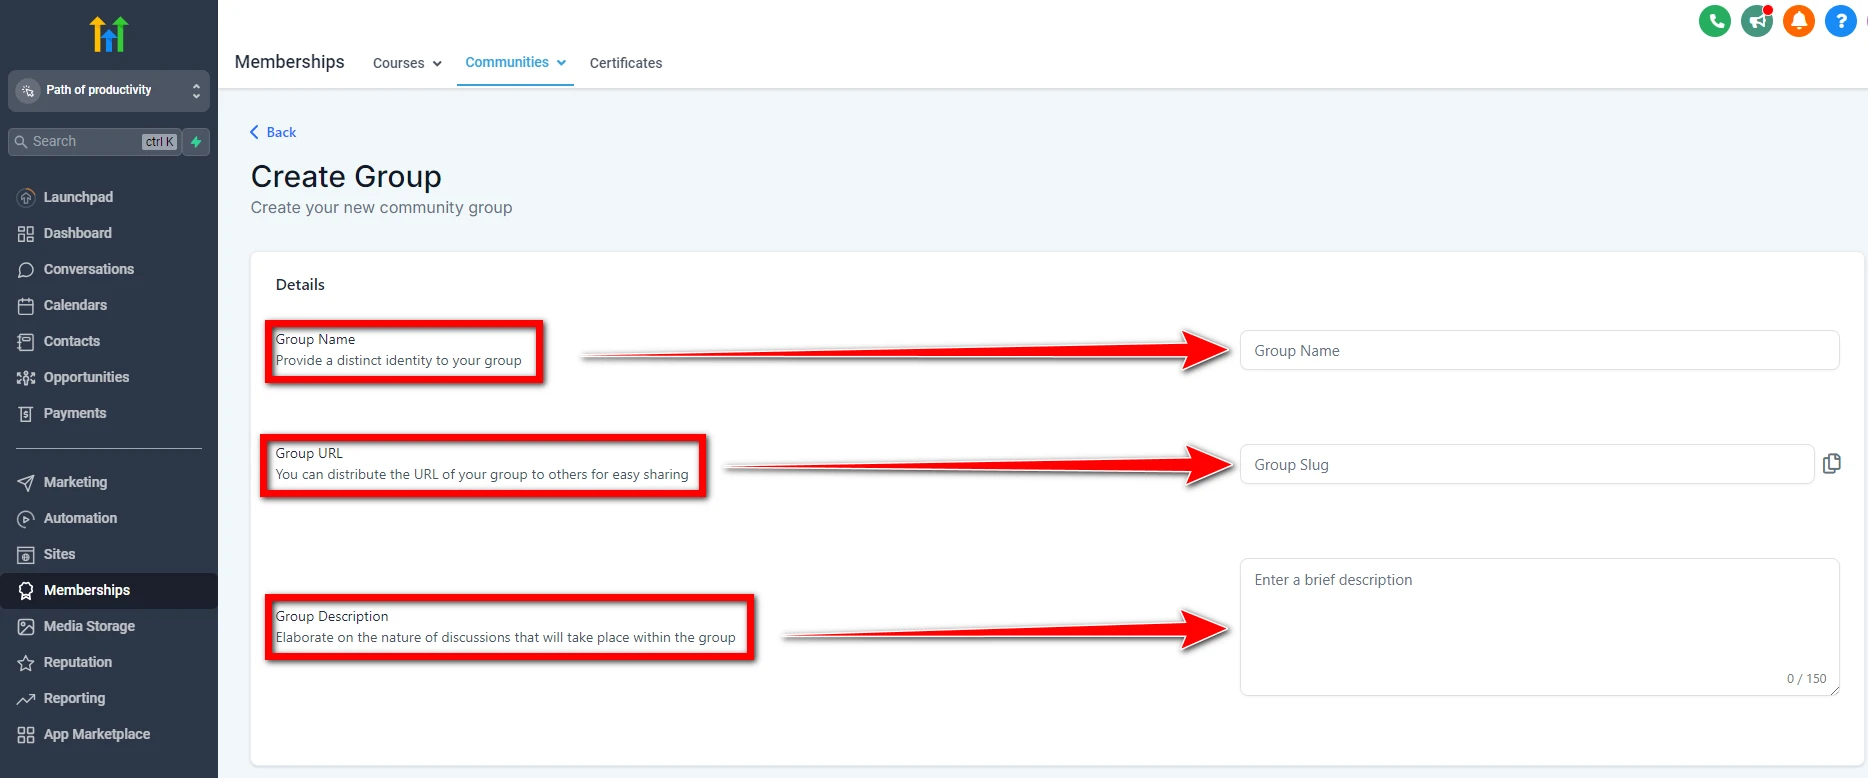
Step 3: Create Your Group
Now that you’ve accessed the Communities section, click the Create Group button to start building your community group. A form will pop up, prompting you to enter key information about your group.

- Group Name: Choose a unique and descriptive name that accurately reflects the purpose or theme of your community. This will help potential members understand the group’s focus and attract the right audience.
- Group URL: The system will automatically generate a URL based on your group name. You can modify this URL to make it more user-friendly or relevant to your community’s purpose.
- Group Description: Provide a brief overview of what your community is about. Keep it clear and concise to attract interested members.
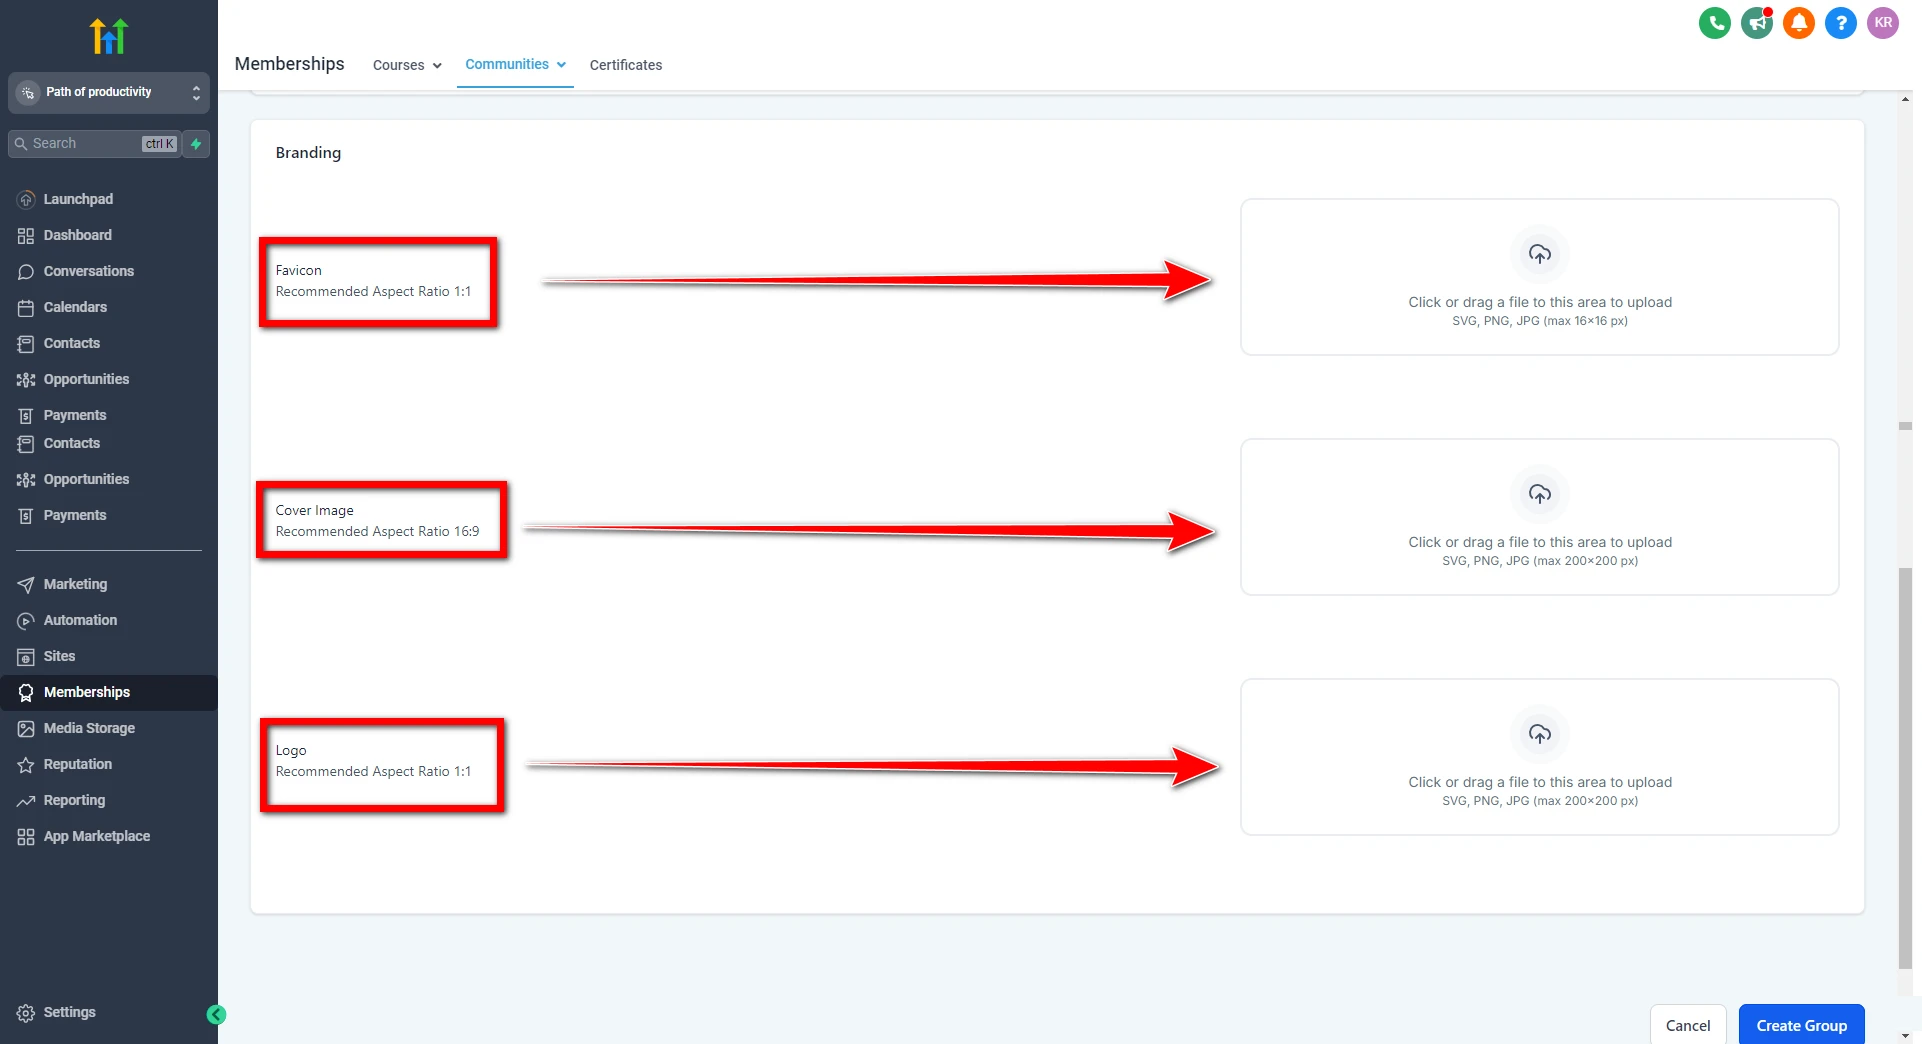
Step 4: Customize Your Branding
To give your community a professional look and feel, GoHighLevel allows you to upload custom branding elements, such as a favicon, cover image, and logo. These visual assets help distinguish your community and reinforce your brand identity.
- Favicon: A 16×16-pixel icon that appears in the browser tab when someone visits your community page.
- Cover Image: A larger image that appears at the top of your community page (recommended size: 200×200 pixels).
- Logo: Your community’s logo, which should be 200×200 pixels.
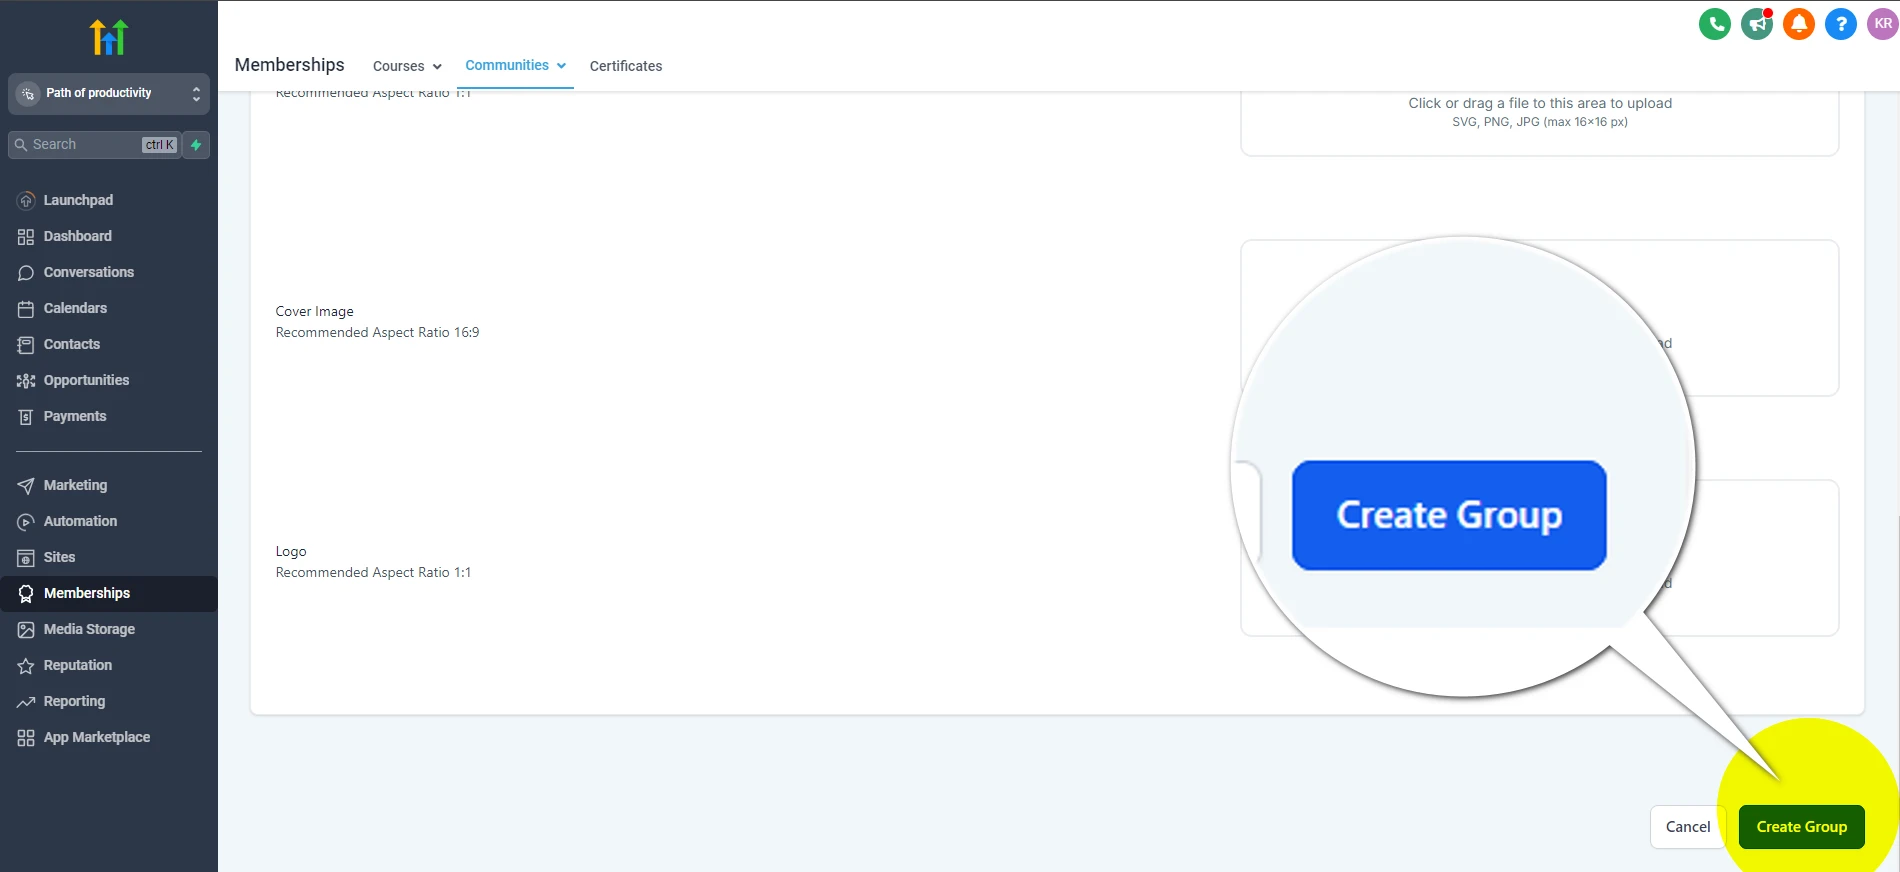
Step 5: Finalize and Launch Your Community
After you’ve filled out the required information and customized your branding, click on Create Group to start your new community.
Next, you’ll be asked to set a password for your community. This step is important for controlling who can access your group and ensuring its security.
Step 6: Share the Group URL and Start Inviting Members
Now that your community is live, it’s time to invite members! Share the unique URL you created. With just a click on the link, potential members can join and set up their profiles easily. This simple onboarding process makes it effortless to grow your community.
If you’re interested in expanding your services, explore our How to Create an E-Commerce Store in GoHighLevel to complement your community with an e-commerce solution.
Community Group Interface in GoHighLevel
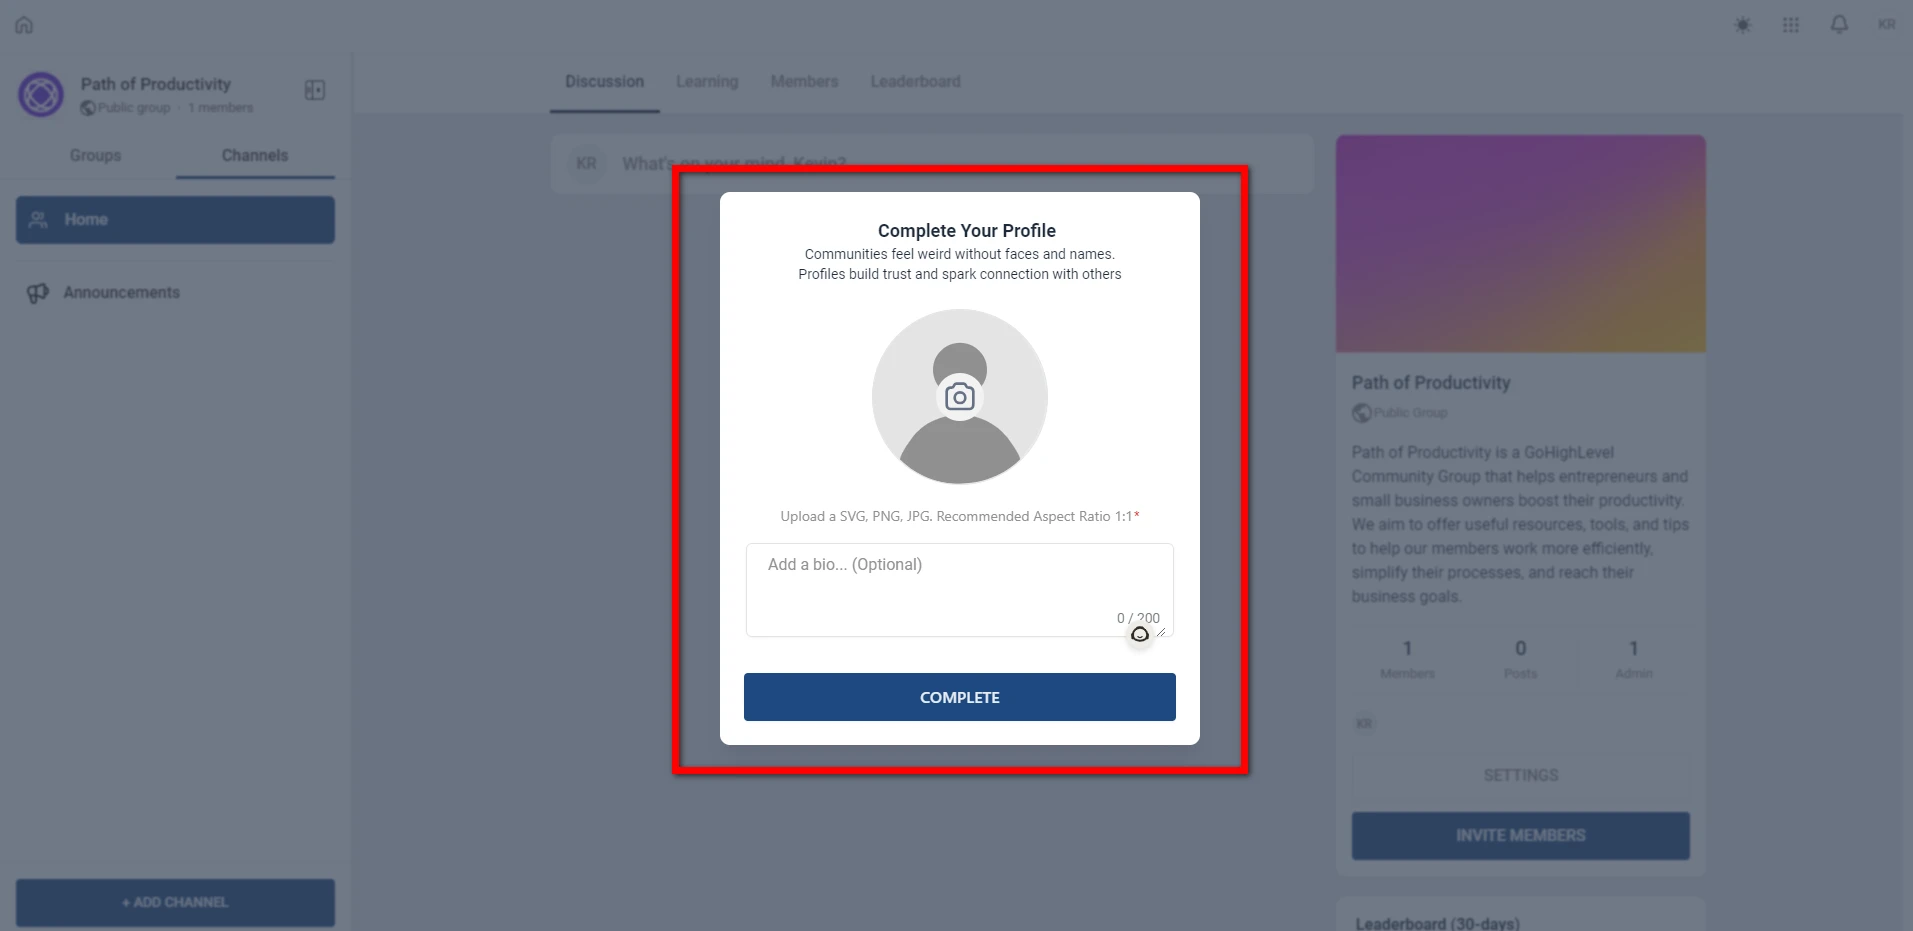
When you first enter the GoHighLevel Community Group Interface, you’ll notice how easy it is to use. The design is intuitive, making it simple to manage and navigate your community.
Upon logging in, you might see a pop-up that asks you to complete your profile if you haven’t filled in all the necessary details.
At the top of the interface, you’ll find key sections like Discussion, Learning, Members, and Leaderboard. Each of these sections serves a specific purpose and helps promote interaction among community members.
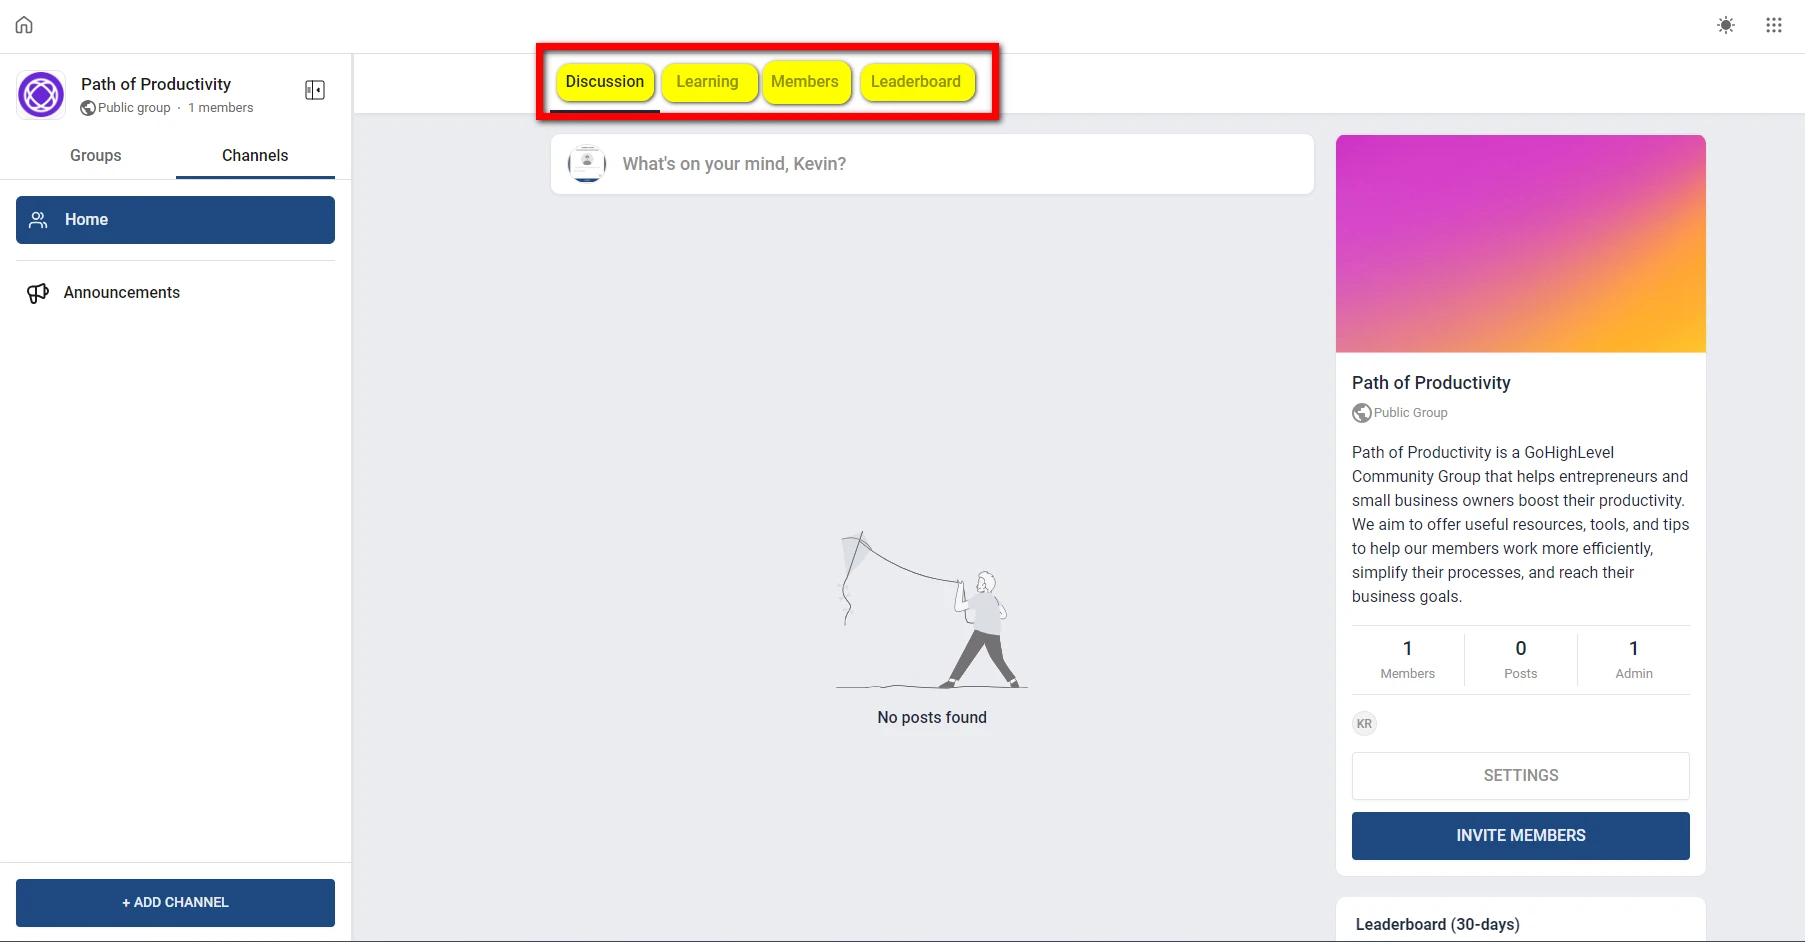
Let’s break down each section to understand how they work and why they’re useful for managing your community effectively.
1. Discussion: The Heart of the Community
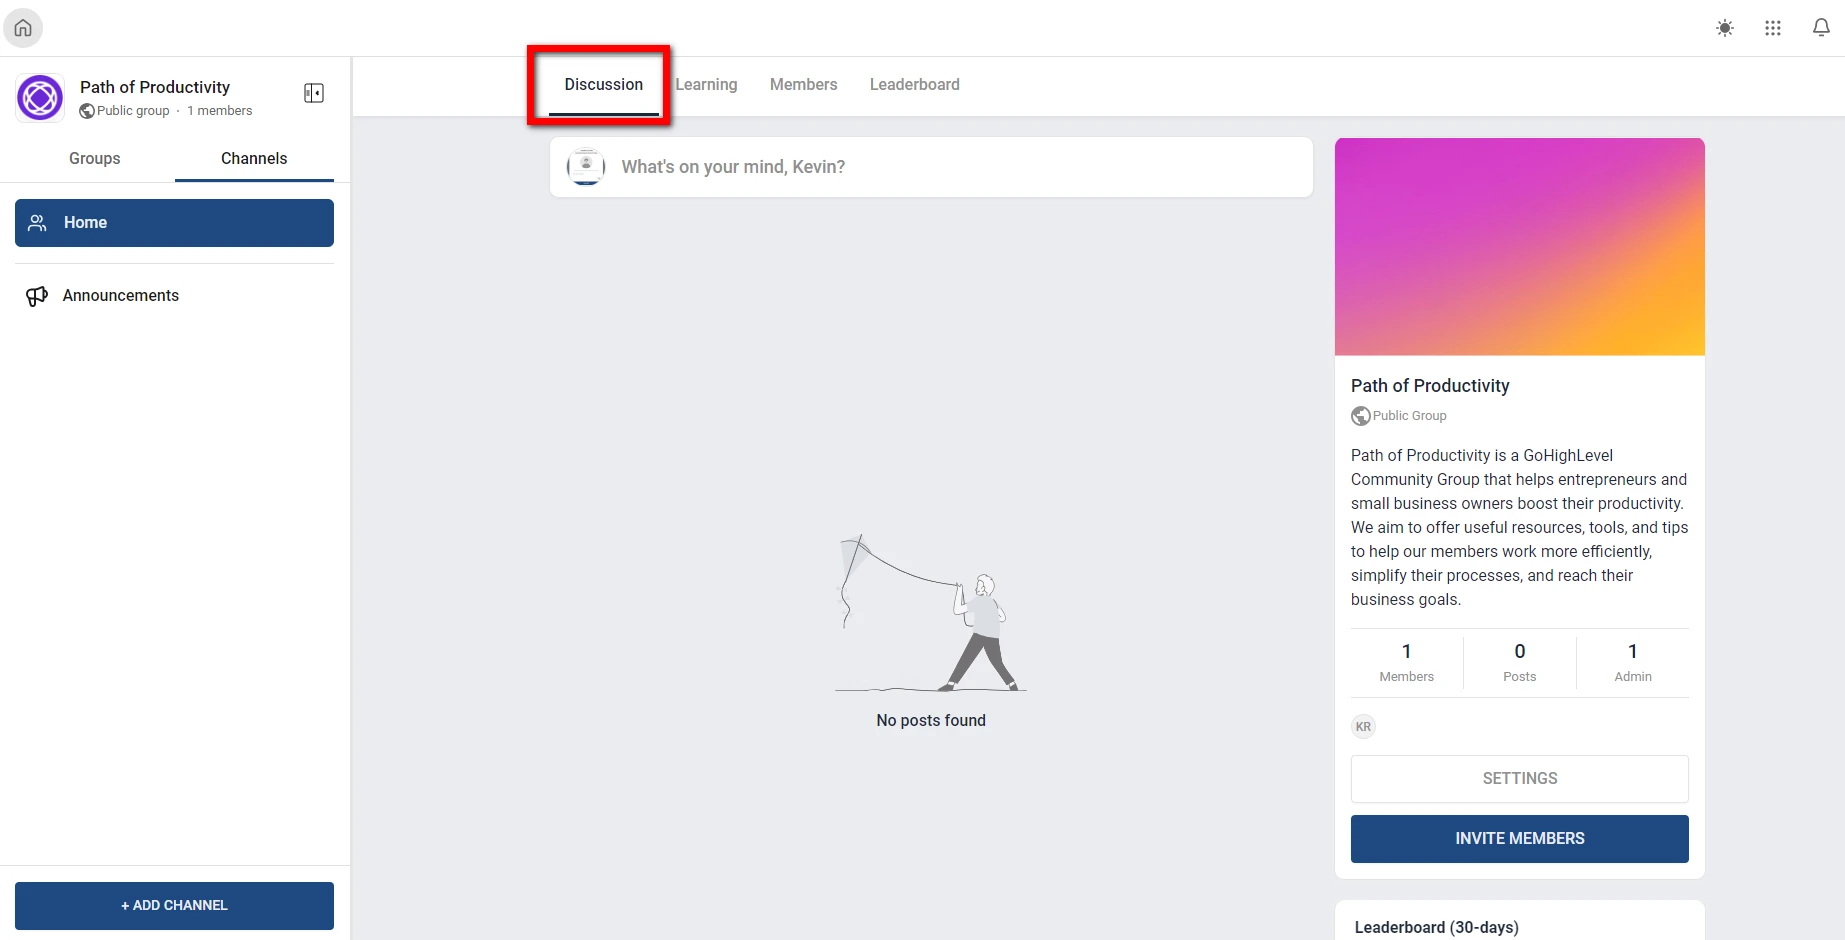
The Discussion section serves as the primary hub for member interaction. It is where your community members can engage in discussions, share insights, and build relationships.
- Post Box: At the top of the Discussion section, there’s a post box that says, “What’s on your mind?” This is where you can start new threads. Members can ask questions, share updates, or join ongoing conversations. As people engage, the feed below the post box fills up with discussions, replies, and reactions. This creates a lively and active community.
- Group Information Sidebar: On the right side of the Discussion section, you’ll find a group information sidebar. This sidebar gives a quick overview of the community. It includes the group name, whether it’s public or private, and a description of its purpose. You’ll also see group statistics here, such as the total number of members and posts, as well as information about the community admin.
- Invite Members: The “Invite Members” button makes it easy to grow your community by sending invitations. Both admins and existing members can use this feature to bring in new participants. This helps keep the community vibrant and expanding.
- Settings: Below the invite button, you’ll find the Settings tab. This allows admins to customize community settings, moderate content, and set discussion rules. It’s essential for managing group dynamics and ensuring a positive environment.
- Navigation Menu: On the left side of the page, there’s a navigation menu. This menu lets you switch between different groups and channels you are part of. In the Group section, you’ll see all the groups you’re currently involved with. The Channels section categorizes discussions by specific topics. Plus, there’s an +Add Channel button that lets you create new channels for focused discussions.
2. Learning: Offering Educational Content and Courses
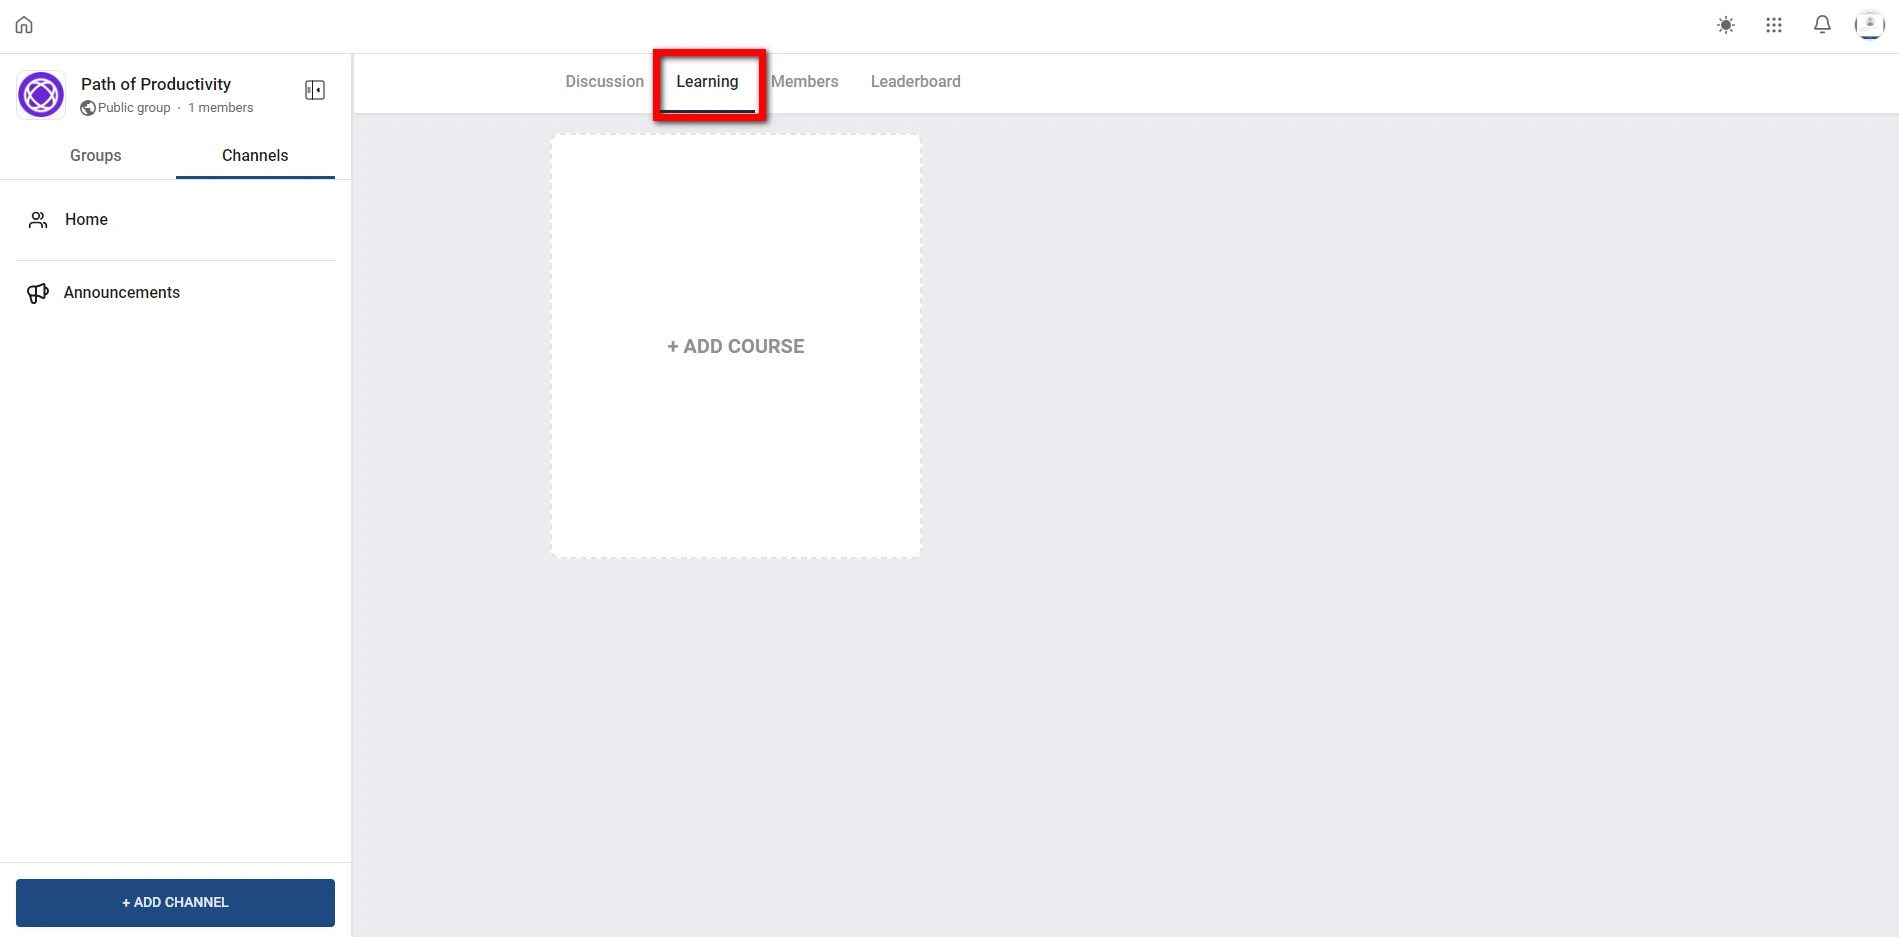
The Learning section in GoHighLevel is designed for admins to upload and manage educational content and courses for the community.
If you want to provide training programs, tutorials, or other learning materials, this section makes it easy. You can organize and deliver valuable content to your members without any hassle.
- Adding Courses: Admins can easily create new courses by clicking the +Add Course button. This user-friendly process requires you to enter key details such as the course name, subscription type, access settings, and price. You can also adjust other settings like trial periods, billing cycles, and currencies. These options allow you to customize your course offerings to fit your community’s needs and revenue strategy.
- Monetization Options: A key feature of the Learning section is its ability to help you monetize your content. You can choose to set courses as subscription-based or offer them as one-time purchases. This flexibility enables you to provide value to your community while also generating revenue.
This section is especially helpful for agencies or businesses looking to create a learning hub within their community. You can offer paid content such as online courses, certifications, and exclusive webinars.
3. Members: Managing and Moderating Community Members
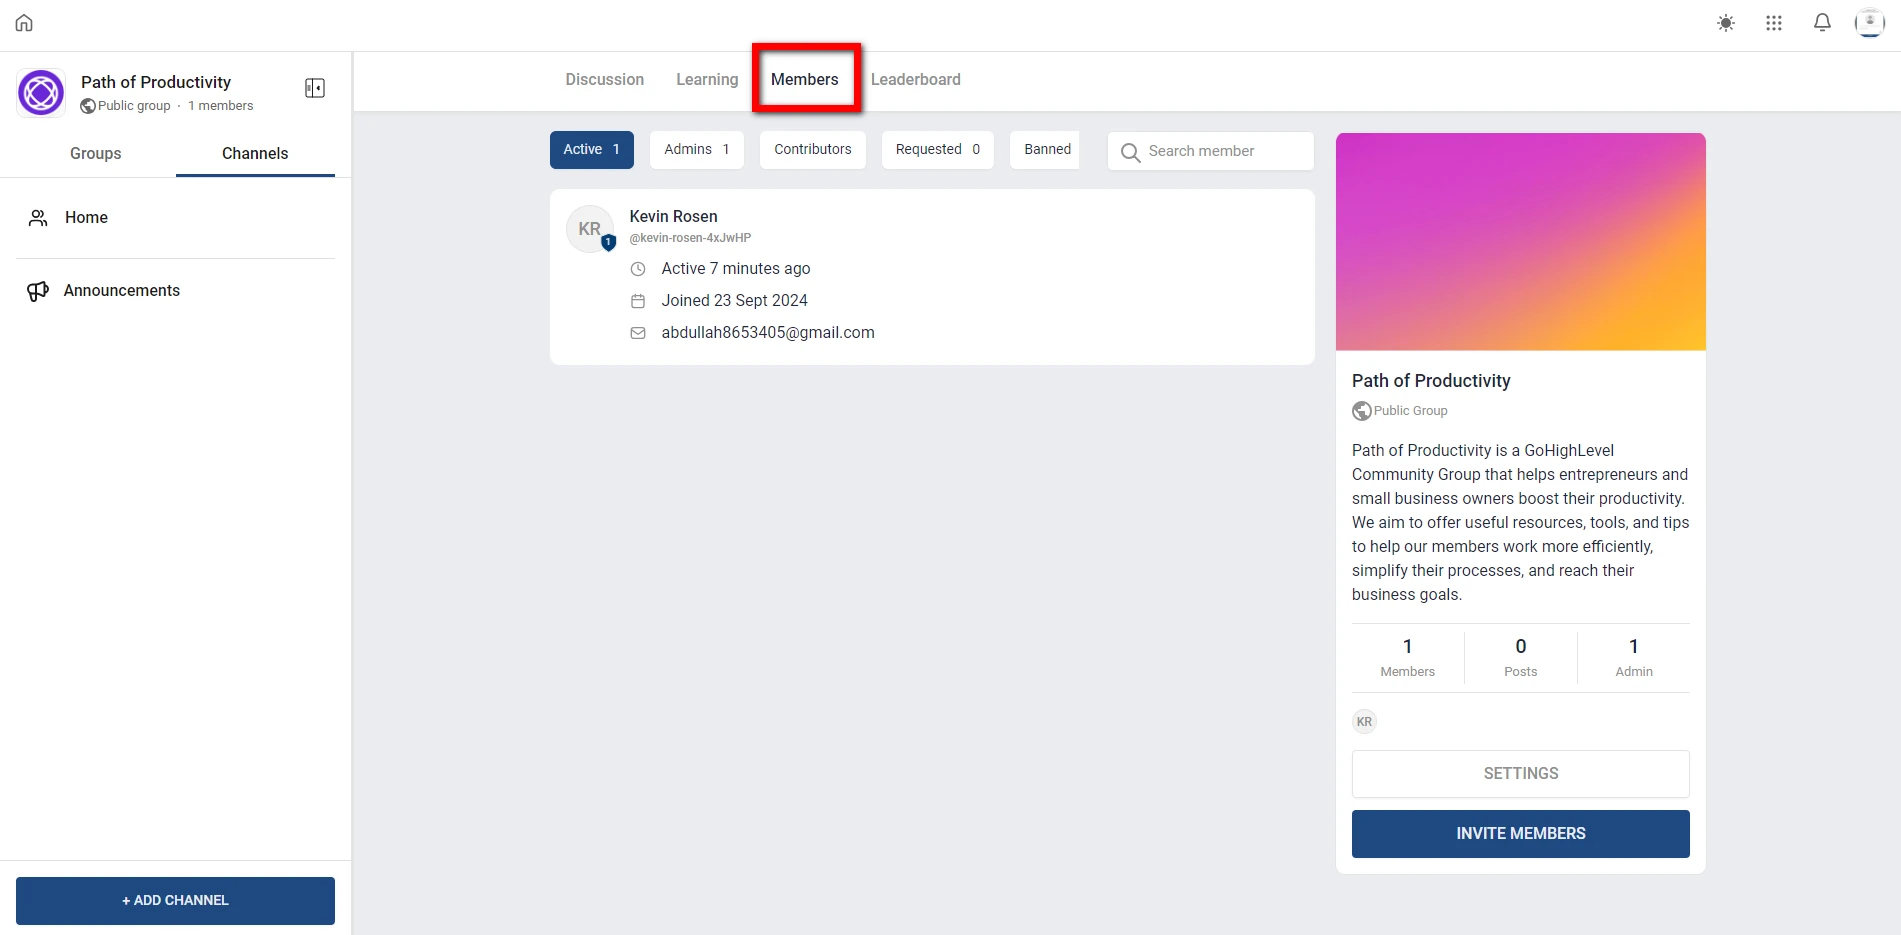
In the Members section, admins can see and manage all the participants in the community. This section shows a list of members. It includes their profiles, roles—such as admin, member, or contributor—and their activity levels. Admins can easily track who is active and how each person contributes to the community.
- Search Functionality: There’s a search bar at the top right. You can easily find specific members by their name or engagement level. This feature is especially useful in larger communities. It saves time and helps with smooth administration.
- Moderation Tools: Admins can approve new members, remove inactive participants, or manage disruptive users. These tools help maintain the integrity of the community. They are essential for keeping the group a positive and constructive space for everyone.
- Monitoring Engagement: The Members section lets you track how engaged members are. This makes it easier to spot top contributors and identify those who are less active. It’s useful for recognizing loyal participants and finding ways to boost member involvement.
4. Leaderboard: Encouraging Friendly Competition and Engagement
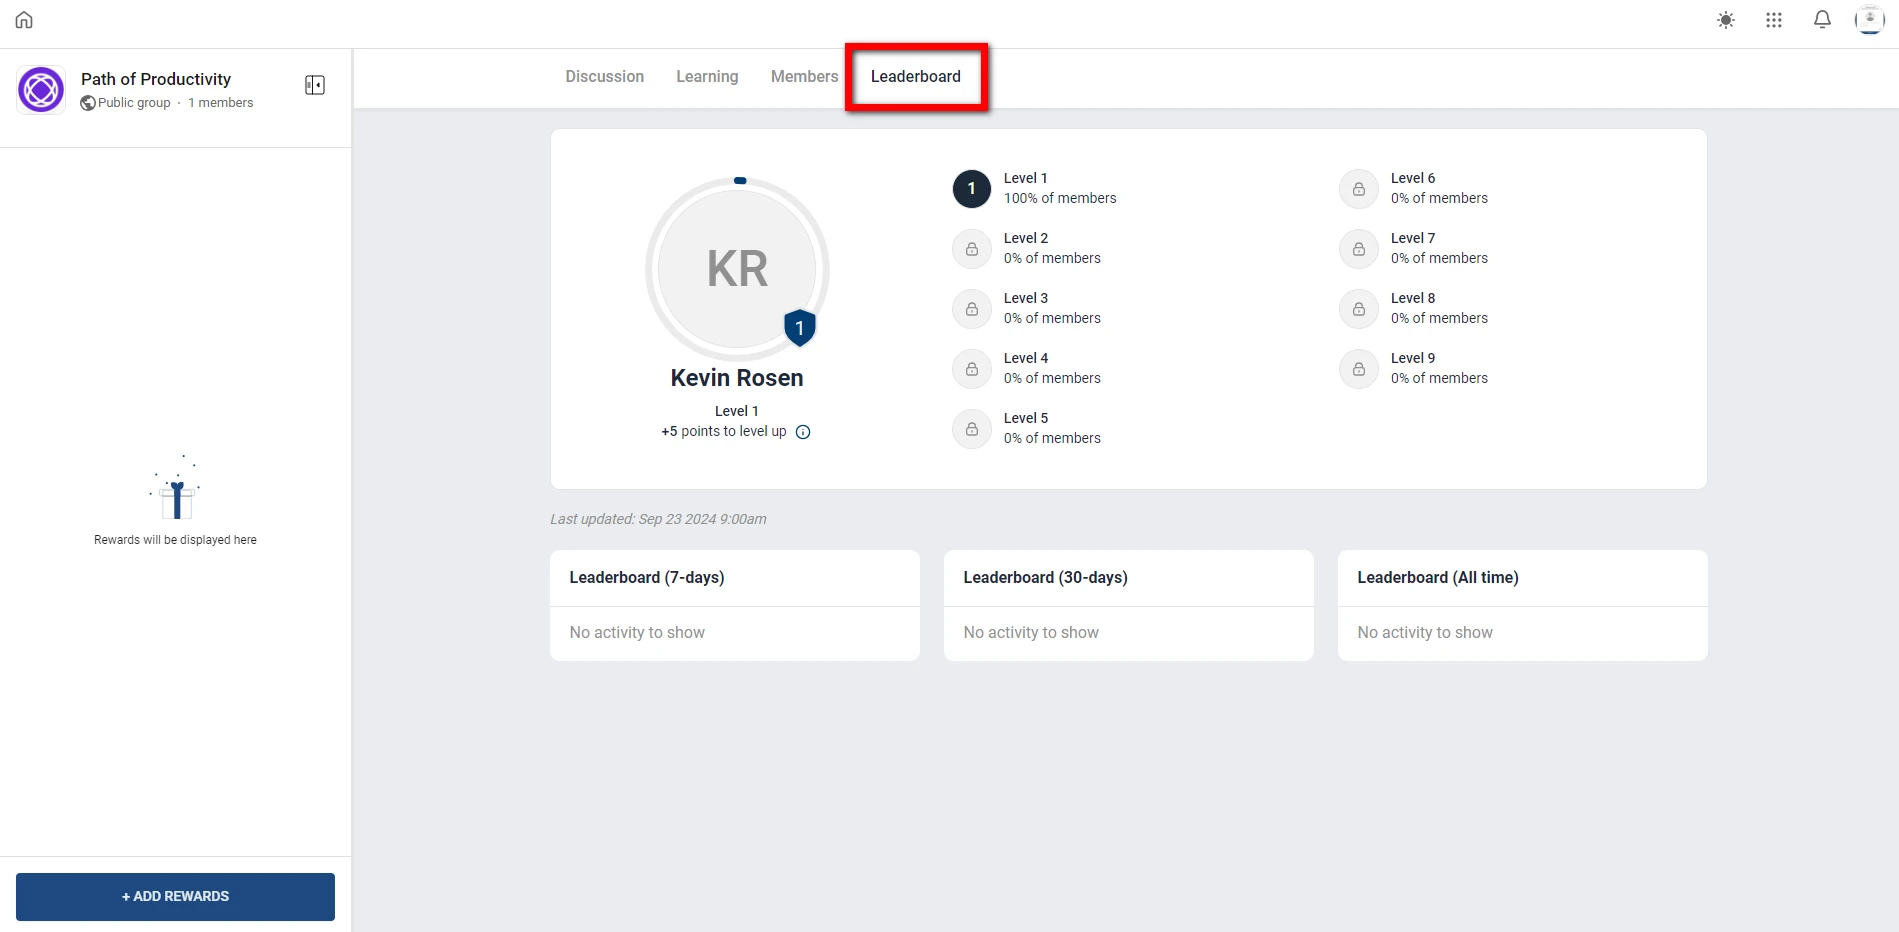
The Leaderboard section brings a fun, competitive vibe to your community. It tracks how active members are by monitoring their posts and participation in discussions. Based on their contributions, the leaderboard ranks users. This encourages friendly competition and boosts engagement within the community.
- User Rankings: Each member has a profile icon and a badge next to their name that shows their current level. This gamification encourages everyone to get involved and strive to move up the ranks.
- Point System: Members earn points for their contributions. These points help determine their rank on the leaderboard. This system motivates active participation and fosters healthy competition within the community.
- Level Distribution: On the right side of the Leaderboard page, you can see how members are spread across different levels, from Level 1 to Level 9. This gives a quick overview of the community’s overall engagement and highlights the most active members.
- Time Filters: To keep things interesting, the leaderboard allows admins to filter rankings by different timeframes, such as the past 7 days, 30 days, or all time. This means that newer members also have a chance to climb to the top.
Additional Features in the Top Right Corner
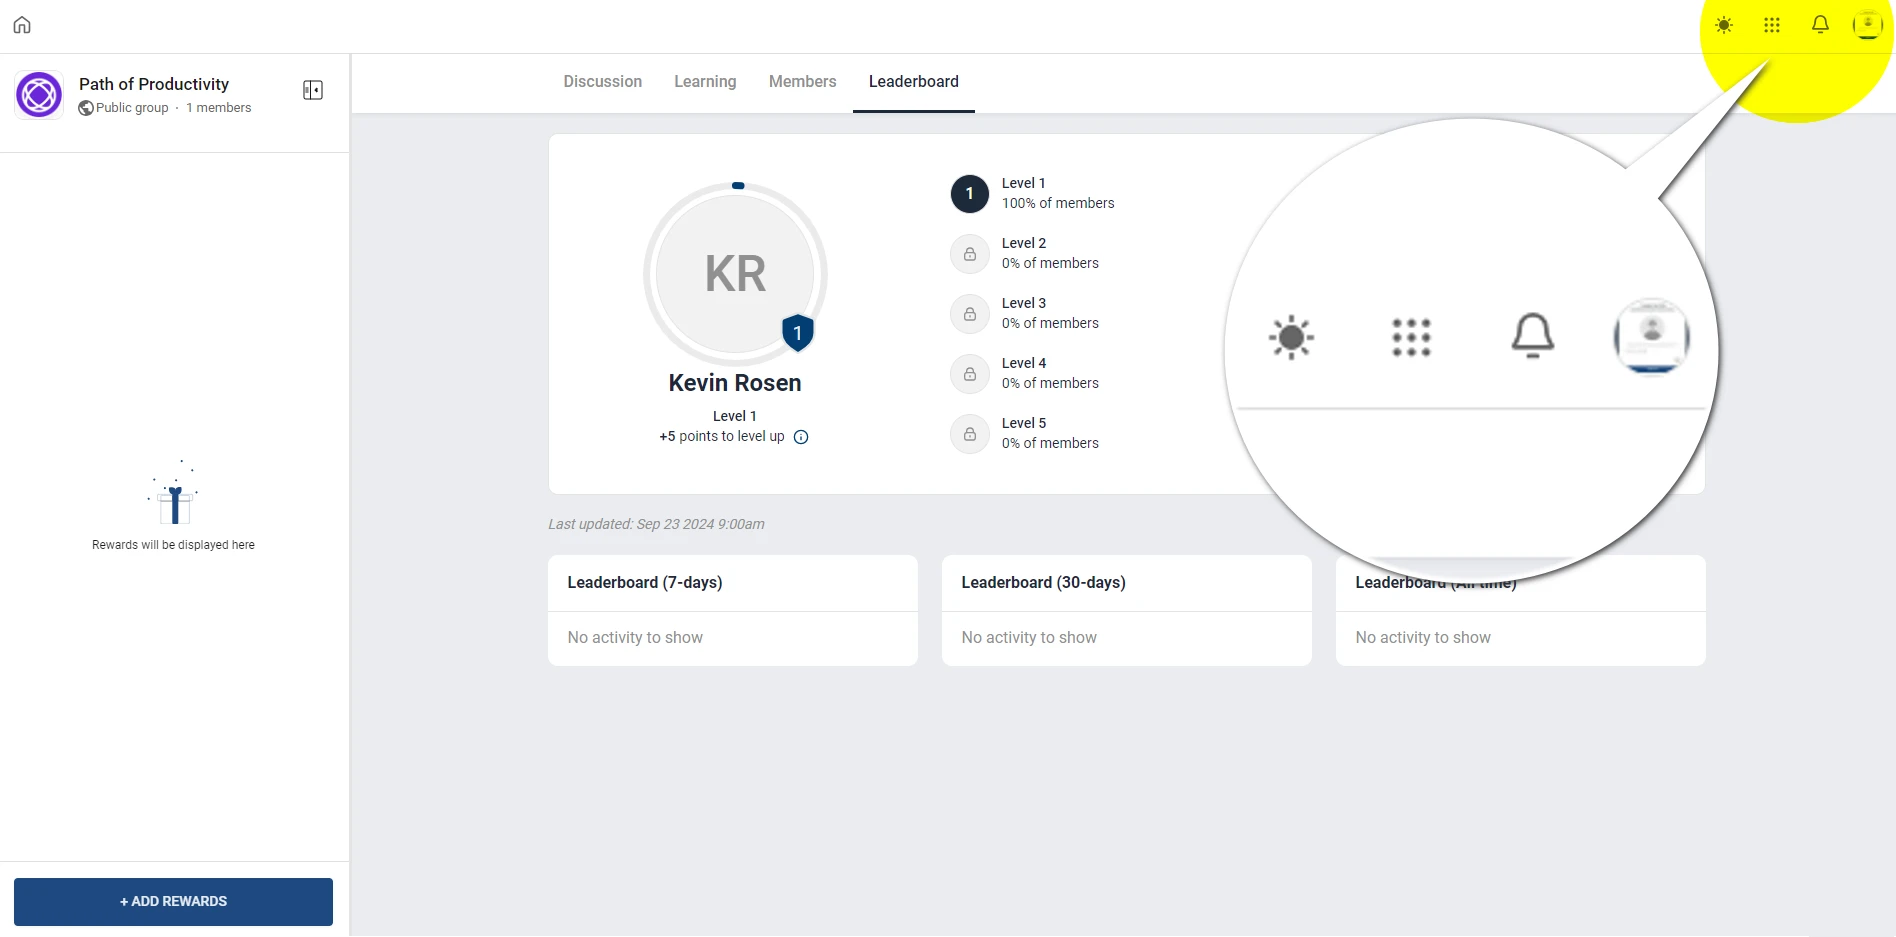
The top right corner of the GoHighLevel community interface offers a few extra features for added convenience:
- Dark/Light Mode: Switch between dark and light mode for better readability, depending on your preference or the time of day.
- Quick Access Grid: A grid of dots provides quick access to other areas, such as affiliate programs, additional communities, or courses.
- Notifications: This section also houses the notifications panel, which alerts you to new activity within your group, including replies, mentions, or important updates.
- Profile Settings: Lastly, there’s a profile menu where you can edit your account settings, update your personal information, or log out.
Curious about GoHighLevel’s value in 2024? Dive into our In-Depth GoHighLevel Review and Test to see if it’s right for you.
Conclusion
GoHighLevel Communities is a game-changer for online community management. It integrates smoothly with marketing and CRM tools, and offers high customization along with real-time engagement features. This makes it stand out from platforms like Skool.
By choosing GoHighLevel, you’re not just picking a platform; you’re investing in a comprehensive ecosystem. This ecosystem enables you to engage your audience, drive business growth, and create a vibrant community all in one place. Now is the perfect time to enhance your community strategy. Experience firsthand how GoHighLevel can help you reach your goals!